Epson PictureMate Snap - PM 240 Product Information Guide - Page 15
Aligning the Print Head, Taking PictureMate With
 |
View all Epson PictureMate Snap - PM 240 manuals
Add to My Manuals
Save this manual to your list of manuals |
Page 15 highlights
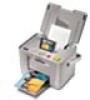
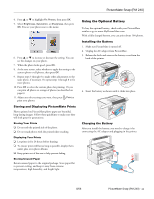
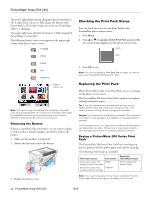
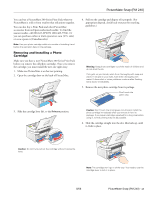
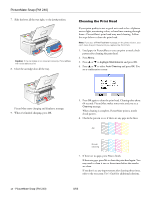
PictureMate Snap (PM 240) Aligning the Print Head If you have moved PictureMate and the print quality is not as good as it used to be-if your prints look fuzzy or have light or dark lines running through them-you may need to align the print head. 1. Load paper in PictureMate so you can print the head alignment pattern. 2. Press Menu. 3. Press or to highlight Maintenance and press OK. 4. Press or to select Head Alignment and press OK. You see a confirmation screen: 5. Press OK again to continue. 6. Press Print. The alignment pattern is printed: Best pattern Taking PictureMate With You PictureMate's handle makes it easy to carry short distances. If PictureMate is going to travel a longer distance, pack it carefully to protect it from getting damaged. Caution: Keep PictureMate out of the sun and don't leave it in your car or other location where it can get too hot or too cold. Otherwise, PictureMate may be damaged or ink may leak. 1. Remove any CDs, if you have one installed in the CD drive (PictureMate Flash only). 2. Remove any installed memory cards. 3. Press the On button to turn off PictureMate. 4. Wait until the On light goes out, then unplug the power cord from the power outlet. 5. Remove all paper and printed photos. 6. Unplug the power cable and any connected USB cables or device from PictureMate. 7. Close the paper support and output tray. Misaligned pattern 7. Look at the printed squares to determine which one is the most even, with no streaks or white lines. (You may need to use a magnifying glass.) 8. Press or to highlight the number for the best square (1 to 9) in set #1. Then press OK. 9. Press or to highlight the number for the best square (1 to 9) in set #2. Then press OK. PictureMate aligns the print head and exits the Maintenance menu. Note: The number that you enter becomes the default setting (#5) the next time you align the print head. 8. Pack PictureMate in the box that it came in or in the optional carrying case. Place the power cable and adapter in the accessory box that came with PictureMate and pack it with the PictureMate. Caution: Make sure the photo cartridge is installed. Do not remove the photo cartridge before transporting. Don't place PictureMate on its side or upside down, or ink may leak. Note: If your prints don't look as good after PictureMate has been moved, try aligning the print head. See page 15. 8/06 PictureMate Snap (PM 240) - 15
-
 1
1 -
2
-
3
-
4
-
5
-
6
-
7
-
8
-
9
-
 10
10 -
 11
11 -
 12
12 -
 13
13 -
 14
14 -
 15
15 -
 16
16
 |
 |