Epson PowerLite 1725 Operation Guide - EasyMP - Page 60
Projecting Scenarios, Creating and Editing a Scenario
 |
View all Epson PowerLite 1725 manuals
Add to My Manuals
Save this manual to your list of manuals |
Page 60 highlights
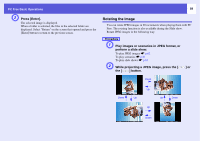
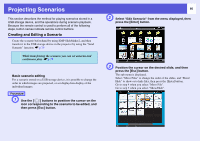
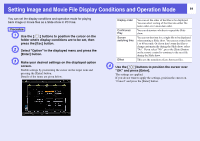
Projecting Scenarios This section describes the method for playing scenarios stored in a USB storage device, and the operations during scenario playback. Because the remote control is used to perform all of the following steps, button names indicate remote control buttons. Creating and Editing a Scenario Create the scenario beforehand by using EMP SlideMaker2, and then transfer it to the USB storage device in the projector by using the "Send Scenario" function. s p.79 q While transferring the scenario you can set autorun and continuous play. s p.79 f Basic scenario editing For a scenario stored on a USB storage device, it is possible to change the order in which images are projected, or set display/non-display of the individual images. Procedure A Use the [ ] buttons to position the cursor on the icon corresponding to the scenario to be edited, and then press [Esc] button. 60 B Select "Edit Scenario" from the menu displayed, then press the [Enter] button. C Position the cursor on the desired slide, and then press the [Esc] button. The sub menu is displayed. Select "Move Files" to change the order of the slides, and "Show/ Hide" to show or to hide files, then press the [Enter] button. Go to step 4 when you select "Move File". Go to step 5 when you select "Show/Hide".
-
 1
1 -
2
-
3
-
4
-
5
-
6
-
7
-
8
-
9
-
10
-
11
-
12
-
13
-
14
-
15
-
16
-
17
-
18
-
19
-
20
-
21
-
22
-
23
-
24
-
25
-
26
-
27
-
28
-
29
-
30
-
31
-
32
-
33
-
34
-
35
-
36
-
37
-
38
-
39
-
40
-
41
-
42
-
43
-
44
-
45
-
46
-
47
-
48
-
49
-
50
-
51
-
52
-
53
-
54
-
 55
55 -
 56
56 -
 57
57 -
 58
58 -
 59
59 -
 60
60 -
 61
61 -
 62
62 -
 63
63 -
 64
64 -
 65
65 -
66
-
67
-
68
-
69
-
70
-
71
-
72
-
73
-
74
-
75
-
76
-
77
-
78
-
79
-
80
-
81
-
82
-
83
-
84
-
85
-
86
-
87
-
88
-
89
-
90
-
91
-
92
-
93
-
94
-
95
-
96
-
97
-
98
-
99
-
100
-
101
-
102
-
103
-
104
-
105
-
106
-
107
-
108
 |
 |
