Epson PowerLite 1725 User's Guide
Epson PowerLite 1725 Manual
 |
View all Epson PowerLite 1725 manuals
Add to My Manuals
Save this manual to your list of manuals |
Epson PowerLite 1725 manual content summary:
- Epson PowerLite 1725 | User's Guide - Page 1
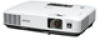
PowerLite® 1725/1735W Multimedia Projector User's Guide - Epson PowerLite 1725 | User's Guide - Page 2
cover on the projector, except the lamp and filter covers. Dangerous electrical voltages inside the projector can severely injure you. Except as specifically explained in this User's Guide, do not attempt to service this product yourself. Refer all servicing to qualified service personnel. WARNING - Epson PowerLite 1725 | User's Guide - Page 3
Image Source 18 Troubleshooting Display Problems 19 You Can't Project an Image 19 The Projector and Notebook Don't Display the Same Image 20 Adjusting the Image 22 Adjusting the Height of Your Image 22 Focusing and Zooming Your Image 23 Adjusting the Image Shape 23 Correcting Computer Images - Epson PowerLite 1725 | User's Guide - Page 4
Remote Control 37 Setting the Projector ID 37 Checking the Projector ID 37 Setting the Remote Control ID 38 3 Connecting to Computers, Cameras, and Other Equipment 39 Connecting to a Computer 40 Connecting to the Video Port 40 Connecting to the USB Port 41 Connecting the Cable for Remote - Epson PowerLite 1725 | User's Guide - Page 5
Data Encryption from EMP NS Connection . 88 Using the EasyMP Software 88 Removing the Wireless 802.11a/b/g Module 89 Connecting to a Wired Network 90 Using Projector E-mail Alerts 91 Using SNMP to Monitor the Projector 93 Connecting With Windows Vista 94 Vista Network Projector Limitations 96 - Epson PowerLite 1725 | User's Guide - Page 6
or Sound 128 Solving Network Problems 134 Solving Problems with the Remote Control 136 Where To Get Help 138 Speak to a Support Representative 138 A Projector Installation 141 B Technical Specifications 143 C Notices 149 Important Safety Instructions 149 FCC Compliance Statement 152 - Epson PowerLite 1725 | User's Guide - Page 7
4 pounds. The projector offers up to 3000 lumens of white and color light output (brightness). You can connect it to a wide range of computers and video sources, or you can project from a USB storage device, or over an 802.11g, 802.11b, or 802.11a wireless network. Easy setup, control, and security - Epson PowerLite 1725 | User's Guide - Page 8
Your Documentation This electronic User's Guide provides detailed instructions on using your projector. In addition, your projector CD-ROM includes the EasyMP Operation Guide and the EMP Monitor Operation Guide. Refer to these manuals for detailed instructions on using the projector in a network - Epson PowerLite 1725 | User's Guide - Page 9
you still need help after checking this User's Guide and the sources listed above, you can use the Epson PrivateLine® Support service to get help fast. Call (800) 637-7661 and enter the PIN on the PrivateLine card. Or take advantage of Epson's automated support services 24 hours a day. See page 138 - Epson PowerLite 1725 | User's Guide - Page 10
, make sure you have all the parts shown below: Projector PDF manual and Projector software registration CD-ROM CD-ROM Wireless module USB key* Remote control and 2 AA batteries Audio adapter Security sticker Carrying case Power cable VGA computer cable * Stored in a small pouch - Epson PowerLite 1725 | User's Guide - Page 11
Components Depending on how you plan to use the projector, you may need additional components: ■ To receive an S-video signal, you'll need an S-video cable. One may be provided with your video equipment, or you can purchase one from Epson; see below. ■ To receive a component video signal from a VCR - Epson PowerLite 1725 | User's Guide - Page 12
projector, Epson provides the following optional accessories: Product Replacement lamp Air filter replacement set (2 filters) Wheeled soft case Soft shoulder case for projector and laptop ATA molded hardshell case SwissGear® backpack Universal projector ceiling mount Adjustable suspended ceiling - Epson PowerLite 1725 | User's Guide - Page 13
video equipment, you need to follow some basic steps to display your image on the screen. Follow the guidelines in this chapter for: ■ Positioning the projector ■ Turning the projector on and off ■ Selecting the image source ■ Troubleshooting display problems ■ Adjusting the image 13 - Epson PowerLite 1725 | User's Guide - Page 14
mount the projector on the ceiling, or place it behind a translucent screen for rear projection. See page 141 for details. Positioning the Projector If the projector other settings. TBD PowerLite 1725 PowerLite 1735W Also keep these considerations in mind: ■ Place the projector on a sturdy, - Epson PowerLite 1725 | User's Guide - Page 15
detailed information about correcting the image shape. For instructions on installing the projector in a permanent location, such as a theater or conference room, see page 141. Turning the Projector On and Off Make sure your projector and any computer or video equipment are connected as described on - Epson PowerLite 1725 | User's Guide - Page 16
slide remains closed for a period of time. This conserves electricity, cools the projector, and extends the life of the lamp. To enable sleep mode, see page 112. Turning On the Projector Follow these steps to turn on the projector: 1. Open the A/V Mute slide (lens cover). 2. Plug one end of the - Epson PowerLite 1725 | User's Guide - Page 17
, see page 106. warning Never look into the lens when the lamp is on. This can damage your eyes, and is especially dangerous for children. Using the Direct Power On Function The Direct Power On function enables faster setup. The projector will start up automatically when you plug it in; you won - Epson PowerLite 1725 | User's Guide - Page 18
PPower button again. The projection lamp turns off and you can unplug the power cord. If you want to turn the projector on again, make sure the orange the image source lets you switch between images input from different pieces of connected equipment (such as a computer or DVD player). If you don't - Epson PowerLite 1725 | User's Guide - Page 19
to project wirelessly or from a USB drive. Troubleshooting Display Problems Follow these guidelines if you're having trouble displaying an image. You Can't Project an Image If you don't see the image you are trying to project, try the following: ■ Make sure the cables are connected correctly, as - Epson PowerLite 1725 | User's Guide - Page 20
both the LCD screen and the external monitor port are enabled. From the Control Panel, open the Display utility. In the Display Properties dialog using Mac OS X: You may need to set up your system to display on the projector screen as well as the LCD screen. Make sure your projector is connected and - Epson PowerLite 1725 | User's Guide - Page 21
4. Click the Arrangement (or Arrange) tab. Make sure Mirror Displays is checked 5. Make sure the Mirror Displays checkbox is selected. Displaying and Adjusting the Image 21 - Epson PowerLite 1725 | User's Guide - Page 22
the foot in position. 3. If necessary, you can fine-tune the height or level of the image by turning the projector's adjustable rear feet. Raising the projector causes the image to distort or "keystone," but you can correct the shape as described on page 23. 22 Displaying and Adjusting the Image - Epson PowerLite 1725 | User's Guide - Page 23
for instructions. Adjusting the Image Shape In most cases, you can maintain a square or rectangular image by placing the projector directly projector has an automatic keystone correction function that detects and corrects vertical keystone distortion. Projector tilted up Corrected image Projector - Epson PowerLite 1725 | User's Guide - Page 24
To adjust your image when it is wider on the top or bottom, do the following: ■ Press one of the two keystone correction buttons on the projector's control panel, as shown below. Continue pressing the button until you are satisfied with the shape of the image. ■ Or press the Menu button on - Epson PowerLite 1725 | User's Guide - Page 25
Correcting Computer Images If you're connected to a computer and the image doesn't look right, press the Auto button on the remote control or the Enter button on the projector. This automatically resets the projector correct the problem, you may need to adjust the tracking or sync using the projector - Epson PowerLite 1725 | User's Guide - Page 26
26 Displaying and Adjusting the Image - Epson PowerLite 1725 | User's Guide - Page 27
be sure to visit presentersonline.com. Using the Remote Control The projector includes a number of tools to enhance your presentation. All of color mode for various environments (page 33). You can also use it as a wireless mouse when projecting from a computer (page 35) or as a pointer to highlight - Epson PowerLite 1725 | User's Guide - Page 28
control: ■ Point the remote control at the front of the projector or at the screen. ■ Stand within 20 feet of the projector. ■ Avoid using the remote under bright fluorescent lamps or in direct sunlight, or the projector may not respond properly. caution When replacing batteries, take the following - Epson PowerLite 1725 | User's Guide - Page 29
turn off the picture and sound, freeze the action, zoom in on the picture, and adjust the volume. Switching Between Picture Sources If your projector is connected to more than one computer and/or video source, you can switch between the different sources: ■ The easiest way to select your source is - Epson PowerLite 1725 | User's Guide - Page 30
Turning Off the Picture and Sound You can use the A/V Mute button on the remote control to turn off the image and sound. This does the same thing as the A/V Mute slide (shown on page 16) and is useful if you want to temporarily redirect your audience's attention. ■ To turn off the picture and sound, - Epson PowerLite 1725 | User's Guide - Page 31
done, press the ESC button to return the image to its original size. Controlling the Volume To change the volume, press the or control or projector. button on the remote note To temporarily shut off the sound and picture, press the A/V Mute button or close the A/V Mute slide. You can also - Epson PowerLite 1725 | User's Guide - Page 32
the button, the projector changes to the next setting. When Connected to Video Equipment If you're PowerLite 1725) or Normal (PowerLite 1735W). PowerLite 1725 PowerLite 1735W 4:3 setting 16:9 setting Normal setting 16:9 setting Note that the projector's native aspect ratio (XGA or WXGA - Epson PowerLite 1725 | User's Guide - Page 33
it. For computers with wide-panel WXGA displays, the PowerLite 1735W displays the image at WXGA resolution, making full use of the display area; likewise, the PowerLite 1725 displays XGA images to their best advantage. Depending on your computer display and projector model, you may see black bars - Epson PowerLite 1725 | User's Guide - Page 34
). sRGB: For matching the color palette of standard sRGB computer displays Blackboard: For projecting accurate colors on a green chalkboard (adjusts the white point). Customized: For manual color adjustment. (See "Six-Axis Color Adjustment" on page 101). 34 Using the Remote Control - Epson PowerLite 1725 | User's Guide - Page 35
Operating Your Computer with the Remote Control If you connect a computer to the projector with a USB cable, as described on page 42, then select Wireless Mouse for the USB Type B setting in the Extended menu (see page 112), you can use the remote control in place of your computer's mouse. - Epson PowerLite 1725 | User's Guide - Page 36
, press the Pointer button on the remote control. A pointer appears on the screen. Pointer If you prefer to use a different style of pointer, see the instructions in the next section. 2. Use the pointer button on the remote control to position the pointer on the screen. 3. When you're done using the - Epson PowerLite 1725 | User's Guide - Page 37
the pointer button to highlight the new ID, and press Enter to select it. 4. When done, press Menu to exit the menu system. Checking the Projector ID To check the ID of a specific projector: 1. Point the remote control at the projector you want to check. Using the Remote Control 37 - Epson PowerLite 1725 | User's Guide - Page 38
. Setting the Remote Control ID The remote control's default ID is zero. This lets it operate any projector. To set it to operate only those projectors with a specific ID, follow these steps: 1. Press and hold the ID button on the remote control. 2. While holding the ID button, press the numbered - Epson PowerLite 1725 | User's Guide - Page 39
VCR, DVD player, or video camera. You can also connect the projector to a USB storage device, digital camera, or external speakers. Follow the instructions in this chapter on: ■ Connecting to a computer ■ Connecting video equipment ■ Connecting to a digital camera or other USB device ■ Playing sound - Epson PowerLite 1725 | User's Guide - Page 40
-held devices. You can also connect to the USB port on a Windows® computer. This lets you connect up to two computers to the projector, one using a VGA cable and one using a USB cable. ■ To connect to your computer's video port, see the instructions below. ■ To connect using your computer's USB - Epson PowerLite 1725 | User's Guide - Page 41
Search button on the projector's control panel. Connecting to the USB Port You can connect a Windows Vista®, Windows XP, or Windows 2000 (SP4) computer to the projector's Type B (square) USB port and project your computer's display. The USB connection also supports computer audio output. A USB - Epson PowerLite 1725 | User's Guide - Page 42
the projector is recognized and the software installation begins. 7. Follow the instructions on your computer screen to install the Epson USB Display software. If you see a "Digital Signature Warning," select Continue. You will only need to install the software the first time you connect. 8. After - Epson PowerLite 1725 | User's Guide - Page 43
The wireless mouse function is supported on systems with a USB port running Windows or Mac OS®. 1. Locate the USB cable that came with your projector. 2. Connect the square end of the cable to the projector's Type B (square) USB port. USB cable 3. Connect the flat end of the cable to any available - Epson PowerLite 1725 | User's Guide - Page 44
for a VGA-style monitor cable or three connectors labeled R/G/B), see "Connecting an RGB Video Source" on page 48. After connecting video cables, you may also want to connect an audio cable to play sound through the projector; see page 50. 44 Connecting to Computers, Cameras, and Other Equipment - Epson PowerLite 1725 | User's Guide - Page 45
3. If you want to play sound through the projector, see page 50 for instructions on connecting audio cables. 4. If you don't need to make any other connections, see page 15 for instructions on turning on the projector and adjusting the image. Once the projector is turned on, select the image source - Epson PowerLite 1725 | User's Guide - Page 46
equipment or you can purchase one from Epson; see page 12). 2. Connect the cable to the S-video connector on your player and the S-Video connector on the projector: 3. If you want to play sound through the projector, see page 50 for instructions on connecting audio cables. 4. If you don't need to - Epson PowerLite 1725 | User's Guide - Page 47
3. If you want to play sound through the projector, see page 50 for instructions on connecting audio cables. 4. If you don't need to make any other connections, see page 15 for instructions on turning on the projector and adjusting the image. Once the projector is turned on, select the image source - Epson PowerLite 1725 | User's Guide - Page 48
3. If you want to play sound through the projector, see page 50 for instructions on connecting audio cables. 4. If you don't need to make any other connections, see page 15 for instructions on turning on the projector and adjusting the image. Once the projector is turned on, select the image source - Epson PowerLite 1725 | User's Guide - Page 49
drive, or multimedia storage viewer, such as the Epson P-5000 or iPod® photo. Use the USB cable specified for your device. Then you can use your device's slideshow function or the projector's EasyMP PC Free feature (see the EasyMP Operation Guide for details) to present images. 1. Connect the flat - Epson PowerLite 1725 | User's Guide - Page 50
included with the projector. Audio adapter 2. Connect the other end of the cable to the audio output connector(s) on your computer or video equipment. 3. Make sure the EasyMP Audio Out option in the Settings menu is set to Internal. See page 105 for instructions. 50 Connecting - Epson PowerLite 1725 | User's Guide - Page 51
the audio adapter included with the projector. 2. Set the EasyMP Audio Out option in the projector's Settings menu to External. See page 105 for instructions. The projector's internal speaker system is disabled while sound is output to external speakers. Connecting to Computers, Cameras, and Other - Epson PowerLite 1725 | User's Guide - Page 52
52 Connecting to Computers, Cameras, and Other Equipment - Epson PowerLite 1725 | User's Guide - Page 53
Quick Setup sheet, or the optional Ethernet unit (see page 90). Then follow the steps in this chapter to use Quick Wireless Connection (Windows only) or configure your projector and network. Finally, see the EasyMP Operation Guide for instructions on installing the EMP NS Connection software. The - Epson PowerLite 1725 | User's Guide - Page 54
the User Account Control screen, click Allow. 4. When you see a license agreement, click Agree to install the Quick Wireless Connection driver. If you see a Windows Firewall message, click Yes to disable the firewall. After a few minutes, your computer image will be displayed through the projector - Epson PowerLite 1725 | User's Guide - Page 55
Enter. 3. Choose Basic and press Enter. You see the following screen: 4. Make sure the projector has a unique name, so you can identify it when connecting to it from your computer. If you need to rename it, highlight the Projector name text box then press Enter. Setting Up Network Projection 55 - Epson PowerLite 1725 | User's Guide - Page 56
keyword on. Then when you want to connect to the projector, it displays a randomized four-digit number or "keyword" on the screen. If you're using EMP NS Connection, you can enter the keyword on your computer to connect (see the EasyMP Operation Guide for details). 8. When you're done making - Epson PowerLite 1725 | User's Guide - Page 57
the instructions below for the mode you want to use. note Make sure you've installed the NS Connection software as described in the EasyMP Operation Guide. To connect to the projector over a wireless network, your computer must be running Windows 2000, XP, or Vista. Your Mac must be running Mac OS - Epson PowerLite 1725 | User's Guide - Page 58
as described in this section. Configuring the Projector 1. Press the Menu button, then choose Network and press Enter. 2. Choose Network Configuration and press Enter. 3. Choose Wireless LAN and press Enter. You see this screen: 4. Make sure Quick is selected for the Connection mode. If not, use the - Epson PowerLite 1725 | User's Guide - Page 59
screen, then press Enter. Choose Setup Complete and press Enter, then choose Yes and press Enter to save your settings. Now you're ready to set up your computer to project wirelessly. Go to "Configuring the Network Settings for Windows" on page 60, or "Setting Up Your Mac for Ad Hoc Mode" on page - Epson PowerLite 1725 | User's Guide - Page 60
's network card match the settings you entered for the projector. 1. Access your wireless network Properties window. For example, in Windows XP you would click Start > Control Panel > Network and Internet Connections. Then click the Network Connections icon. You see a screen similar to this: Right - Epson PowerLite 1725 | User's Guide - Page 61
2. Right-click the Wireless Network Connection icon and select Properties. You see a screen similar to this: Click here 3. Click the Configure button. 4. Click the Advanced tab. You see a screen similar to this: Setting Up Network Projection 61 - Epson PowerLite 1725 | User's Guide - Page 62
make sure that your wireless card or adapter is enabled. 7. When you're done, click OK to close the Properties dialog box. Now you're ready to connect to the projector. See the EasyMP Operation Guide for details. Setting Up Your Mac for Ad Hoc Mode Your AirPort software is automatically configured - Epson PowerLite 1725 | User's Guide - Page 63
window. 7. Click the AirPort icon on the menu bar at the top of the Mac wireless networks. If you need to remain connected to your wireless network, use Access Point mode, as described on page 64. Also, make sure you reconnect to your original wireless network when you are done using the projector - Epson PowerLite 1725 | User's Guide - Page 64
described in this section. Configuring the Projector 1. Press the Menu button, then choose Network and press Enter. 2. Choose Network Configuration and press Enter. 3. Choose Wireless LAN and press Enter. You see this screen: 4. Make sure Advanced is selected for the Connection mode. If not, use the - Epson PowerLite 1725 | User's Guide - Page 65
enter the name in uppercase on the projector, you must type it the same way on the computer connecting to the projector). 7. If your access point assigns IP press Enter. Choose Setup Complete and press Enter, then choose Yes and press Enter to save your settings. note For specific details about your - Epson PowerLite 1725 | User's Guide - Page 66
or adapter match the settings you entered for the projector. 1. Access your wireless network Properties window. For example, in Windows XP you would click Start > Control Panel > Network and Internet Connections. Then click the Network Connections icon. You see a screen similar to this: Right-click - Epson PowerLite 1725 | User's Guide - Page 67
You see a screen similar to this: Click here 3. Click the Configure button. 4. Click the Advanced tab. You see a screen like this: Setting Up Network Projection 67 - Epson PowerLite 1725 | User's Guide - Page 68
set up encryption on the projector. 6. Click the General tab and make sure that your wireless card or adapter is enabled. 7. When you're done, click OK to close the wireless properties dialog box. 8. Right-click the Wireless Network Connection icon again and select Properties. You see this screen - Epson PowerLite 1725 | User's Guide - Page 69
9. Select Internet Protocol and click the Properties button. You see this screen: 10. If your don't see this tab, you may need to enable your wireless card or adapter by clicking Configure to access the device note For specific details about your network, please consult your network administrator. - Epson PowerLite 1725 | User's Guide - Page 70
small icon next to it, indicating a connection. If it's not listed, click Configure and type the name of your access point. 14. When you're done making settings, click OK to close the dialog box. Now you're ready to connect to the projector. See the EasyMP Operation Guide for details. 70 Setting Up - Epson PowerLite 1725 | User's Guide - Page 71
IP addresses manually and need to find out the gateway IP address (the IP address of your access point), make sure the wireless connection to the access point is currently active, as described in the previous section. Then follow these steps: 1. Access your wireless network Properties window. For - Epson PowerLite 1725 | User's Guide - Page 72
network name from the AirPort status menu on the Mac menu bar. If you're having problems connecting to the projector, follow these steps: 1. From the Apple pull-down menu, select System Preferences. 2. Click the Network icon. You see the Network settings window. 72 Setting Up Network Projection - Epson PowerLite 1725 | User's Guide - Page 73
Port Configurations, select AirPort. 6. Click Apply Now. Then close the window. 7. Start the AirPort Admin utility. Select your base station, then click network port is enabled, the projector software warns you to turn off AirPort when you first connect the projector. Disregard this message. Your - Epson PowerLite 1725 | User's Guide - Page 74
already been established. (For connection instructions, refer to the manual provided with the access point.) This method lets you make the settings without having to press any buttons on the projector, and is recommended when the projector is mounted on the ceiling. 74 Setting Up Network Projection - Epson PowerLite 1725 | User's Guide - Page 75
Follow these steps to open the WPS connection screen: 1. Press the Menu button to open the projector menu. 2. Select Network, then Network Configuration, and press Enter. 3. Select Wireless LAN and press Enter. Setting Up Network Projection 75 - Epson PowerLite 1725 | User's Guide - Page 76
Wizard, then press Enter. You see the WPS (Wi-Fi Protected Setup) connection screen: 5. For the Push Button Method, follow the instructions below. For the PIN Code Method, follow the instructions on page 78. Using the Push Button Method 1. Select Push Button Method and press Enter. You see this - Epson PowerLite 1725 | User's Guide - Page 77
by the screen, press the WPS button on the access point. You see a message that WPS setup is complete. 4. Press the Enter button or the Esc button to return to the wireless LAN setting page. 5. Select Setup Complete and press Enter. 6. Make sure Yes is selected and press Enter. 7. Press the Menu - Epson PowerLite 1725 | User's Guide - Page 78
, refer to the manual provided with the access point. 1. Follow steps 1 through 4 on page 75 to access the WPS Connection Screen. 2. Select PIN Code Method and press Enter. You see this screen: 3. From the computer, enter the displayed PIN code for the access point, select Start Setup and then press - Epson PowerLite 1725 | User's Guide - Page 79
, press the Enter or Esc button. 5. When you see the wireless LAN setting page, select Setup Complete and press Enter. You see this screen: 6. Select Yes and press Enter to save the settings. 7. Press the Menu button and then close the - Epson PowerLite 1725 | User's Guide - Page 80
note The authentication and firewall features are only effective when the access point for the connection destination supports the same functions. Using Wireless Security Options The projector includes the following network security options which you can enable for network projection: ■ Data - Epson PowerLite 1725 | User's Guide - Page 81
EAP-TLS Certificate Validation" on page 86 You also need to enable security settings from EMP NS Connection (see page 88). Enabling WEP Encryption 1. Press Menu on the projector remote. Highlight Network and then press Enter. 2. Choose Network Configuration and press Enter. 3. Highlight Security - Epson PowerLite 1725 | User's Guide - Page 82
4. Press Enter to show the menu, then highlight WEP and press Enter. note Text input for WEP encryption varies with different access points; check with your network administrator. Try ASCII first. If that doesn't work, try Text2 and then Text3. 5. For the WEP encryption setting, highlight 128Bit - Epson PowerLite 1725 | User's Guide - Page 83
5 alphanumeric characters. 9. When you're done making these settings, highlight the Return button at the top of the screen, then press Enter. Choose Setup Complete and press Enter, then choose Yes and press Enter to save your settings. Enabling WPA Security 1. Press Menu. Highlight Network and then - Epson PowerLite 1725 | User's Guide - Page 84
, enter it by accessing the projector from a web browser. This lets you enter up to 63 characters. See the EasyMP Operation guide for details. 5. Highlight the of the screen, then press Enter. Choose Setup Complete and press Enter, then choose Yes and press Enter to save your - Epson PowerLite 1725 | User's Guide - Page 85
see the following screen: 4. Press Enter to show the menu, then choose one of the EAP, LEAP, or PEAP options and press Enter. 5. Enter the user name and password that match the settings on your authentication server: Setting Up Network Projection 85 - Epson PowerLite 1725 | User's Guide - Page 86
Highlight the User name text box and press Enter. Use the buttons to select individual Enter the password as you entered the User name. 6. When you're done making these settings, highlight the Return button at the top of the screen, then press Enter. Choose Setup Complete and press Enter, then choose - Epson PowerLite 1725 | User's Guide - Page 87
the screen, for example: 5. When you're done making these settings, highlight the Return button at the top of the screen, then press Enter. Choose Setup Complete and press Enter, then choose Yes and press Enter to save your settings. Setting Up Network Projection 87 - Epson PowerLite 1725 | User's Guide - Page 88
more information, see the EasyMP Operation Guide. Using the EasyMP Software Once you've set up your projector and computer for network projection, see the EasyMP Operation Guide for instructions on the following EasyMP features: ■ Starting NS Connection ■ Projecting over the network ■ Multi-screen - Epson PowerLite 1725 | User's Guide - Page 89
Wireless 802.11a/b/g Module Follow these steps to remove the module from your projector. 1. If you're running NS Connection, click Disconnect on the control bar. Click Disconnect 2. Check the access light to make sure it isn't flashing. 3. Turn off the projector and unplug it. 4. Turn the projector - Epson PowerLite 1725 | User's Guide - Page 90
to a Wired Network With the optional Ethernet unit, you can connect the projector to your network and configure it with an IP address. This provides an alternative to connecting to the projector wirelessly. 1. Remove the wireless module and cover plate, as described above, then insert the Ethernet - Epson PowerLite 1725 | User's Guide - Page 91
. When you're done making all necessary changes, press Menu to exit the menu system. Using Projector E-mail Alerts When this feature is enabled, the projector sends you an e-mail alert if it has any problems. 1. Press the Menu button on the remote control, select the Network menu, then press Enter - Epson PowerLite 1725 | User's Guide - Page 92
by mail. When the selected problem or warning occurs, an e-mail message is sent to the specified notification addresses. The subject line of the e-mail is EPSON Projector. The e-mail includes the following information: ■ Line 1: The name of the projector where the problem has occurred 92 Setting Up - Epson PowerLite 1725 | User's Guide - Page 93
■ Line 2: The IP address of the projector where the problem has occurred ■ Line 3: Details of the problem Using SNMP to Monitor the Projector Network administrators can use SNMP (Simple Network Management Protocol) to monitor projectors. 1. Press the Menu button on the remote control, select the - Epson PowerLite 1725 | User's Guide - Page 94
inserted (see the Quick Setup sheet). Connecting With Windows Vista If you have Windows Vista, you can use the Network Projector function to connect to the projector without installing the EasyMP software. This provides a quick, easy way to connect wirelessly, though with limited capabilities - Epson PowerLite 1725 | User's Guide - Page 95
. You see this screen: 4. You can select the projector automatically or manually: ■ To let your computer search automatically for the projector, select Search for a projector. You see this screen: After locating the connected projectors, your computer lists them on the screen. Select the one - Epson PowerLite 1725 | User's Guide - Page 96
you connect wirelessly to the projector using Vista Network Projector, be aware of the following limitations: ■ You can connect to only one projector at a time. ■ You cannot connect the projector to a PC with a video output resolution in excess of 1024 × 768 (XGA). ■ You cannot project a Windows - Epson PowerLite 1725 | User's Guide - Page 97
the image, sound, and other features. This chapter covers the following information: ■ Using the menu system ■ Adjusting the image ■ Adjusting signal settings ■ Customizing projector features ■ Using the projector security features ■ Customizing power and operation ■ Multi-screen color adjustment 97 - Epson PowerLite 1725 | User's Guide - Page 98
menu screen, press the Menu button on the remote control or on the projector. You see a menu screen similar to the one below: Options Menu list the pointer button on the remote control (or the navigational buttons on the projector) to scroll through the menu list. When you've highlighted the desired - Epson PowerLite 1725 | User's Guide - Page 99
menus To restore all the projector settings to their factory-default values, select the Reset menu, highlight Reset All, and press Enter. note When you select Reset All in the Reset menu, it does not reset the Computer Input, Video Signal, User's Logo, Language, or Lamp settings. Fine-Tuning the - Epson PowerLite 1725 | User's Guide - Page 100
and select the Image menu. You see the Image menu screen. note The Brightness setting changes the opacity of the projector's LCD panels. You can also change the lamp's brightness (see page 104). 2. Use the pointer button to highlight the desired option, then adjust it as needed: ■ Color Mode - Epson PowerLite 1725 | User's Guide - Page 101
photographs or artwork, you can adjust the hue and saturation for six different color axes. 1. Follow the instructions on page 100 to open the Image menu and select Color Mode. 2. Press the Enter button to select color, and saturation changes the strength of the color. Fine-Tuning the Projector 101 - Epson PowerLite 1725 | User's Guide - Page 102
lamp in your projector changes over time. note You can projector normally detects and optimizes the input signal automatically, you can use the Signal menu to make manual adjustments. In addition to changing the position of the projected image, you can correct ■ Auto Setup Leave this - Epson PowerLite 1725 | User's Guide - Page 103
: RGB: For a computer connection. Component Video: For a video player that outputs a component video signal. ■ Video Signal Leave this setting at Auto unless you are using a 60-Hz PAL system (then select PAL60). ■ Aspect Choose an aspect ratio setting that allows the image to fit best in the display - Epson PowerLite 1725 | User's Guide - Page 104
36 for more information. ■ Brightness Control Lets you select from two levels of brightness. The Low setting reduces power consumption and noise, and extends the lamp's operating life. ■ Volume Raises or lowers the volume of the projector's speaker. 104 Fine-Tuning the - Epson PowerLite 1725 | User's Guide - Page 105
, and when performing keystone correction. Using the Projector Security Features To prevent unauthorized use of the projector, you can do the following: ■ Assign a password; this can be disabled for a set period if you want to loan the projector to someone. ■ Create an identifying user logo that is - Epson PowerLite 1725 | User's Guide - Page 106
disconnected and reinserted to redisplay the password screen. If an incorrect password is entered thirty times in succession, the user must contact Epson to unlock the projector. The default setting for the Password Protect function is Off. Follow these steps to turn password protection on: 1. Press - Epson PowerLite 1725 | User's Guide - Page 107
the Menu button to exit the screen. 8. To enable your screen logo, select User's Logo Protect and press Enter. Select On and press Enter. When this feature is on, the logo appears whenever you turn on the projector (if the Startup Screen is enabled in the Extended menu; see page 108). It - Epson PowerLite 1725 | User's Guide - Page 108
Protect Release screen again, you can try to enter the correct password. If you enter an incorrect password 30 times in succession, the projector remains locked and you must contact Epson to unlock it. If you have forgotten the password, contact Epson with the request code number that appears in the - Epson PowerLite 1725 | User's Guide - Page 109
a zoom factor (display size) and press Enter. 7. When the message Save this image as the user's logo? appears, select Yes and press Enter. Saving the logo may take a few moments. Do not use your projector, remote control, or video source while the logo is being saved. 8. When you see the message - Epson PowerLite 1725 | User's Guide - Page 110
Menu button, highlight the Settings menu, and press Enter. 2. Select Control Panel Lock and press the Enter button. 3. Select Full Lock (to lock all projector buttons) or Partial Lock (to lock all buttons except the PPower button) and press Enter. 4. Select Yes and press Enter to confirm the setting - Epson PowerLite 1725 | User's Guide - Page 111
for content that provides it. ■ User's Logo Create a custom startup screen, as described on page 108. ■ Projection Select Front (to project from the front of a screen and right side up), Front/Ceiling (when the projector is mounted upside-down from the ceiling), Rear (to project from behind onto - Epson PowerLite 1725 | User's Guide - Page 112
Choose Link 21L to use the remote control as a wireless mouse when your computer is connected to the Computer (Component Video) port; see page 42. ■ Link 21L Enables the projector to work with Link 21L software (not supported in all regions). ■ Projector ID Lets you selectively operate two or more - Epson PowerLite 1725 | User's Guide - Page 113
projector so that you can use the remote control to adjust each projector individually. See page 37 for instructions. 2. Select Multi-screen in the projector different level of projector output (luminance). 4. Adjust the Brightness Correct and Color Correct settings for one projector so that its - Epson PowerLite 1725 | User's Guide - Page 114
114 Fine-Tuning the Projector - Epson PowerLite 1725 | User's Guide - Page 115
the projector, except the lamp cover. Dangerous electrical voltages in the projector can injure you severely. Do not try to service this product yourself, except as specifically explained in this User's Guide. Refer all other servicing to qualified service personnel. Maintaining the Projector Your - Epson PowerLite 1725 | User's Guide - Page 116
detergents. These can damage the case. Never spray a liquid of any kind directly on the projector or its lens. Always apply it to a cloth first. Cleaning the Projector Case Before you clean the case, turn off the projector and unplug the power cord. ■ To remove dirt or dust, wipe the case with - Epson PowerLite 1725 | User's Guide - Page 117
projector includes an air filter to ensure the best performance. If dust collects on the air filter (on the side of the projector) or vent (on the front of the projector), 120. Contact your dealer or call Epson at 800-GO-EPSON (800-463-7766) to obtain a new filter. Maintaining the Projector 117 - Epson PowerLite 1725 | User's Guide - Page 118
on the screen when the lamp comes on and the lamp warning light flashes orange. To maintain projector brightness and image quality, replace the lamp as soon as possible. ■ The lamp warning light flashes red (the lamp is burnt out). Contact your dealer or call Epson at 800-GO-EPSON (800-463-7766 - Epson PowerLite 1725 | User's Guide - Page 119
4. Remove the lamp cover screw. Then slide the lamp cover to the side and lift it off of the projector. 5. Loosen the two screws holding the lamp in place (you can't remove them). Loosen, but don't remove these screws Maintaining the Projector 119 - Epson PowerLite 1725 | User's Guide - Page 120
.) 8. Push down the side marked PUSH until it snaps in. 9. Once the lamp is fully inserted, tighten its screws. 10. Replace the lamp cover, then tighten its screw. 11. Slide out the air filter on the bottom of the projector and remove it. 12. Slide in the new air filter until it clicks - Epson PowerLite 1725 | User's Guide - Page 121
panel. You see the main menu. 2. Use the buttons on the remote control (or the arrow buttons on the projector) to highlight Reset, then press Enter. You see this screen: 3. Select Reset Lamp Hours and press Enter. 4. When you see the prompt, select Yes and press Enter. 5. When you're finished, press - Epson PowerLite 1725 | User's Guide - Page 122
note Epson shall not be liable for any damages incurred during transportation. Transporting the Projector The projector contains many glass and precision parts. Follow these guidelines to prevent damage: ■ Close the A/V Mute slide (lens cover) to protect the lens. ■ When shipping the projector for - Epson PowerLite 1725 | User's Guide - Page 123
you how to contact technical support for problems you can't solve yourself. The following information is included: ■ Using the projector's on-screen help system ■ What to do when the projector's status lights flash ■ Solving projector operation problems ■ Solving problems with the image or sound - Epson PowerLite 1725 | User's Guide - Page 124
the help system, press the ? Help button. If none of the suggestions solve your problem, see additional solutions to problems in the following sections. Checking Projector Status If your projector isn't working correctly, first turn it off, wait for it to cool (the PPower light stops flashing orange - Epson PowerLite 1725 | User's Guide - Page 125
the problem. There is a problem with the fan or temperature sensor. The air filter or vent may be clogged. Clean them or replace the air filter as described on page 117. If this does not resolve the problem, stop using the projector, disconnect the power cable, and contact Epson as described - Epson PowerLite 1725 | User's Guide - Page 126
the problem may be caused by damage to the cooling fan or temperature sensor. Contact Epson for help as described on page 138. Warning: Except as specifically explained in this User's Guide, do not attempt to service this product yourself. It's time to replace the lamp. See page 118 for instructions - Epson PowerLite 1725 | User's Guide - Page 127
span of your lamp. note The information displayed depends on the input signal currently selected. Solving Projector Operation Problems The power doesn't turn on. ■ If the projector doesn't turn on when you press the PPower button, make sure the power cable is connected to the projector and plugged - Epson PowerLite 1725 | User's Guide - Page 128
to Network On, the fans continue to operate after the projector has cooled down. See page 112 for more information about this setting. Solving Problems with the Image or Sound No image appears on the USB display feature is not available for Windows 98, Windows Me, or Macintosh. 128 Solving Problems - Epson PowerLite 1725 | User's Guide - Page 129
connected correctly, as described on page 40. ■ If you've connected a computer and one or more video sources, you may need to press the Source Search button on the projector labelled CRT/LCD. Allow a few seconds for the projector to sync up after pressing it. Check your notebook's manual or online - Epson PowerLite 1725 | User's Guide - Page 130
's resolution setting is correct. Ideally, it should be 1280 × 800 to match the projector's native resolution for the PowerLite 1735W, or 1024 × 768 for the PowerLite 1725. If this them for a different resolution. See your software documentation for specific information. 130 Solving Problems - Epson PowerLite 1725 | User's Guide - Page 131
Epson (see page 12). ■ Keep your computer and video cables away from the power cord as much as possible to prevent interference. ■ The video signal may be split between the computer and the projector and the projector, turn off the notebook's LCD display. ■ Make sure the correct input signal is - Epson PowerLite 1725 | User's Guide - Page 132
may look heavy or blurred. Press the Auto button on the remote control to reset the projector's tracking and sync settings. ■ If further adjustment is needed, you can fine-tune the Tracking and Sync settings manually using the Signal menu, as described on page 103. 1. Fill the screen with an image - Epson PowerLite 1725 | User's Guide - Page 133
page 101 for precise control of the hue and saturation. ■ Check your computer display settings to correct the color balance. ■ The projector's lamp may need to be replaced. See page 118 for instructions. note Because of the different technologies used, your projected image may not exactly match the - Epson PowerLite 1725 | User's Guide - Page 134
. Solving Network Problems You can't display an image using Quick Wireless Connection. You may need to restart your computer to connect. You can't connect to the projector using NS Connection. ■ Make sure the wireless module is installed correctly in the projector, as shown on the Quick Setup sheet - Epson PowerLite 1725 | User's Guide - Page 135
connect to the right network. In Windows, verify that you've enabled your computer's connection to the access point (see page 70) or that your wireless card or adapter is enabled and its SSID is set to match the projector's SSID (see page 62). On a Mac projector's Gateway address on the projector's - Epson PowerLite 1725 | User's Guide - Page 136
're prompted for a password when you connect, enter the WEP encryption key (if you're using WEP encryption). Solving Problems with the Remote Control The projector doesn't respond to remote control commands. ■ The remote control's batteries may not be installed correctly or may be low on power. To - Epson PowerLite 1725 | User's Guide - Page 137
30 seconds, the remote enters sleep mode. Release any button that is held to wake the remote. ■ If you're using the remote control as a wireless mouse, make sure the USB Type B setting in the Extended menu is set to Link 21L (see page 112). Solving - Epson PowerLite 1725 | User's Guide - Page 138
To Get Help Epson provides these technical support services: Internet Support Visit Epson's support website at www.epson.com/support and select your product for solutions to common problems. You can download utilities and documentation, get FAQs and troubleshooting advice, or e-mail Epson with your - Epson PowerLite 1725 | User's Guide - Page 139
and Accessories You can purchase screens, carrying cases, or other accessories from an Epson authorized reseller. To find the nearest reseller, call 800-GO-EPSON (800-463-7766). Or you can purchase online at www.epsonstore.com (U.S. sales) or www.epson.ca (Canadian sales). Solving Problems 139 - Epson PowerLite 1725 | User's Guide - Page 140
140 Solving Problems - Epson PowerLite 1725 | User's Guide - Page 141
projection To project from overhead, you'll need the optional ceiling mounting hardware; see page 12 for ordering information. You'll also need to select Front/Ceiling or Rear/Ceiling as the Projection option in the projector's Extended menu to flip the image upside-down. To project from the - Epson PowerLite 1725 | User's Guide - Page 142
If you're mounting the projector on the ceiling and you place it above screen level, you'll have to tilt the projector down to position the image on the screen. This causes the image to lose its square shape. You can correct the distortion using the Keystone function in the projector's menu system ( - Epson PowerLite 1725 | User's Guide - Page 143
methods Internal sound system Optical aspect ratio 1735W 1725 Epson poly-silicon TFT active matrix 1280 × 800 pixels (WXGA) 1024 × 768 pixels (XGA) 16.8 million colors High Brightness mode: 3000 lumens white light output (ISO 21118 standard) 3000 lumens color light output Low Brightness mode: 1900 - Epson PowerLite 1725 | User's Guide - Page 144
mode Automatic (manual adjustment capability ±30° vertical keystone correction) Supports USB (type B) Projection Lamp Type UHE (Ultra High Efficiency) Power consumption 170 W Lamp life Approx. 3000 hours ( 50/60 Hz AC 100 to 120 VAC, 2.7 A 200 to 240 VAC, 1.2 A 144 Technical Specifications - Epson PowerLite 1725 | User's Guide - Page 145
°C) Storage: 14 to 140 °F (-10 to 60 °C) Operating: 20 to 80% RH Storage: 10 to 90% RH 0 to 7,500 ft (0 to 2,286 m) Safety United States Canada CE Marking FCC 47CFR Part 15B Class B (DoC) UL60950-1 First Edition ICES-003 Class B CSA C22.2 No. 60950-1 Directive 2004/108/EC IEC 60950-1 First - Epson PowerLite 1725 | User's Guide - Page 146
The projector supports NTSC, projector. Some images are automatically resized using Epson's SizeWise™ technology to display in the projector's "native" format (XGA or WXGA). The frequencies of some computers may not allow images to display correctly × 864 1152 × 864 146 Technical Specifications - Epson PowerLite 1725 | User's Guide - Page 147
(720p) 60 - HDTV (720p) 50 - HDTV (1080i) 60 - HDTV (1080i) 50 - TV480i 60 - TV480i 50 - SDTV (480p) 60 - SDTV (480p) 50 - * Available only on the 1735W when the resolution is set to Wide. Technical - Epson PowerLite 1725 | User's Guide - Page 148
148 Technical Specifications - Epson PowerLite 1725 | User's Guide - Page 149
if you use lubricants or oils on the projector, the projector case may crack and the projector may fall from its ceiling mount. This could cause serious injury to anyone under the mount and could damage the projector. When installing or adjusting a ceiling mount, do not use adhesives to prevent the - Epson PowerLite 1725 | User's Guide - Page 150
in this User's Guide, do not attempt to service this product yourself. Refer all servicing to qualified personnel. Opening or removing covers may expose you to dangerous voltages and other hazards. ■ Never open any covers on the projector except as specifically explained in this User's Guide. Never - Epson PowerLite 1725 | User's Guide - Page 151
or power company. ■ If you use the projector in a country other than where you purchased it, use the correct power cord for that country. ■ Do not overload projector is mounted overhead and the lamp breaks, be careful to prevent pieces of glass from falling into your eyes when you open the lamp - Epson PowerLite 1725 | User's Guide - Page 152
installed and used in accordance with the instructions, may cause harmful interference to radio or the equipment off and on, the user is encouraged to try to correct the interference by one or more connected. ■ Consult the dealer or an experienced radio/TV technician for help. WARNING The connection - Epson PowerLite 1725 | User's Guide - Page 153
, 108 to 109 Carrying case, 10, 122 Ceiling mount, 12, 141 to 142 Certificate validation, 86 to 87 Cleaning air filter, 117 lens, 116 projector case, 116 Closed captioning, 111 Color correcting, 33 to 34 mode, 33 to 34, 100 multi-screen adjustment, 113 problems, 133 saturation, 100 settings, 100 to - Epson PowerLite 1725 | User's Guide - Page 154
to 93 EMP NS Connection configuring projector for, 64 to 87 creating password for, 56 problems, 134 to 136 projecting wirelessly, 53 to 88 Encryption, 62, 68, 81 to 83, 88 Environmental specifications, 145 Epson accessories, 12 presentation tips, 9 PrivateLine Support, 9 technical support, 8, 138 to - Epson PowerLite 1725 | User's Guide - Page 155
device, 12, 15 Keystone correction, 23 to 24, 104, 131, 144 Keyword, 56 L Lamp number of hours used, 127 ordering, 12 replacing, 118 to 121 specifications, 144 status light, 125 to 126 Lamp timer, resetting, 121 Language setting, 112 Laptop computer connecting to, 40 to 41 display problems, 20 to 21 - Epson PowerLite 1725 | User's Guide - Page 156
controlling multiple projectors, 37 to 38 correcting color, 33 to 34 E-Zoom button, 31 Freeze button, 30 ID, 38 numeric keypad, using, 107 pointer tool, using, 36 problems, 136 range, 144 specifications, 144 switching sources, 29 troubleshooting, 136 Removing wireless module, 89 Replacing lamp, 118 - Epson PowerLite 1725 | User's Guide - Page 157
remote control problems, 136 wireless projection problems, 134 to 136 Turning off picture (using A/V Mute), 30 Turning on/off projector, 15 to 18 U Unpacking projector, 10 USB cable, 10, 41, 43 USB display, 41 to 42 USB key, 54 User button, 105 User's Logo menu, 108 to 109 V VCR, connecting, 44 to - Epson PowerLite 1725 | User's Guide - Page 158
, 85 to 86 module, 10 network module, 89 PEAP, 85 to 86 presentation, 53 to 96 problems, 134 to 136 Quick Wireless Connection, 54 security, 80 to 88 WEP encryption, 81 to 83 Windows Vista, 94 to 96 WPA security, 83 to 84 Wireless, mouse, 35, 42 to 43 WPA security, 83 to 84 WPS - Epson PowerLite 1725 | User's Guide - Page 159
-
 1
1 -
 2
2 -
 3
3 -
 4
4 -
 5
5 -
 6
6 -
 7
7 -
8
-
9
-
10
-
11
-
12
-
13
-
14
-
15
-
16
-
17
-
18
-
19
-
20
-
21
-
22
-
23
-
24
-
25
-
26
-
27
-
28
-
29
-
30
-
31
-
32
-
33
-
34
-
35
-
36
-
37
-
38
-
39
-
40
-
41
-
42
-
43
-
44
-
45
-
46
-
47
-
48
-
49
-
50
-
51
-
52
-
53
-
54
-
55
-
56
-
57
-
58
-
59
-
60
-
61
-
62
-
63
-
64
-
65
-
66
-
67
-
68
-
69
-
70
-
71
-
72
-
73
-
74
-
75
-
76
-
77
-
78
-
79
-
80
-
81
-
82
-
83
-
84
-
85
-
86
-
87
-
88
-
89
-
90
-
91
-
92
-
93
-
94
-
95
-
96
-
97
-
98
-
99
-
100
-
101
-
102
-
103
-
104
-
105
-
106
-
107
-
108
-
109
-
110
-
111
-
112
-
113
-
114
-
115
-
116
-
117
-
118
-
119
-
120
-
121
-
122
-
123
-
124
-
125
-
126
-
127
-
128
-
129
-
130
-
131
-
132
-
133
-
134
-
135
-
136
-
137
-
138
-
139
-
140
-
141
-
142
-
143
-
144
-
145
-
146
-
147
-
148
-
149
-
150
-
151
-
152
-
153
-
154
-
155
-
156
-
157
-
158
-
159
 |
 |

PowerLite
®
1725/1735W
Multimedia Projector
User’s Guide