Epson R1800 Product Information Guide - Page 10
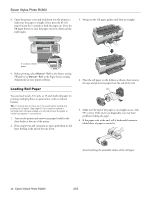
Loading Roll Paper, Swing out the roll paper guides until they are straight. - stylus photo ink
 |
UPC - 010343853072
View all Epson R1800 manuals
Add to My Manuals
Save this manual to your list of manuals |
Page 10 highlights
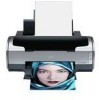
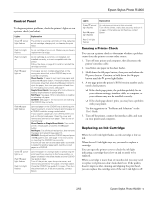
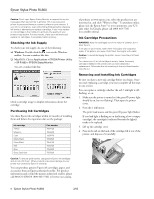
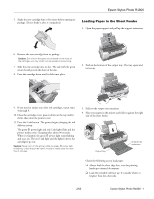
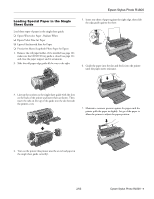
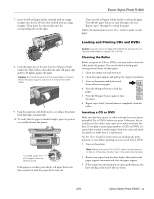
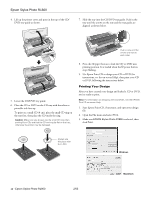
Epson Stylus Photo R1800 8. Open the printer cover and look down into the printer to make sure the paper is straight; if not, press the z roll paper button for 3 seconds to back the paper out. Press the ) paper button to clear the paper out error, then load the paper again. 3. Swing out the roll paper guides until they are straight. If crooked, reload paper 9. Before printing, select Manual - Roll as the Source setting (Windows) or Manual - Roll as the Paper Source setting (Macintosh) in your printer software. Loading Roll Paper You can load 4-inch, 8.3-inch, or 13-inch wide roll paper for printing multiple photos or panoramics, with or without borders. Tip: It's a good idea to check your ink levels before loading and printing on roll paper. (See page 6.) If you need to replace a cartridge with roll paper loaded, you should remove the paper or marks may appear in your printout. 1. Turn on the printer and remove any paper loaded in the sheet feeder at the top of the printer. 2. If the output tray and extension are open, push them in, but leave the flap at the end of the tray down. 4. Place the roll paper on the holders as shown, then remove the tape and protective paper from the end of the roll. 90° 5. Make sure the end of the paper is cut straight across, with 90° corners. If the end is cut diagonally, you may have problems feeding the paper. 6. If the paper curls at the end, roll it backwards between a folded sheet of paper to uncurl it. Avoid touching the printable surface of the roll paper. 10 - Epson Stylus Photo R1800 2/05
-
 1
1 -
2
-
3
-
4
-
 5
5 -
 6
6 -
 7
7 -
 8
8 -
 9
9 -
 10
10 -
 11
11 -
 12
12 -
 13
13 -
 14
14 -
 15
15 -
16
-
17
-
18
 |
 |