Epson R1800 Product Information Guide - Page 9
Loading Special Paper in the Single Sheet Guide, PremierArt Matte Scrapbook Photo Paper for Epson - stylus photo printer
 |
UPC - 010343853072
View all Epson R1800 manuals
Add to My Manuals
Save this manual to your list of manuals |
Page 9 highlights
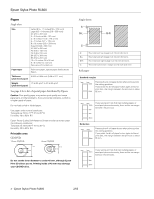
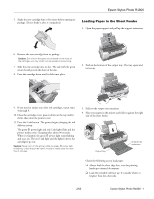
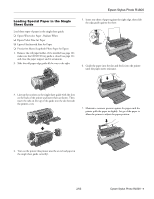
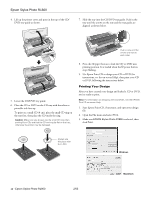
Epson Stylus Photo R1800 Loading Special Paper in the Single Sheet Guide Load these types of paper in the single sheet guide: ❏ Epson Watercolor Paper - Radiant White ❏ Epson Velvet Fine Art Paper ❏ Epson UltraSmooth Fine Art Paper ❏ PremierArt Matte Scrapbook Photo Paper for Epson 1. Remove the roll paper holder, if it's installed (see page 10); make sure the CD/DVD tray guide is closed (see page 11); and close the paper support and its extensions. 2. Slide the roll paper edge guide all the way to the right. 5. Insert one sheet of paper against the right edge, then slide the edge guide against the sheet. 6. Guide the paper into the slot and feed it into the printer until the paper meets resistance. 3. Line up the notches on the single sheet guide with the slots on the back of the printer and insert them as shown. Then insert the tabs on the top of the guide into the slot beneath the printer cover. 7. Maintain a constant pressure against the paper until the printer pulls the paper in slightly. Let go of the paper to allow the printer to adjust the paper position. 4. Turn on the printer (the printer must be on to load paper in the single sheet guide correctly). 2/05 Epson Stylus Photo R1800 - 9
-
 1
1 -
2
-
3
-
 4
4 -
 5
5 -
 6
6 -
 7
7 -
 8
8 -
 9
9 -
 10
10 -
 11
11 -
 12
12 -
 13
13 -
 14
14 -
15
-
16
-
17
-
18
 |
 |
