Epson R1800 Product Information Guide - Page 14
Mac OS X, Cleaning the Print Head, Automatically Checking and Cleaning the Print Head, Print Head
 |
UPC - 010343853072
View all Epson R1800 manuals
Add to My Manuals
Save this manual to your list of manuals |
Page 14 highlights
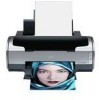
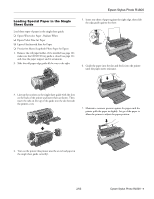
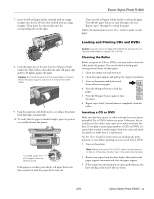
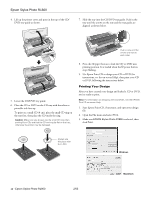
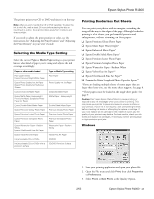
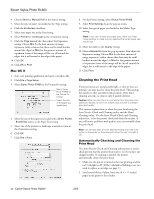
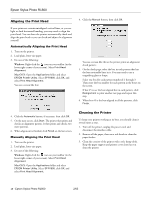
Epson Stylus Photo R1800 4. Choose Sheet or Manual Roll as the Source setting. 5. Select the type of paper you loaded as the Type setting. 6. Click the Borderless checkbox. 7. Select your paper size as the Size setting. 8. Select Portrait or Landscape as the orientation setting. 9. Click the Page Layout tab, then adjust the Expansion setting. Choose Min for the least amount of image expansion (with a chance that there may be small borders around the edges) or Max for the greatest amount of expansion (some of the image will be cut off around the edges, but it will extend to the edge of the paper). 10. Click OK. 11. Click OK or Print. Mac OS X 1. Start your printing application and open your photo file. 2. Click File > Page Setup. 3. Select Stylus Photo R1800 as the Format for setting. Select Stylus Photo R1800 as the Format for setting Select the size of the paper you loaded here 4. Select the size of the paper you loaded with a Sheet Feeder - Borderless source as the Paper Size setting. 5. Select one of the portrait or landscape orientation icons as the Orientation setting. 6. Click OK. 7. Click File > Print. 8. For the Printer setting, select Stylus Photo R1800. 9. Select Print Settings from the pop-up menu. 10. Select the type of paper you loaded as the Media Type setting. Note: If you can't choose your paper type, check your Page Setup settings to make sure you selected the correct paper size and source. 11. Move the slider to the Quality setting. 12. Choose Expansion from the pop-up menu, then adjust the Expansion setting. Choose Min for the least amount of image expansion (with a chance that there may be small borders around the edges) or Max for the greatest amount of expansion (some of the image will be cut off around the edges, but it will extend to the edge of the paper). 13. Click Print. Cleaning the Print Head If your printouts are unexpectedly light, or dots or lines are missing, you may need to clean the print head. This unclogs the nozzles so they can deliver ink properly. Print head cleaning uses ink, so clean it only if quality declines. Caution: When you don't turn on your printer for a long time, print quality can decline, so turn it on at least once a month to maintain good print quality. This section explains how to clean the print head using the Auto Nozzle Check and Cleaning utility and the Head Cleaning utility. Use the Auto Nozzle Check and Cleaning utility first, to let the printer check and clean the nozzles. If you still notice problems with quality, you can manually clean the print head. Note: You can also clean the print head by holding down the H ink button on the printer for three seconds (when the red H ink light is off). Automatically Checking and Cleaning the Print Head The Auto Nozzle Check and Cleaning utility prints a nozzle check pattern that the printer then reads to see if you have any clogged nozzles. If cleaning is needed, the printer automatically cleans the print head. 1. Make sure the printer is turned on but not printing, and the red H ink light is off. (If the H ink light is flashing or on, you need to replace a cartridge; see page 5.) 2. Load several sheets of plain, letter-size (8.5 × 11 inches) paper in the printer's sheet feeder. 14 - Epson Stylus Photo R1800 2/05
-
 1
1 -
2
-
3
-
4
-
5
-
6
-
7
-
8
-
 9
9 -
 10
10 -
 11
11 -
 12
12 -
 13
13 -
 14
14 -
 15
15 -
 16
16 -
 17
17 -
 18
18
 |
 |