Epson R1800 Product Information Guide - Page 11
Loading and Printing CDs and DVDs, Cleaning the Roller, Inserting a CD or DVD - stylus photo
 |
UPC - 010343853072
View all Epson R1800 manuals
Add to My Manuals
Save this manual to your list of manuals |
Page 11 highlights
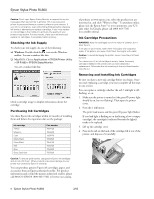
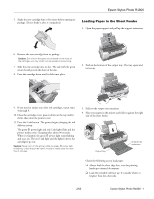
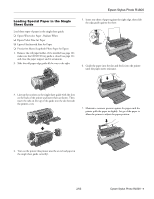
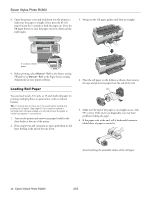
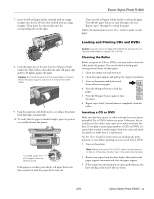
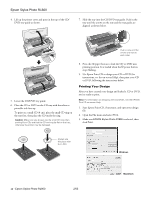
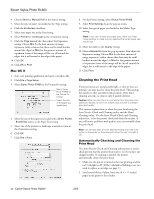
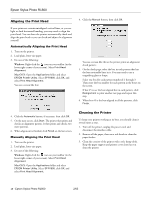
Epson Stylus Photo R1800 7. Insert the left roll paper holder (marked with an orange triangle) into the far left slot (also marked with an orange triangle). Then insert the other holder into the corresponding slot on the right. Then turn the roll paper holder knobs to roll up the paper. Press the ) paper button to clear the paper out error. Repeat steps 7 through 9 to reload the paper. Follow the instructions in your User's Guide to print on roll paper. 8. Load the paper part of the way into the roll paper feeder (under the white rollers), then slide the right roll paper edge guide to fit lightly against the paper. Caution: Don't load roll paper into the sheet feeder or the slot behind the paper support; make sure it is below the white rollers. 9. Push the paper into the feeder as far as it will go; the printer feeds the paper automatically. 10. To verify that the paper is loaded straight, open the printer cover and look into the printer. If crooked, press the z roll paper button for three seconds If the paper is crooked, press the z roll paper button for three seconds to back the paper all the way out. Loading and Printing CDs and DVDs Caution: Use only ink jet printable CDs or DVDs for printing. Do not use thermal-printable or regular CDs or DVDs. Cleaning the Roller Before you print on CDs or DVDs, you may need to clean the roller inside the printer. You can do this by feeding and ejecting several sheets of plain paper. 1. Open the output tray and extension. 2. Open the paper support and pull up the support extensions. 3. Turn on the printer and load several sheets of letter-size paper. 4. Press the ) paper button to feed the paper. 5. Press the ) paper button again to eject the paper. 6. Repeat steps 4 and 5 several times to completely clean the roller. Inserting a CD or DVD Make sure the data, music, or video is burned on your ink jet printable CDs or DVDs before you print. Otherwise, dirt or scratches on the surface may cause errors when you burn the data. If you plan to print large numbers of CDs or DVDs, it's a good idea to print a small sample, then wait a day and check the quality to make sure it is satisfactory. See the User's Guide for instructions on checking the print position or color before printing on your actual CD or DVD. 1. Turn on the printer. Note: Before you insert a CD or DVD, make sure the printer is turned on. Otherwise, the disc may not be positioned correctly. 2. Remove any paper from the sheet feeder, then push in the paper support extensions and close the paper support. 3. If the output tray and extension are open, push them in, but leave the flap at the end of the tray down. 2/05 Epson Stylus Photo R1800 - 11
-
 1
1 -
2
-
3
-
4
-
5
-
 6
6 -
 7
7 -
 8
8 -
 9
9 -
 10
10 -
 11
11 -
 12
12 -
 13
13 -
 14
14 -
 15
15 -
 16
16 -
17
-
18
 |
 |
