Epson R280 Product Information Guide - Page 10
Windows, Macintosh - software
 |
UPC - 010343866171
View all Epson R280 manuals
Add to My Manuals
Save this manual to your list of manuals |
Page 10 highlights
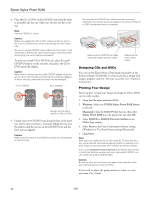
Epson Stylus Photo R280 4. Place the CD or DVD on the CD/DVD tray with the white or printable side face-up. Make sure the disc lies flat in the tray. Note: Use one CD/DVD at a time. Caution: Before you position the CD or DVD, make sure that no dust or dirt is on the CD/DVD tray, as this may damage the disc's data side. Be sure to use the CD/DVD tray provided with this printer. If you use another CD/DVD tray, there may be a gap in the print position and printing may not be performed properly. To print on a small CD or DVD (8-cm), place the small CD/DVD adapter on the tray first, then place the CD or DVD inside the adapter. Caution: Make sure you always use the small CD/DVD adapter when you print on 8-cm CDs or DVDs and that the CD or DVD and adapter lie flat on the tray; otherwise the printer may be damaged. 12-cm CD/DVD 8-cm CD/DVD Always use this piece with 8-cm CDs or DVDs 5. Firmly insert the CD/DVD tray along the base of the front tray until it meets resistance. Continue sliding the tray into the printer until the arrows on the CD/DVD tray and the front tray are aligned. Caution: Make sure both sides of the CD/DVD tray slide into the brackets on the front tray. Do not insert the CD/DVD tray while the printer is printing; otherwise, your printer may be damaged or the surface of the CD or DVD may become dirty or scratched. Make sure the CD/DVD tray slides under the bracket (on both sides) Make sure the arrow marks match Designing CDs and DVDs You can use the Epson Print CD program (included on the Printer Software CD-ROM) to create and print a design with images, graphics, and text. See your on-screen User's Guide for instructions. Printing Your Design After you have created your design and loaded a CD or DVD, you're ready to print. 1. Open the File menu and select Print. 2. Windows: Make sure EPSON Stylus Photo R280 Series is selected. Macintosh: Click the Select Printer button, then select Stylus Photo R280 from the printer list and click OK. 3. Select CD/DVD or CD/DVD Premium Surface as the Media Type setting. 4. Select None as the Print Confirmation Pattern setting (Windows) or Test Print Pattern setting (Macintosh). 5. Click Print. Note: After you print, handle the CD or DVD carefully. To allow the ink to dry, wait at least 24 hours before playing the disc or inserting it in a drive. Keep printed discs away from moisture and direct sunlight. If you select CD/DVD Premium Surface as the Media Type setting in the Printer Settings window and use a high quality CD/DVD, you can create high quality CD/DVD labels. Caution: Be sure to place the front tray in the paper (lower) position when you're done printing on CDs and DVDs. If you need to adjust the print position or color, see your on-screen User's Guide. 10 7/07
-
 1
1 -
2
-
3
-
4
-
 5
5 -
 6
6 -
 7
7 -
 8
8 -
 9
9 -
 10
10 -
 11
11 -
 12
12 -
 13
13 -
 14
14
 |
 |
