Epson R280 Product Information Guide - Page 11
Cleaning the Print Head - stylus photo ink cartridges
 |
UPC - 010343866171
View all Epson R280 manuals
Add to My Manuals
Save this manual to your list of manuals |
Page 11 highlights
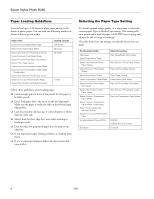
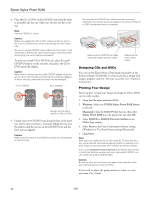
Epson Stylus Photo R280 Cleaning the Print Head If your printouts are unexpectedly light or faint, or you notice light or dark bands across your printout, you may need to clean the print head. This unclogs the nozzles so they can deliver ink properly. Print head cleaning uses ink, so clean it only if quality declines. You can clean the print head using the ink button on the printer or using the Head Cleaning utility on your computer. You can also run a nozzle check to see if the print head needs cleaning. Note: Clean the print head only when print quality declines (for example, if you see lines in your printout or colors are incorrect or missing). Before you clean the print head, check the print head nozzles first (as described in the next section) to confirm that the print head needs to be cleaned. This saves ink. If the red ink light comes on or flashes, you cannot clean the print head. In this case, replace the appropriate ink cartridge first. Caution: If you don't use your printer often it is a good idea to print a few pages at least once a month to maintain good print quality. Before you check the print head nozzles or clean the print head, make sure the CD/DVD tray is not inserted in the printer, and make sure the front tray is in the paper (lower) position. Checking the Print Head Nozzles You can check the print head nozzles using your computer or the buttons on the printer. Using Your Computer 1. Make sure the printer is turned on but not printing, and the red ink light is not on. (If the red ink light is on, you need to replace a cartridge.) 2. Make sure letter-size plain paper is loaded in the printer. 3. Windows: Right-click the printer icon on your taskbar (in the lower right corner of your screen). Select Nozzle Check. Macintosh OS X: Open the Applications folder and select EPSON Printer Utility2. Select SPR280 Series in the printer list, click OK, and select Nozzle Check. You see a screen like the following: 4. Click Print or Next. The nozzle check pattern prints: Print head does not need to be cleaned: Print head needs to be cleaned: 5. If there are no gaps or lines, click Finish. If there are gaps or lines, or the test patterns are faint, click Clean. Then read the on-screen instructions and skip to step 3 under "Running the Head Cleaning Utility" ("Using Your Computer") to clean the nozzles. Using the Buttons on the Printer 1. Make sure the printer is turned on but not printing, that the CD/DVD tray is not inserted in the printer, and the red ink light is not on. (If the red ink light is on, you need to replace a cartridge.) 2. Turn the printer off and make sure the front tray is in the paper (lower) position. 3. Make sure letter-size plain paper is loaded in the printer. 7/07 11
-
 1
1 -
2
-
3
-
4
-
5
-
 6
6 -
 7
7 -
 8
8 -
 9
9 -
 10
10 -
 11
11 -
 12
12 -
 13
13 -
 14
14
 |
 |
