Epson RX595 Product Information Guide - Page 12
Printing Photos, See the next for details. - review
 |
UPC - 010343866157
View all Epson RX595 manuals
Add to My Manuals
Save this manual to your list of manuals |
Page 12 highlights
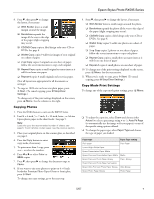
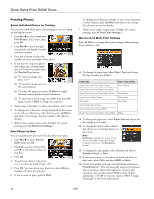
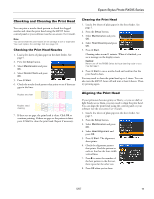
Epson Stylus Photo RX595 Series Printing Photos Select Individual Photos for Printing You can select individual photos for printing as you view them on the display screen. 1. Press l or r to select View and Print Photos, if necessary, then press OK. 2. Press l or r to move through your photos and display one that you want to print. 3. Press the + button to select the number of copies you want of that photo. 4. If you want to crop your photo and enlarge the resulting image area to fit onto your paper, press the Display/Crop button. ❏ To resize the image area, press + or -. ❏ To move the image area, use the arrow buttons. ❏ To rotate the image area, press x Menu to toggle between vertical and horizontal orientation. ❏ To check the zoomed image, press OK, then press OK again or press y Back to change the crop area. 5. Repeat steps 2 through 4 to select more photos, if you want. 6. To change any of the print settings displayed on the screen, or use red eye reduction or other features, press x Menu and select your settings. (See the column to the right for details.) 7. When you're ready to print, press x Start. (To cancel printing, press y Stop/Clear Settings.) Print Photos by Date You can quickly print photos by the date they were taken. 1. Press l or r to select Print by Date, then press OK. 2. Highlight any dates shown and press r to print photos taken on that date. 3. Press OK. 4. To print more than 1 copy, press + or - to select the number (up to 99). 5. Press OK. You can review your photos or select different numbers of copies for each one. 6. If you're ready to print, press x Start. To change any of the print settings, or use red eye reduction or other features, press x Menu and select your settings. (See the next section for details.) 7. When you're ready to print, press x Start. (To cancel printing, press y Stop/Clear Settings.) Memory Card Mode Print Settings Press x Menu to change these print settings while printing from a memory card: ❏ To change the paper type, select Paper Type and choose the type of paper you loaded. Paper type Paper Type setting Epson Premium Photo Paper Glossy Prem. Glossy Epson Premium Photo Paper Semi-gloss Epson Ultra Premium Photo Paper Glossy Ultra Glossy Epson Photo Paper Glossy Photo Paper Plain paper Plain Paper Epson Bright White Paper Epson Presentation Paper Matte Epson Premium Presentation Paper Matte Matte ❏ To change the paper size, select Paper Size and choose the size of paper you loaded. ❏ To change the layout, select Layout and choose one of settings shown on the screen. Note: Borderless expands the image all the way to the edge of the paper (slight cropping may occur; see Expansion below). ❏ To change the copy quality, select Quality and choose Standard, Draft, or Best. ❏ If you want to print a color photo in black and white or sepia tone, select Filter and select B&W or Sepia. ❏ For the best quality printing, select Enhance and choose PhotoEnhance.™ This automatically analyzes your photos and, if necessary, adjusts the brightness, contrast, and saturation. You can also choose None to turn off this adjustment, or P.I.M. to use your camera's PRINT Image Matching® or Exif Print adjustments. 12 5/07
-
 1
1 -
2
-
3
-
4
-
5
-
6
-
 7
7 -
 8
8 -
 9
9 -
 10
10 -
 11
11 -
 12
12 -
 13
13 -
 14
14 -
 15
15 -
 16
16
 |
 |