Epson RX595 Product Information Guide - Page 13
Printing From Other External Devices, Scanning to a Computer, Replacing an Ink Cartridge - stylus photo ink cartridges
 |
UPC - 010343866157
View all Epson RX595 manuals
Add to My Manuals
Save this manual to your list of manuals |
Page 13 highlights
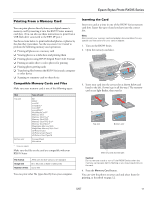
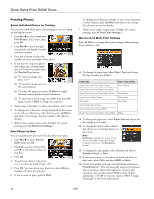
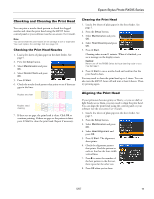
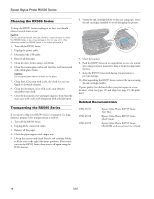
Epson Stylus Photo RX595 Series Note: PhotoEnhance uses a sophisticated face recognition technology to optimize photos that include faces. For this to work, both eyes and the nose must be visible in the subject's face. If your photo includes a face with an intentional color cast, such as a bronze statue, you may want to turn off PhotoEnhance to retain the special color effects. ❏ To remove the effects of red eyes in portraits, turn on Reduce Red Eye. (It's a good idea to use this feature on your camera too, if included with your model.) ❏ To adjust the Brightness, Contrast, Sharpness, or Saturation in your printed photos, select these options and select more or less of the effect. (Affects all photos you're printing.) ❏ To print the date on your photos and select the format for it, select Date and choose the format you want. (Affects all photos you're printing.) ❏ To print information about your camera's settings for the photo, turn on Print Info. (Affects all photos you're printing.) ❏ To automatically crop your photo to fit in your selected layout, turn on Fit Frame. Turn it off to leave a small white margin, if necessary. (Affects all photos you're printing.) ❏ To improve print quality but slow down printing, turn off Bidirectional (choose On for faster print speed). (Affects all photos you're printing.) ❏ To adjust the amount of image expansion when printing borderless photos, select Expansion and choose Standard, Min, or Mid. (Affects all photos you're printing.) Note: You may see white borders on your printed photo if you use the Min setting. Printing From Other External Devices If you have a digital camera that supports PictBridge printing, you can connect it to the RX595 Series and print your photos directly from the camera. Check your camera manual to see if it is compatible. You can print from an external storage device connected to the RX595 Series, such as a USB flash drive, or an external CD burner, Zip® drive, or magneto-optical drive. You can also copy files from your memory card to these devices. You can print photos wirelessly from Bluetooth-enabled devices, such as digital cameras, PDAs (Personal Digital Assistants), phones, and computers. To do this, you need to purchase the optional Bluetooth Photo Print Adapter (part number C12C824383), available from Epson. See the on-screen User's Guide for instructions on printing or transferring files from any of these devices. Scanning to a Computer You can use your RX595 Series to scan a photo or document and save it on your computer or other device. You can even restore and correct photographs as you scan. The Epson Scan software provides three scanning modes: ❏ Full Auto Mode scans quickly and easily using automatic settings. ❏ Home Mode previews your image and provides preset options for scanning. ❏ Professional Mode previews your image and provides a full array of tools. Note: For detailed scanning instructions, or instructions on scanning a photo or document to a memory card or USB storage device, see the onscreen User's Guide. Replacing an Ink Cartridge Your RX595 Series and its software will let you know when an ink cartridge is low or expended. If an ink cartridge is low or expended, you see a message on the RX595 Series display screen. If a cartridge is expended, you must replace it to be able to print. If a cartridge is low, you can continue printing until a cartridge needs replacement. Note: You cannot print or copy when an ink cartridge is expended even if the other cartridges are not expended. Replace any expended cartridges before printing or copying. When an installed ink cartridge is more than six months old, you may need to replace it if your printouts do not look their best, even after cleaning (see page 15) and aligning (see page 15) the print head. Checking the Ink Supply You can check the ink cartridge status anytime using the RX595 Series display screen. You can also check the status with your Windows® or Macintosh® software; see the on-screen User's Guide. 1. Press the Setup button. 2. Select Ink Levels and press OK. A cartridge marked with a ! is getting low on ink. Replace the cartridge, if necessary. 3. Press OK to exit. 5/07 13
-
 1
1 -
2
-
3
-
4
-
5
-
6
-
7
-
 8
8 -
 9
9 -
 10
10 -
 11
11 -
 12
12 -
 13
13 -
 14
14 -
 15
15 -
 16
16
 |
 |
