Epson RX595 Product Information Guide - Page 16
Cleaning the RX595 Series, Start Here, Quick Guide, User's Guide - stylus photo all in one printer
 |
UPC - 010343866157
View all Epson RX595 manuals
Add to My Manuals
Save this manual to your list of manuals |
Page 16 highlights
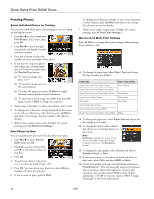
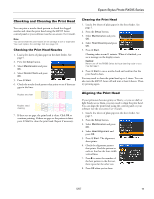
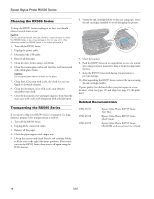
Epson Stylus Photo RX595 Series Cleaning the RX595 Series To keep the RX595 Series working at its best, you should clean it several times a year. Caution: Do not use a hard brush, benzine, alcohol, or paint thinner to clean the RX595 Series or you may damage it. Do not use oil or other lubricants inside the RX595 Series or let water get inside it. 1. Turn off the RX595 Series. 2. Unplug the power cable. 3. Disconnect the USB cable. 4. Remove all the paper. 5. Clean the sheet feeder using a soft brush. 6. Clean the scanner glass with a soft, lint-free cloth moistened with a little glass cleaner. Caution: Do not spray glass cleaner directly on the glass. 7. Clean the LCD screen with a soft, dry cloth. Do not use liquid or chemical cleansers. 8. Clean the document cover with a soft, non-abrasive microfiber-type cloth. 9. Close the document cover and paper support, then clean the outer case with a soft cloth dampened with mild detergent. Transporting the RX595 Series If you need to ship your RX595 Series or transport it a long distance, prepare it for transportation as follows: 1. Turn off the RX595 Series. 2. Unplug all the connected cables. 3. Remove all the paper. 4. Close the paper support and output tray. 5. Lift up the scanner and check that the ink cartridge holder is all the way to the right (the home position). If necessary, turn on the RX595 Series, then turn it off again using the P On button. 6. Fasten the ink cartridge holder to the case using tape. Leave the ink cartridges installed to avoid damaging the printer. 7. Close the scanner. 8. Pack the RX595 Series in its original box or one of a similar size using protective material to keep it from moving inside the box. 9. Keep the RX595 Series level during transportation to prevent damage. 10. After unpacking the RX595 Series, remove the tape securing the ink cartridge holder. If print quality has declined when you print again in a new location, clean (see page 15) and align (see page 15) the print head. Related Documentation CPD-23917 CPD-23918 CPD-23919 Epson Stylus Photo RX595 Series Start Here Epson Stylus Photo RX595 Series Quick Guide Epson Stylus Photo RX595 Series CD-ROM with on-screen User's Guide 16 5/07
-
 1
1 -
2
-
3
-
4
-
5
-
6
-
7
-
8
-
9
-
10
-
 11
11 -
 12
12 -
 13
13 -
 14
14 -
 15
15 -
 16
16
 |
 |