Epson SureColor T3000 User Manual - Page 204
Problem Solver, What to Do When a Message Is Displayed
 |
View all Epson SureColor T3000 manuals
Add to My Manuals
Save this manual to your list of manuals |
Page 204 highlights
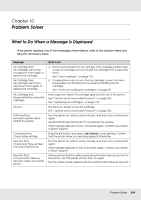
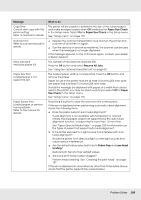
Chapter 10 Problem Solver What to Do When a Message Is Displayed If the printer displays one of the messages shown below, refer to the solution listed and take the necessary steps. Message Ink Cartridge Error Ink cartridge cannot be recognized. Insert again or replace ink cartridge. Ink Cartridge Error Ink cartridge cannot be detected. Insert again or replace ink cartridge. Ink Cartridge Error Please install the correct ink cartridge. Ink Low F/W Install Error Firmware update failed. Restart the printer. Command Error Check driver settings. Reel Unit Error Check Auto Take-up Reel Unit and restart printer. Reel Unit Error Connect Auto Take-up Reel Unit cable and restart printer. What to do O Remove and reinsert the ink cartridge. If the message persists, insert a new ink cartridge (do not reinstall the cartridge that caused the error). See "How to replace" on page 193. O Condensation may occur in the ink cartridge. Leave it at room temperature for at least four hours before installing the ink cartridge. See "Notes on handling ink cartridges" on page 25. Insert a genuine Epson ink cartridge approved for use in the printer. See "Options and Consumable Products" on page 222. See "Replacing Ink Cartridges" on page 193. The ink is low. Ready a new ink cartridge. See "Options and Consumable Products" on page 222. Turn the printer off, wait for a few minutes, and then turn on the printer again. Use EPSON LFP Remote Panel 2 to re-attempt the update. If this message appears on the LCD panel again, contact your dealer or Epson Support. Press the W button and select Job Cancel to stop printing. Confirm that the printer driver you are using supports this printer. Turn the printer off, wait for a few minutes, and then turn on the printer again. If this message appears on the LCD panel again, contact your dealer or Epson Support. After reconnecting the cable connecting the auto take-up reel unit to the printer, turn the printer off and then on again. See the Setup Guide supplied with the optional auto take-up reel unit. Problem Solver 204
-
 1
1 -
2
-
3
-
4
-
5
-
6
-
7
-
8
-
9
-
10
-
11
-
12
-
13
-
14
-
15
-
16
-
17
-
18
-
19
-
20
-
21
-
22
-
23
-
24
-
25
-
26
-
27
-
28
-
29
-
30
-
31
-
32
-
33
-
34
-
35
-
36
-
37
-
38
-
39
-
40
-
41
-
42
-
43
-
44
-
45
-
46
-
47
-
48
-
49
-
50
-
51
-
52
-
53
-
54
-
55
-
56
-
57
-
58
-
59
-
60
-
61
-
62
-
63
-
64
-
65
-
66
-
67
-
68
-
69
-
70
-
71
-
72
-
73
-
74
-
75
-
76
-
77
-
78
-
79
-
80
-
81
-
82
-
83
-
84
-
85
-
86
-
87
-
88
-
89
-
90
-
91
-
92
-
93
-
94
-
95
-
96
-
97
-
98
-
99
-
100
-
101
-
102
-
103
-
104
-
105
-
106
-
107
-
108
-
109
-
110
-
111
-
112
-
113
-
114
-
115
-
116
-
117
-
118
-
119
-
120
-
121
-
122
-
123
-
124
-
125
-
126
-
127
-
128
-
129
-
130
-
131
-
132
-
133
-
134
-
135
-
136
-
137
-
138
-
139
-
140
-
141
-
142
-
143
-
144
-
145
-
146
-
147
-
148
-
149
-
150
-
151
-
152
-
153
-
154
-
155
-
156
-
157
-
158
-
159
-
160
-
161
-
162
-
163
-
164
-
165
-
166
-
167
-
168
-
169
-
170
-
171
-
172
-
173
-
174
-
175
-
176
-
177
-
178
-
179
-
180
-
181
-
182
-
183
-
184
-
185
-
186
-
187
-
188
-
189
-
190
-
191
-
192
-
193
-
194
-
195
-
196
-
197
-
198
-
 199
199 -
 200
200 -
 201
201 -
 202
202 -
 203
203 -
 204
204 -
 205
205 -
 206
206 -
 207
207 -
 208
208 -
 209
209 -
210
-
211
-
212
-
213
-
214
-
215
-
216
-
217
-
218
-
219
-
220
-
221
-
222
-
223
-
224
-
225
-
226
-
227
-
228
-
229
-
230
-
231
-
232
-
233
-
234
-
235
-
236
-
237
-
238
-
239
-
240
-
241
-
242
-
243
-
244
-
245
-
246
-
247
-
248
-
249
-
250
-
251
 |
 |
