Epson WF-2630 Users Guide - Page 86
Cloud, Computer, Computer WSD, USB Connection, Color, Parent topic, Related tasks
 |
View all Epson WF-2630 manuals
Add to My Manuals
Save this manual to your list of manuals |
Page 86 highlights
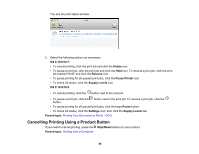
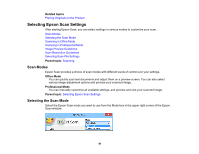
The scan options are displayed: 3. Press the up or down arrow buttons to select a scan option and press the OK button. • Cloud sends your scanned files to a destination that you have registered with Epson Connect. • Computer saves your scan as a JPEG file to your computer or as an image capture in OS X. • Computer (WSD) lets you manage network scanning in Windows 7 or Windows Vista (English only). Note: To use this feature, you must first set up WSD (Web Services for Devices) on the computer you want to scan to. 4. To scan to your computer, you first need to select how you connected your product to your computer: • If your product is connected directly to your computer with a USB cable, press the up or down arrow buttons to select USB Connection. • If your product is connected to your computer over a network, press the up or down arrow buttons to select the computer name from the list and press the OK button to begin scanning. 5. Press the Color button to start scanning. Changing Default Scan Button Settings Parent topic: Starting a Scan Related tasks Using Epson Scan to Cloud Related topics Placing Originals on the Product 86
-
 1
1 -
2
-
3
-
4
-
5
-
6
-
7
-
8
-
9
-
10
-
11
-
12
-
13
-
14
-
15
-
16
-
17
-
18
-
19
-
20
-
21
-
22
-
23
-
24
-
25
-
26
-
27
-
28
-
29
-
30
-
31
-
32
-
33
-
34
-
35
-
36
-
37
-
38
-
39
-
40
-
41
-
42
-
43
-
44
-
45
-
46
-
47
-
48
-
49
-
50
-
51
-
52
-
53
-
54
-
55
-
56
-
57
-
58
-
59
-
60
-
61
-
62
-
63
-
64
-
65
-
66
-
67
-
68
-
69
-
70
-
71
-
72
-
73
-
74
-
75
-
76
-
77
-
78
-
79
-
80
-
 81
81 -
 82
82 -
 83
83 -
 84
84 -
 85
85 -
 86
86 -
 87
87 -
 88
88 -
 89
89 -
 90
90 -
 91
91 -
92
-
93
-
94
-
95
-
96
-
97
-
98
-
99
-
100
-
101
-
102
-
103
-
104
-
105
-
106
-
107
-
108
-
109
-
110
-
111
-
112
-
113
-
114
-
115
-
116
-
117
-
118
-
119
-
120
-
121
-
122
-
123
-
124
-
125
-
126
-
127
-
128
-
129
-
130
-
131
-
132
-
133
-
134
-
135
-
136
-
137
-
138
-
139
-
140
-
141
-
142
-
143
-
144
-
145
-
146
-
147
-
148
-
149
-
150
-
151
-
152
-
153
-
154
-
155
-
156
-
157
-
158
-
159
-
160
-
161
-
162
-
163
-
164
-
165
-
166
-
167
-
168
-
169
-
170
-
171
-
172
-
173
-
174
-
175
-
176
-
177
-
178
-
179
-
180
-
181
-
182
-
183
-
184
-
185
-
186
-
187
-
188
-
189
-
190
-
191
-
192
-
193
-
194
-
195
-
196
-
197
-
198
-
199
-
200
-
201
-
202
-
203
-
204
-
205
-
206
-
207
-
208
-
209
-
210
-
211
-
212
-
213
-
214
-
215
-
216
-
217
-
218
-
219
-
220
-
221
-
222
-
223
-
224
-
225
-
226
-
227
-
228
-
229
-
230
-
231
-
232
-
233
-
234
-
235
-
236
-
237
-
238
-
239
-
240
-
241
-
242
-
243
-
244
-
245
-
246
-
247
-
248
-
249
-
250
-
251
-
252
-
253
-
254
-
255
-
256
 |
 |
