Epson WorkForce WF-2520 Quick Guide - Page 13
Scanning a Document or Photo, Quick Scanning With the Scan Button
 |
View all Epson WorkForce WF-2520 manuals
Add to My Manuals
Save this manual to your list of manuals |
Page 13 highlights
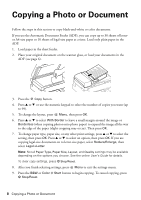
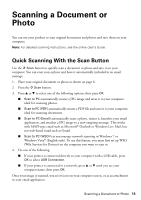
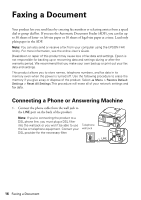
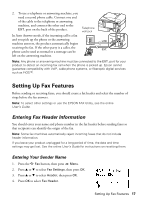
Scanning a Document or Photo You can use your product to scan original documents and photos and save them on your computer. Note: For detailed scanning instructions, see the online User's Guide. Quick Scanning With the Scan Button Use the u Scan button to quickly scan a document or photo and save it on your computer. You can even scan a photo and have it automatically included in an email message. 1. Place your original document or photo as shown on page 6. 2. Press the u Scan button. 3. Press u or d to select one of the following options, then press OK. ■ Scan to PC automatically creates a JPG image and saves it to your computer; ideal for scanning photos. ■ Scan to PC (PDF) automatically creates a PDF file and saves it to your computer; ideal for scanning documents. ■ Scan to PC (Email) automatically scans a photo, resizes it, launches your email application, and attaches a JPG image to a new outgoing message. This works with MAPI-type email such as Microsoft® Outlook or Windows Live Mail, but not web-based email such as Gmail. ■ Scan to PC (WSD) lets you manage network scanning in Windows 7 or Windows Vista® (English only). To use this feature, you must first set up WSD (Web Services for Devices) on the computer you want to scan to. 4. Do one of the following: ■ If your printer is connected directly to your computer with a USB cable, press OK to select USB Connection. ■ If your printer is connected to a network, press u or d until you see your computer name, then press OK. Once your image is scanned, you see its icon on your computer screen, or as an attachment in your email application. Scanning a Document or Photo 13
-
 1
1 -
2
-
3
-
4
-
5
-
6
-
7
-
 8
8 -
 9
9 -
 10
10 -
 11
11 -
 12
12 -
 13
13 -
 14
14 -
 15
15 -
 16
16 -
 17
17 -
 18
18 -
19
-
20
-
21
-
22
-
23
-
24
-
25
-
26
-
27
-
28
-
29
-
30
-
31
-
32
-
33
-
34
-
35
-
36
-
37
-
38
-
39
-
40
-
41
-
42
-
43
-
44
-
45
-
46
-
47
-
48
-
49
-
50
-
51
-
52
-
53
-
54
-
55
-
56
-
57
-
58
-
59
-
60
-
61
-
62
-
63
-
64
-
65
-
66
-
67
-
68
-
69
-
70
-
71
-
72
-
73
-
74
-
75
-
76
-
77
-
78
-
79
-
80
-
81
-
82
-
83
-
84
 |
 |