Epson WorkForce WF-2830 Users Guide - Page 143
Selecting the Line Type, If the Select Dial Tone Detection screen appears, select
 |
View all Epson WorkForce WF-2830 manuals
Add to My Manuals
Save this manual to your list of manuals |
Page 143 highlights
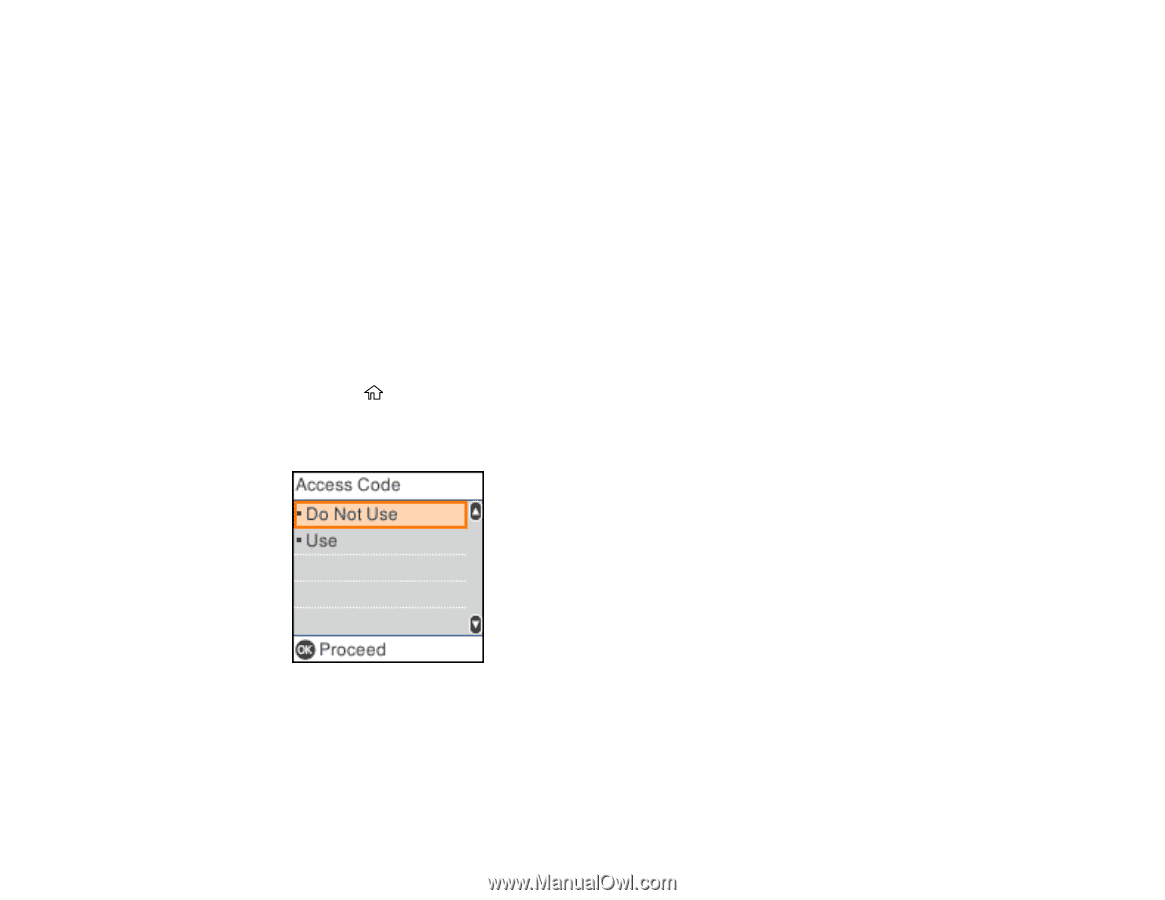
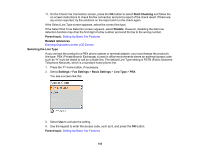
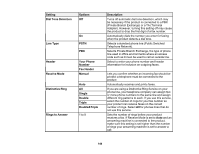
11. On the Check Fax Connection screen, press the OK button to select Start Checking and follow the on-screen instructions to check the fax connection and print a report of the check result. If there are any errors reported, try the solutions on the report and run the check again. If the Select Line Type screen appears, select the correct line type. If the Select Dial Tone Detection screen appears, select Disable. However, disabling the dial tone detection function may drop the first digit of a fax number and send the fax to the wrong number. Parent topic: Setting Up Basic Fax Features Related references Entering Characters on the LCD Screen Selecting the Line Type If you connect the product to a PBX phone system or terminal adapter, you must change the product's line type. PBX (Private Branch Exchange) is used in office environments where an external access code such as "9" must be dialed to call an outside line. The default Line Type setting is PSTN (Public Switched Telephone Network), which is a standard home phone line. 1. Press the home button, if necessary. 2. Select Settings > Fax Settings > Basic Settings > Line Type > PBX. You see a screen like this: 3. Select Use to activate the setting. 4. Use the keypad to enter the access code, such as 9, and press the OK button. Parent topic: Setting Up Basic Fax Features 143
-
 1
1 -
2
-
3
-
4
-
5
-
6
-
7
-
8
-
9
-
10
-
11
-
12
-
13
-
14
-
15
-
16
-
17
-
18
-
19
-
20
-
21
-
22
-
23
-
24
-
25
-
26
-
27
-
28
-
29
-
30
-
31
-
32
-
33
-
34
-
35
-
36
-
37
-
38
-
39
-
40
-
41
-
42
-
43
-
44
-
45
-
46
-
47
-
48
-
49
-
50
-
51
-
52
-
53
-
54
-
55
-
56
-
57
-
58
-
59
-
60
-
61
-
62
-
63
-
64
-
65
-
66
-
67
-
68
-
69
-
70
-
71
-
72
-
73
-
74
-
75
-
76
-
77
-
78
-
79
-
80
-
81
-
82
-
83
-
84
-
85
-
86
-
87
-
88
-
89
-
90
-
91
-
92
-
93
-
94
-
95
-
96
-
97
-
98
-
99
-
100
-
101
-
102
-
103
-
104
-
105
-
106
-
107
-
108
-
109
-
110
-
111
-
112
-
113
-
114
-
115
-
116
-
117
-
118
-
119
-
120
-
121
-
122
-
123
-
124
-
125
-
126
-
127
-
128
-
129
-
130
-
131
-
132
-
133
-
134
-
135
-
136
-
137
-
 138
138 -
 139
139 -
 140
140 -
 141
141 -
 142
142 -
 143
143 -
 144
144 -
 145
145 -
 146
146 -
 147
147 -
 148
148 -
149
-
150
-
151
-
152
-
153
-
154
-
155
-
156
-
157
-
158
-
159
-
160
-
161
-
162
-
163
-
164
-
165
-
166
-
167
-
168
-
169
-
170
-
171
-
172
-
173
-
174
-
175
-
176
-
177
-
178
-
179
-
180
-
181
-
182
-
183
-
184
-
185
-
186
-
187
-
188
-
189
-
190
-
191
-
192
-
193
-
194
-
195
-
196
-
197
-
198
-
199
-
200
-
201
-
202
-
203
-
204
-
205
-
206
-
207
-
208
-
209
-
210
-
211
-
212
-
213
-
214
-
215
-
216
-
217
-
218
-
219
-
220
-
221
-
222
-
223
-
224
-
225
-
226
-
227
-
228
-
229
-
230
-
231
-
232
-
233
-
234
-
235
-
236
-
237
-
238
-
239
-
240
-
241
-
242
-
243
-
244
-
245
-
246
-
247
-
248
-
249
-
250
-
251
-
252
-
253
-
254
-
255
-
256
-
257
-
258
-
259
-
260
-
261
-
262
-
263
-
264
-
265
-
266
-
267
-
268
-
269
-
270
-
271
-
272
-
273
-
274
-
275
-
276
-
277
-
278
-
279
-
280
-
281
-
282
-
283
-
284
-
285
-
286
-
287
-
288
-
289
-
290
-
291
-
292
-
293
-
294
 |
 |