Fisher and Paykel OR36SCG6W1 User Guide - Page 54
Burner parts, Replacing the semi-rapid burners
 |
View all Fisher and Paykel OR36SCG6W1 manuals
Add to My Manuals
Save this manual to your list of manuals |
Page 54 highlights
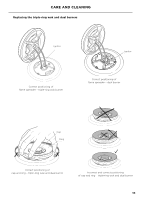
CARE AND CLEANING Burner parts yy You can remove and clean these parts with hot soapy water or non-abrasive detergents. Clean spills regularly before they become burnt on. Do not wash these parts in a dishwasher. yy After cleaning, check that the burners and their flame spreaders are dry before replacing correctly. yy It is very important to check that the burner flame spreader and the cap have been correctly positioned. Failure to do so can cause serious problems. yy Check that the ignitor is always clean to ensure trouble free sparking. It must be cleaned very carefully using a toothbrush and methylated spirits. yy Note: to avoid damage to the electronic ignition, do not try to light a burner without all burner parts in place. Replacing the burner parts yy Carefully replace the burner parts as per the following illustrations. yy Fit the flame spreader to the housing as shown below. Make sure the burner is not able to rotate. Check that: yy the ignitor is always clean to ensure trouble-free sparking yy the probe is always clean to ensure correct operation of the safety valves yy the flame spreaders are clean and the holes are not clogged Note: both the ignitor and probe must be very carefully cleaned using a toothbrush and methylated spirits. Replacing the semi-rapid burners CaCp Flame F spreader ISgnitor Correct positioning of semi-rapid burner parts 52 Replacing the semi-rapid burner caps
-
 1
1 -
2
-
3
-
4
-
5
-
6
-
7
-
8
-
9
-
10
-
11
-
12
-
13
-
14
-
15
-
16
-
17
-
18
-
19
-
20
-
21
-
22
-
23
-
24
-
25
-
26
-
27
-
28
-
29
-
30
-
31
-
32
-
33
-
34
-
35
-
36
-
37
-
38
-
39
-
40
-
41
-
42
-
43
-
44
-
45
-
46
-
47
-
48
-
 49
49 -
 50
50 -
 51
51 -
 52
52 -
 53
53 -
 54
54 -
 55
55 -
 56
56 -
 57
57 -
 58
58 -
 59
59 -
60
-
61
-
62
-
63
-
64
-
65
-
66
-
67
-
68
 |
 |
