Gateway P7805u 8513155 - Gateway FX Notebook Reference Guide with eRecovery R3 - Page 65
Getting help, Using an eSATA (external SATA) hard drive
 |
UPC - 884483424177
View all Gateway P7805u manuals
Add to My Manuals
Save this manual to your list of manuals |
Page 65 highlights
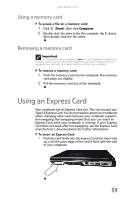
www.gateway.com To reset drives to non-RAID status: 1 Start (or restart) your notebook. During startup, the RAID option screen appears. 2 While the RAID option screen is open, press CTRL+I. The Matrix Storage Manager opens. 3 Highlight 3. Reset Disks to Non-RAID, then press ENTER. The Reset RAID Data menu opens. 4 Press ↑ or ↓ to highlight each of the drives you want to reset, press the spacebar to select (mark with a green triangle) each drive you want to reset, then press ENTER. A warning message appears. 5 Type Y to confirm the drive reset. Getting help For more information on RAID concepts, configuration, and maintenance, search for RAID FAQ information on the Gateway Technical Support Web site (www.gateway.com) and the Intel Support & Downloads Web site (support.intel.com). Using an eSATA (external SATA) hard drive To connect your eSATA hard drive to your notebook: 1 Turn off your notebook. 2 Connect one end of the eSATA cable to your external hard drive. 3 Connect the other end of the cable to the eSATA port on your notebook. 57
-
 1
1 -
2
-
3
-
4
-
5
-
6
-
7
-
8
-
9
-
10
-
11
-
12
-
13
-
14
-
15
-
16
-
17
-
18
-
19
-
20
-
21
-
22
-
23
-
24
-
25
-
26
-
27
-
28
-
29
-
30
-
31
-
32
-
33
-
34
-
35
-
36
-
37
-
38
-
39
-
40
-
41
-
42
-
43
-
44
-
45
-
46
-
47
-
48
-
49
-
50
-
51
-
52
-
53
-
54
-
55
-
56
-
57
-
58
-
59
-
 60
60 -
 61
61 -
 62
62 -
 63
63 -
 64
64 -
 65
65 -
 66
66 -
 67
67 -
 68
68 -
 69
69 -
 70
70 -
71
-
72
-
73
-
74
-
75
-
76
-
77
-
78
-
79
-
80
-
81
-
82
-
83
-
84
-
85
-
86
-
87
-
88
-
89
-
90
-
91
-
92
-
93
-
94
-
95
-
96
-
97
-
98
-
99
-
100
-
101
-
102
-
103
-
104
-
105
-
106
-
107
-
108
-
109
-
110
-
111
-
112
-
113
-
114
-
115
-
116
-
117
-
118
-
119
-
120
-
121
-
122
-
123
-
124
-
125
-
126
-
127
-
128
-
129
-
130
-
131
-
132
-
133
-
134
-
135
-
136
-
137
-
138
-
139
-
140
-
141
-
142
-
143
-
144
-
145
-
146
-
147
-
148
-
149
-
150
-
151
-
152
-
153
-
154
-
155
-
156
-
157
-
158
-
159
-
160
-
161
-
162
-
163
-
164
 |
 |
