Gateway P7805u 8513155 - Gateway FX Notebook Reference Guide with eRecovery R3 - Page 78
Recalibrating the battery - p bios
 |
UPC - 884483424177
View all Gateway P7805u manuals
Add to My Manuals
Save this manual to your list of manuals |
Page 78 highlights
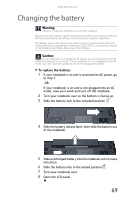
CHAPTER 5: Managing Power Recalibrating the battery Important Do not interrupt the battery recalibration process. If recalibration is interrupted, you must start the process over again. If your notebook unexpectedly goes into Sleep mode while you are using it but the battery charge is not low, you may need to recalibrate your battery. You should also recalibrate the battery periodically to maintain the accuracy of the battery gauge. To recalibrate the battery: 1 Connect your notebook to AC power and let the battery charge completely. 2 As soon as it starts and you see a startup screen, press F2. The BIOS Setup utility opens. 3 Open the Advanced menu. 4 Highlight Battery Auto Learning, then select Enabled by pressing the spacebar. 5 Open the Exit menu, highlight Exit Saving Changes, then press ENTER. 6 Select Yes, then press ENTER. The battery recalibration process begins and a screen opens showing you the progress. The entire process takes several hours. When the recalibration has finished, the message "Press [Esc] key to exit" appears. 7 Press ESC. The battery charge indicator now displays an accurate battery charge. Important If, after completing this procedure, the battery charge indicator still does not show an accurate charge, contact Gateway Customer Care at the location shown on the Customer Care label. For more information, see "Gateway contact information" on page 2. 70
-
 1
1 -
2
-
3
-
4
-
5
-
6
-
7
-
8
-
9
-
10
-
11
-
12
-
13
-
14
-
15
-
16
-
17
-
18
-
19
-
20
-
21
-
22
-
23
-
24
-
25
-
26
-
27
-
28
-
29
-
30
-
31
-
32
-
33
-
34
-
35
-
36
-
37
-
38
-
39
-
40
-
41
-
42
-
43
-
44
-
45
-
46
-
47
-
48
-
49
-
50
-
51
-
52
-
53
-
54
-
55
-
56
-
57
-
58
-
59
-
60
-
61
-
62
-
63
-
64
-
65
-
66
-
67
-
68
-
69
-
70
-
71
-
72
-
 73
73 -
 74
74 -
 75
75 -
 76
76 -
 77
77 -
 78
78 -
 79
79 -
 80
80 -
 81
81 -
 82
82 -
 83
83 -
84
-
85
-
86
-
87
-
88
-
89
-
90
-
91
-
92
-
93
-
94
-
95
-
96
-
97
-
98
-
99
-
100
-
101
-
102
-
103
-
104
-
105
-
106
-
107
-
108
-
109
-
110
-
111
-
112
-
113
-
114
-
115
-
116
-
117
-
118
-
119
-
120
-
121
-
122
-
123
-
124
-
125
-
126
-
127
-
128
-
129
-
130
-
131
-
132
-
133
-
134
-
135
-
136
-
137
-
138
-
139
-
140
-
141
-
142
-
143
-
144
-
145
-
146
-
147
-
148
-
149
-
150
-
151
-
152
-
153
-
154
-
155
-
156
-
157
-
158
-
159
-
160
-
161
-
162
-
163
-
164
 |
 |
