Gateway P7805u 8513155 - Gateway FX Notebook Reference Guide with eRecovery R3 - Page 82
Changing notebook power settings, Changing the power plan
 |
UPC - 884483424177
View all Gateway P7805u manuals
Add to My Manuals
Save this manual to your list of manuals |
Page 82 highlights
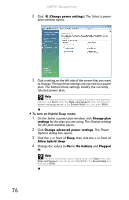
CHAPTER 5: Managing Power Changing notebook power settings You can change the function of your notebook's power button, Sleep system key, and power-saving timers by changing power settings on your notebook. You can customize power settings from the Windows Mobility Center by selecting power plans and adjusting advanced power settings. Changing the power plan Power plans (groups of power settings) let you change power saving options such as when the display or hard drive is automatically turned off. You can select one of the defined power plans or create a custom power plan. Three power plans are pre-defined for you: • Balanced - This is the default power plan which balances performance and battery life. • Power saver - This power plan sacrifices performance in order to extend battery life. Use this plan if you will be away from AC power outlets for an extended period of time. Your programs may run slower than you are accustomed to under the other two power plans. • High performance - This power plan sacrifices battery life in order to gain performance. Use this plan if you need additional computing power for your program. Your battery may not last as long as you are accustomed to under the other two power plans. To change the power plan: 1 Click (Start), All Programs, Accessories, then click Windows Mobility Center. The Windows Mobility Center window opens. 74
-
 1
1 -
2
-
3
-
4
-
5
-
6
-
7
-
8
-
9
-
10
-
11
-
12
-
13
-
14
-
15
-
16
-
17
-
18
-
19
-
20
-
21
-
22
-
23
-
24
-
25
-
26
-
27
-
28
-
29
-
30
-
31
-
32
-
33
-
34
-
35
-
36
-
37
-
38
-
39
-
40
-
41
-
42
-
43
-
44
-
45
-
46
-
47
-
48
-
49
-
50
-
51
-
52
-
53
-
54
-
55
-
56
-
57
-
58
-
59
-
60
-
61
-
62
-
63
-
64
-
65
-
66
-
67
-
68
-
69
-
70
-
71
-
72
-
73
-
74
-
75
-
76
-
 77
77 -
 78
78 -
 79
79 -
 80
80 -
 81
81 -
 82
82 -
 83
83 -
 84
84 -
 85
85 -
 86
86 -
 87
87 -
88
-
89
-
90
-
91
-
92
-
93
-
94
-
95
-
96
-
97
-
98
-
99
-
100
-
101
-
102
-
103
-
104
-
105
-
106
-
107
-
108
-
109
-
110
-
111
-
112
-
113
-
114
-
115
-
116
-
117
-
118
-
119
-
120
-
121
-
122
-
123
-
124
-
125
-
126
-
127
-
128
-
129
-
130
-
131
-
132
-
133
-
134
-
135
-
136
-
137
-
138
-
139
-
140
-
141
-
142
-
143
-
144
-
145
-
146
-
147
-
148
-
149
-
150
-
151
-
152
-
153
-
154
-
155
-
156
-
157
-
158
-
159
-
160
-
161
-
162
-
163
-
164
 |
 |
