GE NX-148E User Manual - Page 17
Assigning User Code Authority Levels - change master code
 |
UPC - 782136404340
View all GE NX-148E manuals
Add to My Manuals
Save this manual to your list of manuals |
Page 17 highlights
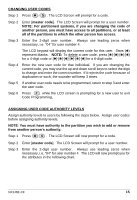
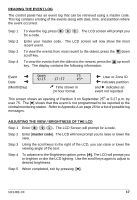
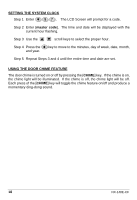
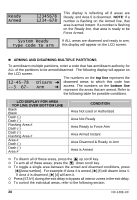
CHANGING USER CODES Step 1 Press r 5 . The LCD Screen will prompt for a code. Step 2 Enter [master code]. The LCD Screen will prompt for a user number. NOTE: For partitioned systems, if you are changing the code of another person, you must have access to all partitions, or at least all of the partitions to which the other person has access. Step 3 Enter the 2-digit user number. Always use leading zeros when necessary, i.e. "04" for user number 4. The LCD keypad will display the current code for this user. Stars (r) represent blanks. NOTE: To delete a user code, press [r]-[r]-[r]-[r] for a 4-digit code or [r]-[r]-[r]-[r]-[r]-[r] for a 6-digit code. Step 4 Enter the new user code for that individual. If you are changing the current code, you may use the up and down scroll keys to select the digit to change and enter the correct number. If it rejects the code because of duplication or such, the sounder will beep 3 times. Step 5 If another user code needs to be programmed, return to step 3 and enter the user code. Step 6 Press # while the LCD screen is prompting for a new user to exit Code Programming, ASSIGNING USER CODE AUTHORITY LEVELS Assign authority levels to users by following the steps below. Assign user codes before assigning authority levels. NOTE: You must have authority to the partition you wish to add or remove from another person's authority. Step 1 Press r 6 . The LCD Screen will now prompt for a code. Step 2 Enter [master code]. The LCD Screen will prompt for a user number. Step 3 Enter the 2-digit user number. Always use leading zeros when necessary, i.e. "04" for user number 4. The LCD will now prompt you for the attributes in the following chart. NX148E-CF 15
-
 1
1 -
2
-
3
-
4
-
5
-
6
-
7
-
8
-
9
-
10
-
11
-
 12
12 -
 13
13 -
 14
14 -
 15
15 -
 16
16 -
 17
17 -
 18
18 -
 19
19 -
 20
20 -
 21
21 -
 22
22 -
23
-
24
-
25
-
26
-
27
-
28
-
29
-
30
-
31
-
32
 |
 |