GE NX-148E User Manual - Page 22
Ready, Armed, System Ready, Type code to arm, Disarm
 |
UPC - 782136404340
View all GE NX-148E manuals
Add to My Manuals
Save this manual to your list of manuals |
Page 22 highlights
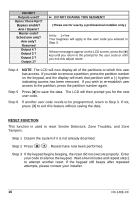
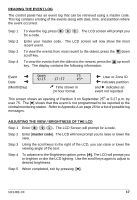
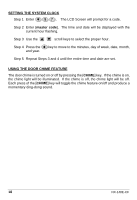
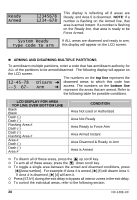
Ready Armed 12345678 1234-678 This display is reflecting all 8 areas are Ready, and Area 5 is disarmed. NOTE: If a number is flashing on the Armed line, that area is armed Instant. If a number is flashing on the Ready line, that area is ready to be Force Armed. System Ready Type code to arm If ALL areas are disarmed and ready to arm, this display will appear on the LCD screen. ARMING AND DISARMING MULTIPLE PARTITIONS To arm/disarm multiple partitions, enter a code that has arm/disarm authority for ALL of the partitions to be armed/disarmed. The following display will appear on the LCD screen. The numbers on the top line represent the 12-45-78 --3 67- Disarm º disarmed areas to which this code has Arm º access. The numbers on the bottom line represent the areas that are armed. Refer to the following table for possible conditions. LCD DISPLAY FOR AREA TOP LINE OVER BOTTOM LINE Blank Blank Dash (-) Dash (-) Flashing Area # Dash (-) Dash (-) Flashing Area # Area # Dash (-) Dash (-) Area # CONDITION Area Not used or Authorized Area Not Ready Area Ready to Force Arm Area Armed Instant Area Disarmed & Ready to Arm Area is Armed To disarm all of these areas, press the • up scroll key. To arm all of these areas, press the - down scroll key. To toggle a single area between the armed and disarmed conditions, press [r][Area number]. For example: If Area 4 is armed, [r] [4] will disarm Area 4. If Area 4 is disarmed, [r] [4] will arm it. Press [STAY] during the exit delay to bypass all interior zones in the exit delay. To control the individual areas, refer to the following section. 20 NX-148E-CF
-
 1
1 -
2
-
3
-
4
-
5
-
6
-
7
-
8
-
9
-
10
-
11
-
12
-
13
-
14
-
15
-
16
-
 17
17 -
 18
18 -
 19
19 -
 20
20 -
 21
21 -
 22
22 -
 23
23 -
 24
24 -
 25
25 -
 26
26 -
 27
27 -
28
-
29
-
30
-
31
-
32
 |
 |