Genie Excelerator Owner's Manual - Page 20
Installation Step 9 - power head assembly
 |
View all Genie Excelerator manuals
Add to My Manuals
Save this manual to your list of manuals |
Page 20 highlights
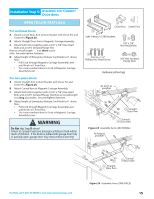
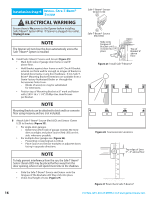
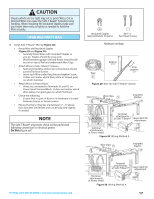
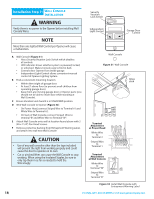
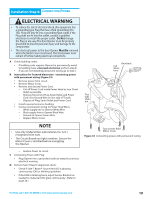
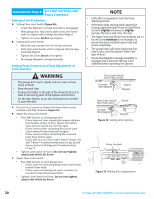
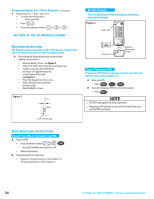
Installation SteCpH9: SET LIMIT SWITCHES AND FORCE CONTROLS Setting of Limit Switches A Setting Close Limit Switch (Figure 34): • Check that Magnetic Carriage Assembly is disengaged. • With garage door fully closed, slide Close Limit Switch until it is aligned with Carriage Assembly Magnet. • Tighten Set Screw. Do Not over-tighten. B Setting Open Limit Switch: • Manually open garage door to full open position. • Slide Open Limit Switch until it is aligned with Carriage Assembly Magnet. • Tighten Set Screw. Do not over-tighten. • Re-engage Magnetic Carriage Assembly. Setting Force Controls and Final Adjustment of Limit Switches WARNING • The garage door opens rapidly, and can cause serious injury or death. • Keep the path clear. • Position the ladder to the side of the Power Head so it is clear of all moving parts of the Opener and the door. • Set the door Opener to use the minimum force needed to open the door. A Pre-set Force Controls to midpoint between fully counter clockwise and fully clockwise (Figure 35). B Adjust the Close Limit Switch: • Press Wall Console to close garage door. - If door does not close completely, measure distance from bottom of door to floor. Move Limit Switch same amount toward door and try again. - If door reverses after contacting floor, move Limit Switch toward Power Head and try again. - If door reverses before contacting floor, increase Close force and try again. - If door fails to move, check Safe-T-Beam® System. See Safe-T-Beam® Troubleshooting Guide on pg. 26, and Opener System Self-diagnostic Troubleshooting on pg. 27. • Tighten Limit Switch Set Screw. Do not over-tighten (strip) Limit Switch Set Screw. C Adjust Open Limit Switch: • Press Wall Console to open garage door. - If door does not open completely, move Limit Switch toward Power Head. - If door opens completely, but motor continues to run, move Limit Switch toward door. • Tighten Limit Switch Set Screw. Do not over-tighten (strip) Limit Switch Set Screw. NOTE • Little effort is required to turn the Force Adjusting Knobs. • If the door stops moving while opening or closing, adjust the Open Force or Close Force Controls slightly clockwise (to slightly increase the force) and retry the step. • The Open Force and Close Force Controls are to be set to the minimum force necessary to ensure the door smoothly opens fully and closes completely. • The garage door will move slowly the first time it runs, until the Opener "learns" the type of door. • Ensure the Magnetic Carriage Assembly is engaged and is between the two Limit Switches before operating the Opener. Close Limit Switch (door fully closed) Carriage (disengaged) Switch Magnet Open Limit Switch Switch (door fully open) Carriage (disengaged) Magnet Figure 34 Setting Limit Switches Force Controls HI LO HI LO OPEN CLOSE FORCE FORCE Figure 35 Making Force Adjustments 20 For Help, call 1-800-35-GENIE or visit www.geniecompany.com
-
 1
1 -
2
-
3
-
4
-
5
-
6
-
7
-
8
-
9
-
10
-
11
-
12
-
13
-
14
-
 15
15 -
 16
16 -
 17
17 -
 18
18 -
 19
19 -
 20
20 -
 21
21 -
 22
22 -
 23
23 -
 24
24 -
 25
25 -
26
-
27
-
28
-
29
-
30
-
31
-
32
 |
 |
