Genie Excelerator Owner's Manual - Page 25
Fcc And Ic Certified - motor drive board
 |
View all Genie Excelerator manuals
Add to My Manuals
Save this manual to your list of manuals |
Page 25 highlights
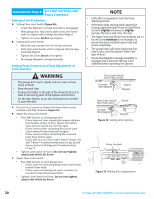
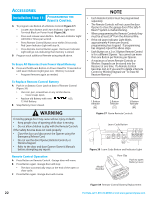
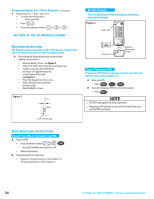
Installation Step 13: INSTALL LIGHT BULBS AND LENS Snap Lens Hinges into slots on back of Motor Cover MAINTENANCE A Monthly: • Door springs and door hardware: - Oil door roller, bearings, and hinges using silicone lubricant or light oil. WARNING 60 Watts maximum Lens 1A Push in Latches to close Lens Figure 41 Install Lens Cover and Light Bulbs A Install two 60 Watt light bulbs (not included) into Light Sockets (Figure 41): • Rough service, 130 Volt bulbs are recommended. B Install Lens into slots in Motor Cover. C Install Genie Emergency Release Kit (GER-2) accessory, if purchased. D Installation is now complete. Transmitter Compliance Statement Do not operate door automatically or manually if springs are broken. Contact a Genie Factory Authorized Dealer for service or call Customer Service at 1-800-35-GENIE. • Balance Door. - Close door. - Release Magnetic Carriage Assembly from Rail Assembly by pulling down on Emergency Release Knob. - Raise door manually 3'- 4' and verify that door stays at that position. See Check Step 2 on page 3. NOTE When the door is 3' - 4' above the ground, the door should stay open. Slight movement is acceptable. If the door moves too much, contact a Genie Factory Authorized Dealer for service or call Customer Service at 1-800-35-GENIE. - Reattach Magnetic Carriage Assembly to Rail Assembly: a. Pull the Emergency Release Knob toward Power Head. b. Close door. • Contact Reverse Test. - Perform Installation Step 10 on page 21. WARNING If the door fails to reverse on contact with the board, adjust the Close Force Control as specified in Set Limit Switches and Force Controls on page 20. If the Opener still fails, contact a Genie Factory Authorized Dealer for service or call Customer Service at 1-800-35-GENIE. B Yearly: • Wipe off old excess lubricant from Drive Screw. • Lubricate Drive Screw with Genie Lubricant (GLU-3) NOTE Use ONLY Genie Lubricant (GLU-3). Other lubricants may damage the Opener. GLU-3 Lubricant SDcoroerwOPDaprrteiNvnoee. GrGLLUa-ur3abgreicant FCC AND IC CERTIFIED All devices comply with Part 15 of the FCC Rules. Operation is subject to the following two conditions: (1) this device may not cause harmful interference, and (2) this device must accept any interference received, including interference that may cause undesired operation. For Help, call 1-800-35-GENIE or visit www.geniecompany.com 25
-
 1
1 -
2
-
3
-
4
-
5
-
6
-
7
-
8
-
9
-
10
-
11
-
12
-
13
-
14
-
15
-
16
-
17
-
18
-
19
-
 20
20 -
 21
21 -
 22
22 -
 23
23 -
 24
24 -
 25
25 -
 26
26 -
 27
27 -
 28
28 -
 29
29 -
 30
30 -
31
-
32
 |
 |