Gigabyte g-Smart User Manual - GSmart English Version - Page 59
Searching Contacts, View and Update New Contacts
 |
View all Gigabyte g-Smart manuals
Add to My Manuals
Save this manual to your list of manuals |
Page 59 highlights
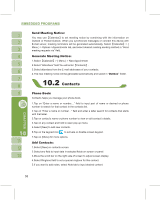
6.Tap " OK " to save and return to contacts. To save a contact from phone to SIM, tap on that contact in the contacts list and then select "Save to SIM" in { Menu }. Searching Contacts: There are four contact search methods provided in this system. ˙Input the contact's name or phone number in input field, and then the contacts list will show the information of this contact.If you want to clear text entered, press key on screen keypad to clear. ˙Select { Menu } > { Filter } and select the way to display contacts, by which your contacts list will only display contacts in this category. ˙If you want to view the contacts by companies,select { Menu } > { View By } > { Company }, then the contacts list will display in the order of companies.The number of contacts in each company will show on the right hand side of company name. ˙To search for a contact, select " Start " >ʲProgramsʳ>ʲSearchʳ. Enter the name of the contact in " Search " field and select " Contacts " in " Type " field.Tap on Search to start searching. View and Update New Contacts: Select a contact in the contact list to view contact summary screen.To edit a contact's details, select { Menu } > { Edit } on contact summary screen. You may useʲTasksʳto help you track unfinished tasks. 1.To add a new task, tap on "Tap here to add a new task". 2." ! " Represent first priority. 3.Select a single item to enter the details screen of this time. 4.Select a single item and hold to activate the pop-up menu. 5.Tap on { New } to add tasks. 6.You may change the arrangement of the tasks list. On " Tasks " screen, select { Menu } > { Sort By }. 7.You may choose to display a specific task category in your tasks list. Select { Menu } > { Filter }. 59
-
 1
1 -
2
-
3
-
4
-
5
-
6
-
7
-
8
-
9
-
10
-
11
-
12
-
13
-
14
-
15
-
16
-
17
-
18
-
19
-
20
-
21
-
22
-
23
-
24
-
25
-
26
-
27
-
28
-
29
-
30
-
31
-
32
-
33
-
34
-
35
-
36
-
37
-
38
-
39
-
40
-
41
-
42
-
43
-
44
-
45
-
46
-
47
-
48
-
49
-
50
-
51
-
52
-
53
-
 54
54 -
 55
55 -
 56
56 -
 57
57 -
 58
58 -
 59
59 -
 60
60 -
 61
61 -
 62
62 -
 63
63 -
 64
64 -
65
-
66
-
67
-
68
-
69
-
70
-
71
-
72
-
73
-
74
-
75
 |
 |
