Hamilton Beach HBS1200 Operation Manual - Page 5
Preparation - ice shaver
 |
UPC - 040094908394
View all Hamilton Beach HBS1200 manuals
Add to My Manuals
Save this manual to your list of manuals |
Page 5 highlights
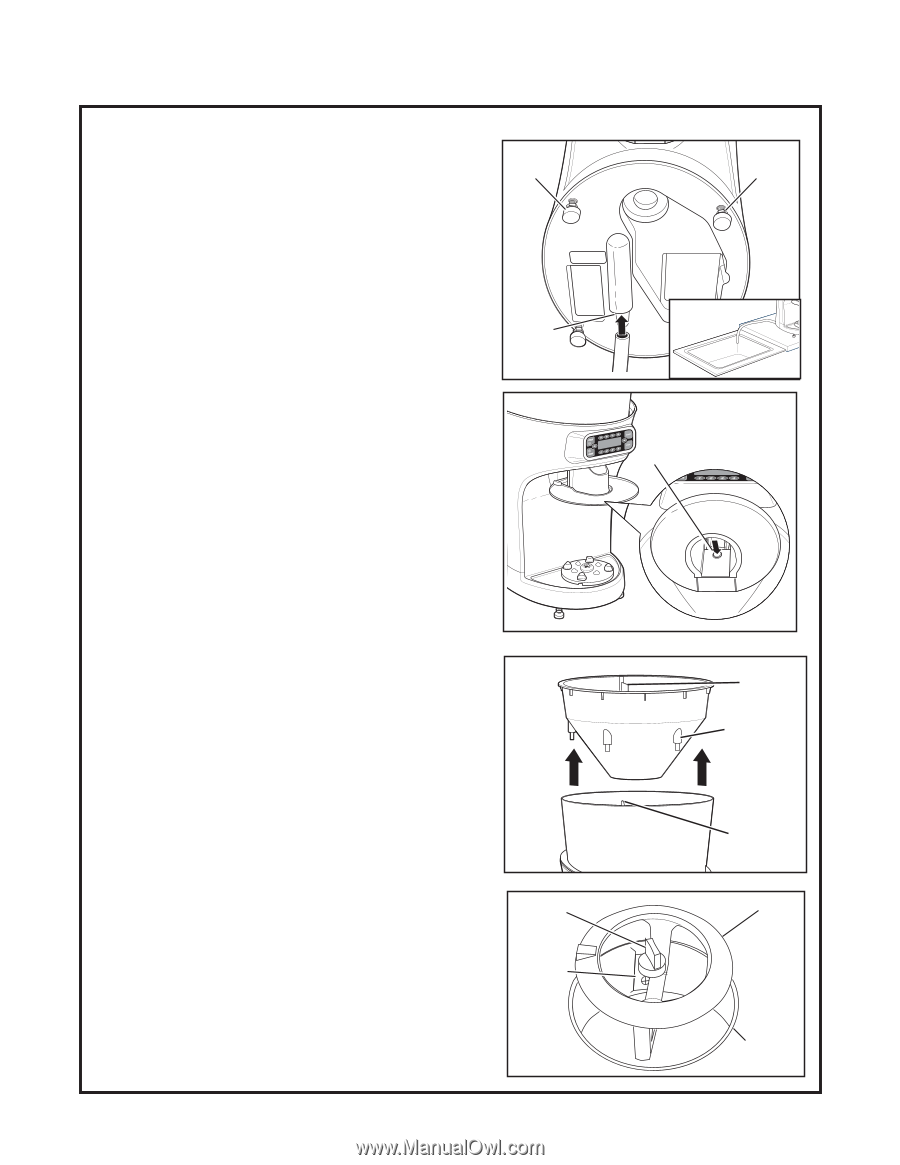
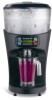
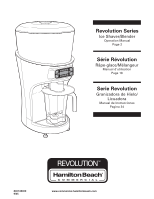
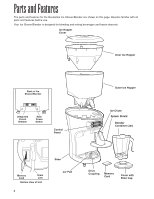
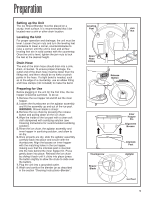
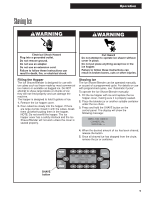
Preparation Setting up the Unit The Ice Shaver/Blender must be placed on a sturdy, level surface. It is recommended that it be located near a sink or other drain location. Leveling the Unit For proper operation and drainage, the unit must be level. Loosen the jam nuts and turn the leveling feet (clockwise to lower a corner, counterclockwise to raise a corner) until the unit is level and all four leveling feet are in solid contact with the countertop. Once the unit is level, tighten the jam nuts to lock the feet at the desired height. Drain Hose The end of the drain hose should drain into a sink, drain, or bucket. To ensure proper drainage, the outlet end of the drain hose must be lower than the fitting end, and there should be no kinks or pinch points in the hose. If a tight bend is needed, such as at the edge of a countertop, use an elbow fitting and hose clamps (not included) to make the bend. Preparing for Use Before plugging in the unit for the first time, the ice hopper should be sanitized. To do so: 1. Remove the ice hopper lid and lift out the inner hopper. 2. Loosen the thumbscrew on the agitator assembly and lift the assembly up and out of the ice pool. WARNING: Shaver blade is sharp! 3. Remove the ice chute by pressing the release button and pulling down on the ice chute. 4. Wipe the inside of the ice pool with a clean soft cloth dampened with sanitizing solution (see Cleaning Instructions for recommended sanitizing solution). 5. Rinse the ice chute, the agitator assembly and inner hopper in sanitizing solution, and allow to air dry. 6. Once all parts are dry, slide the agitator assembly carefully back into place and secure with the thumbscrew. Align the bosses on inner hopper with the matching holes in the ice hopper, making sure that the interlock post is inserted into the hole behind the inner hopper fin. Press gently down into place. Reinstall the ice chute by sliding it back until it clicks into place (press the button slightly to allow the chute to slide over the button). 7. Plug the unit into a grounded outlet. 8. Wash and sanitize the blender jar as described in the section "Cleaning Instructions-Blender". Leveling Feet Jam Nut Drain Hose Fitting Release Button Thumbscrew Shaver Blade Inner Hopper Fin Alignment Bosses Interlock Post Agitator Ice Pool 5
-
 1
1 -
 2
2 -
 3
3 -
 4
4 -
 5
5 -
 6
6 -
 7
7 -
 8
8 -
 9
9 -
 10
10 -
 11
11 -
12
-
13
-
14
-
15
-
16
-
17
-
18
-
19
-
20
-
21
-
22
-
23
-
24
-
25
-
26
-
27
-
28
-
29
-
30
-
31
-
32
-
33
-
34
-
35
-
36
-
37
-
38
-
39
-
40
-
41
-
42
-
43
-
44
-
45
-
46
-
47
-
48
 |
 |