Hamilton Beach HBS1200 Operation Manual - Page 8
Using Automatic Cycles - container
 |
UPC - 040094908394
View all Hamilton Beach HBS1200 manuals
Add to My Manuals
Save this manual to your list of manuals |
Page 8 highlights
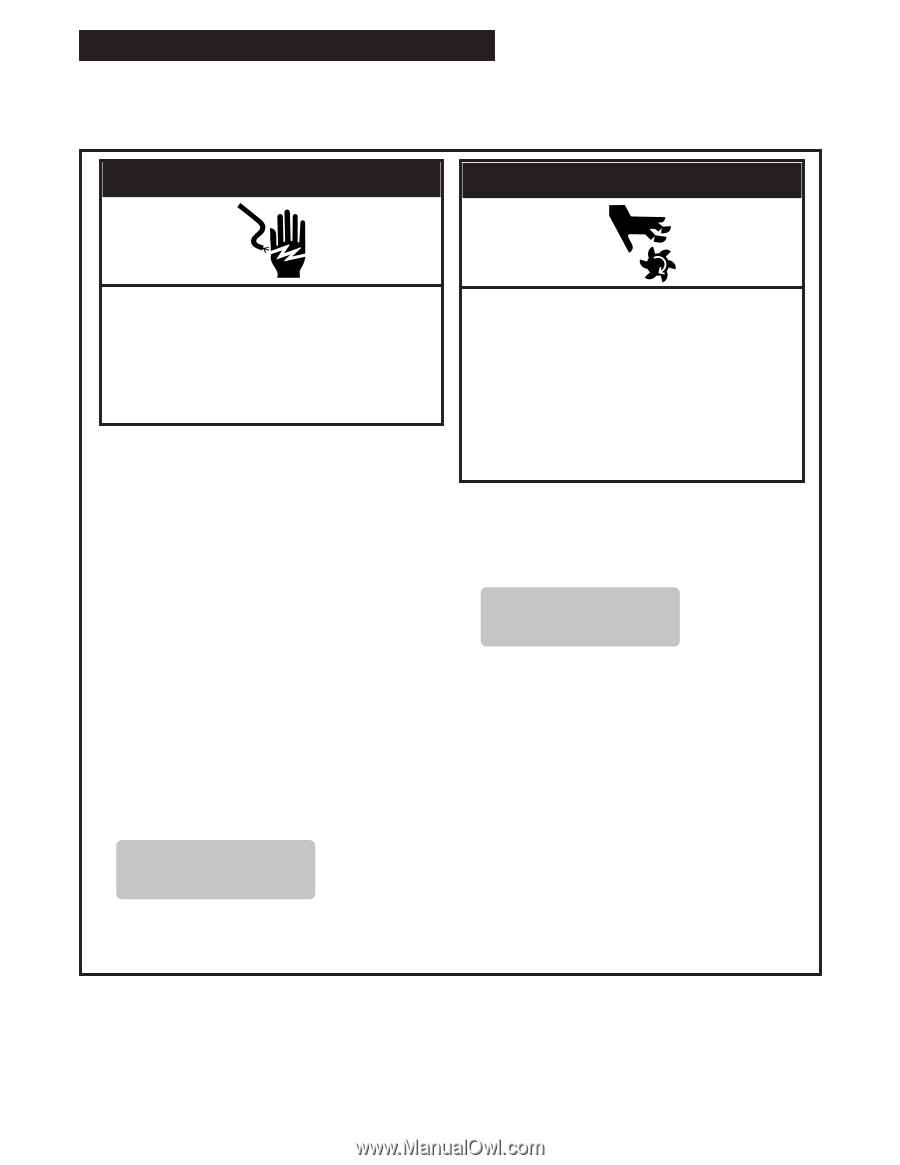
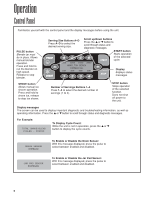
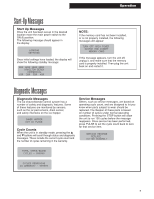
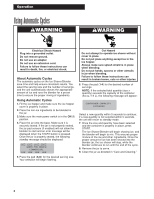
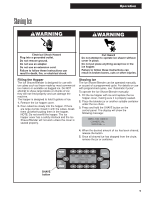
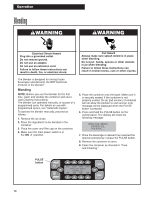
Operation Using Automatic Cycles wWARNING wWARNING Electrical Shock Hazard Plug into a grounded outlet. Do not remove ground. Do not use an adapter. Do not use an extension cord. Failure to follow these instructions can result in death, fire, or electrical shock. About Automatic Cycles The automatic cycles on the Ice Shaver/Blender save time and help ensure consistent results. You select the serving size and the number of servings, and the unit automatically shaves the appropriate amount of ice and runs the blender for a preset time to ensure the proper mixing of ingredients. Using Automatic Cycles 1. Fill the ice hopper and make sure the ice hopper cover is properly in place. 2. Place the non-ice ingredients to be blended in the jar. 3. Make sure the main power switch is in the ON (I) position. 4. Place the jar onto the base. Make sure it is securely seated. If the jar is not properly seated, the jar pad sensors (if enabled) will not allow the blender to start and an error message will be displayed when the START button is pressed. Once the jar is properly seated, the following standby message should be displayed: 8OZ 12OZ 16OZ 20OZ HAMILTON BEACH COMMERCIAL 1DR 2DR 3DR 4DR 5. Press the pad (A-D) for the desired serving size. Your selection will begin flashing. Cut Hazard Do not attempt to operate ice shaver without cover in place. Do not put place anything except ice in the ice hopper. Always make sure splash shield is in place when blending. Do not put hands, spoons or other utensils in jar when blending. Failure to follow these instructions can result in broken bones, cuts or other injuries. 6. Press the pad (1-4) for the desired number of servings. NOTE: If the selected total quantity (size x quantity) exceeds the capacity of the container (64 oz./1.9 L), the following message will appear: CONTAINER CAPACITY EXCEEDED Select a new quantity within 5 seconds to continue; if a new quantity is not selected within 5 seconds, the unit will return to standby mode. 7. Once the size and quantity have been selected and the container is properly in place, press START. The Ice Shaver/Blender will begin shaving ice, and the blender will begin to mix. This ensures proper mixture of the ice and other ingredients. Once the proper amount of ice has been shaved into the blender jar, the ice shaver will stop, while the blender continues to run until the end of the cycle. 8. Remove the jar to serve. 9. Clean the jar as directed in "Care and Cleaning." 8
-
 1
1 -
2
-
 3
3 -
 4
4 -
 5
5 -
 6
6 -
 7
7 -
 8
8 -
 9
9 -
 10
10 -
 11
11 -
 12
12 -
 13
13 -
14
-
15
-
16
-
17
-
18
-
19
-
20
-
21
-
22
-
23
-
24
-
25
-
26
-
27
-
28
-
29
-
30
-
31
-
32
-
33
-
34
-
35
-
36
-
37
-
38
-
39
-
40
-
41
-
42
-
43
-
44
-
45
-
46
-
47
-
48
 |
 |