Harman Kardon AVR85 Owners Manual - Page 23
Surround Right, Surround Left
 |
View all Harman Kardon AVR85 manuals
Add to My Manuals
Save this manual to your list of manuals |
Page 23 highlights
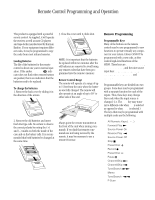
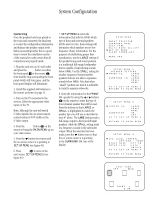
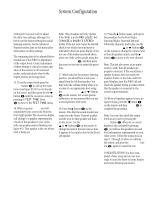
System Configuration 20 At this point you may wish to adjust the delay time settings, although it is best to use the factory settings for initial listening sessions. See the Advanced Features section later in this manual for information on delay settings. The remaining item to be adjusted before normal use of the AVR85 is adjustment of the output levels. Correct adjustment of these settings is critical to proper operation of the receiver in all surround modes, and particularly when Dolby Digital sources are being played. 15. To set the output levels press the Select button j to call up the main menu (see figure #1)if it is not already on the screen, and then press the the ¤ button i until the on-screen cursor is pointing to TEST TONE. Press Select j to move to the TEST TONE menu. 16. When you press Select you will immediately hear a test noise from the front right speaker. The on-screen display will change to a graphic representation of each of the speakers in your room, with one speaker position blinking (see figure #5). That speaker is the one whose level is being set. Note: This procedure will only operate if the AVR85 is in the PRO LOGIC, AC3, MOVIE or DOLBY 3 STEREO modes. If the test tone cannot be selected, check to see which surround mode is indicated in the front panel display. If it is not one of the modes mentioned above, select one of the correct modes using the Mode Selectors y, and then move the cursor to test tone to restart the procedure. 17. While seated in the primary listening position, you should hear a test noise signal from the left front speaker. You may leave the volume setting where it is, or raise it to an appropriate level using the Speaker Adjust ⁄ or ¤ buttons n on the remote. For a more precise calibration, we recommend that you use a sound pressure level meter. 18. Press the › button i on the remote. Note that the sound should now come from the Center Channel speaker, and the icon for that speaker will flash on the screen. Use the Speaker Adjust ⁄ or ¤ buttons n on the remote to change the level of the test noise so that it appears to be equal in level to the Front Left speaker. 19. Press the › button again, and repeat the procedure for the Front Right, Surround Right, Surround Left and Subwoofer channels. Each time, use the Speaker Adjust ⁄ or ¤ buttons n on the remote to change the volume level so that all speakers match, and the › button i to move to the next channel. Note: This test also serves as an opportunity to verify that all speakers are properly connected. If the sound from a speaker location does not match the location shown on the video and front panel displays, turn the AVR85 off and check the speaker wiring to make certain that the speaker is connected to the correct output terminals. 20. When all speakers appear to have an equal volume, press the ‹ button i on the remote and then Select j to complete the procedure. Note: You may also check the output levels at any time by pressing the Test Tone button l. When the on-screen display is also activated by pressing OSD k, you will see the speaker icons and level information superimposed on your video screen. Follow the instructions in steps 17 through 19 above to calibrate the system, and press the Test Tone button l again to cancel the test. CONGRATULATIONS! You have completed a basic setup and you are now ready to enjoy the finest in home theater and music listening enjoyment.
-
 1
1 -
2
-
3
-
4
-
5
-
6
-
7
-
8
-
9
-
10
-
11
-
12
-
13
-
14
-
15
-
16
-
17
-
 18
18 -
 19
19 -
 20
20 -
 21
21 -
 22
22 -
 23
23 -
 24
24 -
 25
25 -
 26
26 -
 27
27 -
 28
28 -
29
-
30
-
31
-
32
-
33
-
34
-
35
-
36
-
37
-
38
-
39
-
40
 |
 |
