HP 2500 HP Color LaserJet 2500 series - User Guide - Page 17
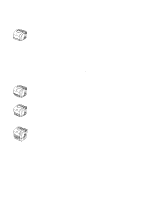
Control panel features, Understanding Supplies Status - only prints yellow
 |
View all HP 2500 manuals
Add to My Manuals
Save this manual to your list of manuals |
Page 17 highlights
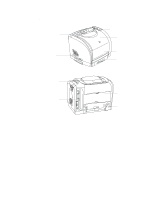
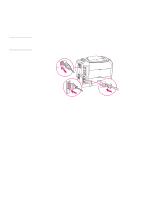
Supplies Status lights and buttons Printer Status lights and buttons Control panel features The printer contains the following lights and buttons on its control panel: Black print-cartridge light Cyan print-cartridge light Magenta print-cartridge light Yellow print-cartridge light ROTATE CAROUSEL button Imaging-drum light CANCEL JOB button Attention light (amber) Ready light (green) Go light and GO button (both green) The lights and buttons are arranged into two main groups: Supplies Status (top) and Printer Status (bottom). To interpret and troubleshoot control panel light messages, see "Resolving control panel messages" on page 71. Understanding Supplies Status The printer contains five lights and one button to indicate and control the status of the print cartridges and imaging drum. To interpret and troubleshoot control panel light messages, see "Resolving control panel messages" on page 71. Black, Cyan, Magenta, and Yellow Supplies Status lights These lights indicate when a print cartridge is low (light is on), empty or missing (light blinks), or the first time you install a non-HP print cartridge (light blinks and Attention light is on). These lights will not indicate low or empty status for non-HP print cartridges. Rotate Carousel button When the top cover is closed, pressing (ROTATE CAROUSEL) rotates the print-cartridge carousel to bring the next print cartridge into the top position. The light for the print cartridge that is approaching the top position blinks quickly two or three times. Imaging drum light This light indicates when the imaging drum is low (light is on) empty or missing (light blinks), or the first time you install a non-HP imaging drum (light blinks and Attention light is on). This light will not indicate low or empty status for non-HP imaging drums. ENWW Chapter 1 Printer basics 15
-
 1
1 -
2
-
3
-
4
-
5
-
6
-
7
-
8
-
9
-
10
-
11
-
 12
12 -
 13
13 -
 14
14 -
 15
15 -
 16
16 -
 17
17 -
 18
18 -
 19
19 -
 20
20 -
 21
21 -
 22
22 -
23
-
24
-
25
-
26
-
27
-
28
-
29
-
30
-
31
-
32
-
33
-
34
-
35
-
36
-
37
-
38
-
39
-
40
-
41
-
42
-
43
-
44
-
45
-
46
-
47
-
48
-
49
-
50
-
51
-
52
-
53
-
54
-
55
-
56
-
57
-
58
-
59
-
60
-
61
-
62
-
63
-
64
-
65
-
66
-
67
-
68
-
69
-
70
-
71
-
72
-
73
-
74
-
75
-
76
-
77
-
78
-
79
-
80
-
81
-
82
-
83
-
84
-
85
-
86
-
87
-
88
-
89
-
90
-
91
-
92
-
93
-
94
-
95
-
96
-
97
-
98
-
99
-
100
-
101
-
102
-
103
-
104
-
105
-
106
-
107
-
108
-
109
-
110
-
111
-
112
-
113
-
114
-
115
-
116
-
117
-
118
-
119
-
120
-
121
-
122
-
123
-
124
-
125
-
126
-
127
-
128
-
129
-
130
-
131
-
132
-
133
-
134
-
135
-
136
-
137
-
138
-
139
-
140
-
141
-
142
-
143
-
144
-
145
-
146
-
147
-
148
-
149
-
150
-
151
-
152
 |
 |
