HP 3310 User Guide - Page 74
To install the Windows HP All-in-One software, Issues Stopping Installation
 |
UPC - 829160970424
View all HP 3310 manuals
Add to My Manuals
Save this manual to your list of manuals |
Page 74 highlights
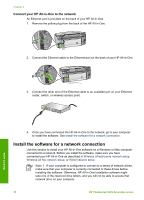
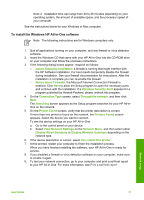
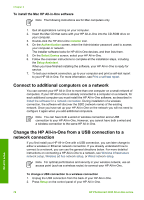
Note 2 Installation time can range from 20 to 45 minutes depending on your operating system, the amount of available space, and the processor speed of your computer. See the instructions below for your Windows or Mac computer. To install the Windows HP All-in-One software Note The following instructions are for Windows computers only. 1. Quit all applications running on your computer, and any firewall or virus detection software. 2. Insert the Windows CD that came with your HP All-in-One into the CD-ROM drive on your computer and follow the onscreen instructions. 3. If the following dialog boxes appear, respond as follows: - Issues Stopping Installation: a firewall is running that might interfere with the HP Software Installation. For best results temporarily disable the firewall during installation. See your firewall documentation for instructions. After the installation is complete you can re-enable the firewall. - Notice about Firewalls: the Microsoft Internet Connection Firewall is enabled. Click Next to allow the Setup program to open the necessary ports and continue with the installation. If a Windows Security Alert appears for a program published by Hewlett-Packard, please unblock this program. 4. On the Connection Type screen, select Through the network, and then click Next. The Searching screen appears as the Setup program searches for your HP All-inOne on the network. 5. On the Printer Found screen, verify that the printer description is correct. If more than one printer is found on the network, the Printers Found screen appears. Select the device you want to connect. To see the device settings on your HP All-in-One: a. Go to the control panel on your device. b. Select View Network Settings on the Network Menu, and then select either Display Wired Summary or Display Wireless Summary depending on the network type. 6. If the device description is correct, select Yes, install this printer. 7. At the prompt, restart your computer to finish the installation process. When you have finished installing the software, your HP All-in-One is ready for service. 8. If you disabled a firewall or virus detection software on your computer, make sure to enable it again. 9. To test your network connection, go to your computer and print a self-test report to your HP All-in-One. For more information, see Print a self-test report. Network setup User Guide 71
-
 1
1 -
2
-
3
-
4
-
5
-
6
-
7
-
8
-
9
-
10
-
11
-
12
-
13
-
14
-
15
-
16
-
17
-
18
-
19
-
20
-
21
-
22
-
23
-
24
-
25
-
26
-
27
-
28
-
29
-
30
-
31
-
32
-
33
-
34
-
35
-
36
-
37
-
38
-
39
-
40
-
41
-
42
-
43
-
44
-
45
-
46
-
47
-
48
-
49
-
50
-
51
-
52
-
53
-
54
-
55
-
56
-
57
-
58
-
59
-
60
-
61
-
62
-
63
-
64
-
65
-
66
-
67
-
68
-
 69
69 -
 70
70 -
 71
71 -
 72
72 -
 73
73 -
 74
74 -
 75
75 -
 76
76 -
 77
77 -
 78
78 -
 79
79 -
80
-
81
-
82
-
83
-
84
-
85
-
86
-
87
-
88
-
89
-
90
-
91
-
92
-
93
-
94
-
95
-
96
-
97
-
98
-
99
-
100
-
101
-
102
-
103
-
104
-
105
-
106
-
107
-
108
-
109
-
110
-
111
-
112
-
113
-
114
-
115
-
116
-
117
-
118
-
119
-
120
-
121
-
122
-
123
-
124
-
125
-
126
-
127
-
128
-
129
-
130
-
131
-
132
-
133
-
134
-
135
-
136
-
137
-
138
-
139
-
140
-
141
-
142
-
143
-
144
-
145
-
146
-
147
-
148
-
149
-
150
-
151
-
152
-
153
-
154
-
155
-
156
-
157
-
158
-
159
-
160
-
161
-
162
-
163
-
164
-
165
-
166
-
167
-
168
-
169
-
170
-
171
-
172
-
173
-
174
-
175
-
176
-
177
-
178
-
179
-
180
-
181
-
182
-
183
-
184
-
185
-
186
-
187
-
188
-
189
-
190
-
191
-
192
-
193
-
194
-
195
-
196
-
197
-
198
-
199
-
200
-
201
-
202
-
203
-
204
-
205
-
206
-
207
-
208
-
209
-
210
-
211
-
212
 |
 |
