HP 410 HP Digital Copier printer 410 - (English) Printing Guide - Page 18
The HP Digital Copier Printer 410 Properties dialog box appears., Change Default Print Settings - software
 |
UPC - 844844844303
View all HP 410 manuals
Add to My Manuals
Save this manual to your list of manuals |
Page 18 highlights
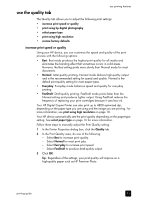
chapter 3 to change the print settings for a current print job 1 Open the file you want to print. 2 Depending on the software program you are using, use one of the following paths to open the printer Properties dialog box: - Click File, Print, select hp digital copier 410, and then click Properties or Preferences. - Click File, Print, Setup, select hp digital copier 410, and then click Properties or Preferences. - Click File, Print Setup, select hp digital copier 410, and then click Properties or Preferences. The HP Digital Copier Printer 410 Properties dialog box appears. 3 Change the desired settings, and then click OK to print the job. For information about changing settings on a specific tab, see the appropriate section in this chapter. to change the print settings for all future jobs 1 Choose one of the following methods: - From the Windows Start menu, select Settings, Printers. - For Windows XP, navigate from the Start menu to Printers and Faxes. - If you have a printer icon in the lower-right corner of your computer screen, right-click the icon, make sure hp digital copier 410 is marked with a check mark, select Change Default Print Settings, and then skip to step 3. 2 Right-click hp digital copier 410, and select Properties; or, for Windows XP, select Printing Preferences. 3 Make changes as desired, and then click OK to save all your changes as the new default settings for future print jobs. The following topics provide more information about using the HP Digital Copier Printer 410 Properties dialog box to adjust print settings. 14 hp digital copier printer 410
-
 1
1 -
2
-
3
-
4
-
5
-
6
-
7
-
8
-
9
-
10
-
11
-
12
-
 13
13 -
 14
14 -
 15
15 -
 16
16 -
 17
17 -
 18
18 -
 19
19 -
 20
20 -
 21
21 -
 22
22 -
 23
23 -
24
-
25
-
26
-
27
-
28
-
29
-
30
-
31
-
32
-
33
-
34
-
35
-
36
-
37
-
38
-
39
-
40
-
41
-
42
-
43
-
44
-
45
-
46
-
47
-
48
 |
 |
