HP 4x1Ex32 HP IP Console Viewer User Guide - Page 12
Installation, Setting up the HP IP Console Switch, Synchronizing mouse pointers
 |
View all HP 4x1Ex32 manuals
Add to My Manuals
Save this manual to your list of manuals |
Page 12 highlights
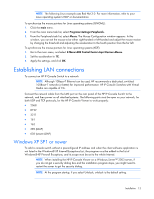
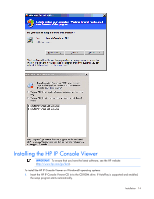
Installation Setting up the HP IP Console Switch Before installing the HP IP Console Viewer, see the following sections to be sure that you have all the items necessary for proper installation and that you synchronize your mouse pointers. 1. Adjust the mouse acceleration on each server to none. 2. Install the console switch hardware, connect the interface adapters, and connect the keyboard, monitor, and mouse to the analog ports. 3. Connect a terminal or a workstation running emulation software, such as HyperTerminal, to the configuration serial port on the rear panel of the console switch, and set up the network parameters. You can also set the network parameters from the HP IP Console Viewer or the local console user interface. 4. Using the local console user interface, input all server names, or you can change the server names of the interface adapters through the Remote Management Console. Synchronizing mouse pointers When viewing a server attached to your console switch, the viewer displays the mouse pointer of the accessed server and the mouse pointer for your local computer by default. The pointer for the server follows the movement of the local pointer. To maintain pointer synchronization, the mouse speed and accelerations must be configured correctly on the target server: 1. Set the mouse speed to 50%. 2. Disable the mouse acceleration. 3. Synchronize your mouse pointers through the local port on servers attached to console switches. NOTE: HP recommends that all Windows® systems attached to the console switch use the default Windows® mouse driver. Windows operating systems To synchronize the mouse pointers for Windows® operating systems (using the default drivers): 1. From the desktop, select Start>Setting>Control Panel, and double-click Mouse. 2. Select Motion. 3. For Windows Server® 2003, set the Speed setting to 50% (default), and then clear the Enhance Pointer Precision option. Linux operating systems Installation 12
-
 1
1 -
2
-
3
-
4
-
5
-
6
-
 7
7 -
 8
8 -
 9
9 -
 10
10 -
 11
11 -
 12
12 -
 13
13 -
 14
14 -
 15
15 -
 16
16 -
 17
17 -
18
-
19
-
20
-
21
-
22
-
23
-
24
-
25
-
26
-
27
-
28
-
29
-
30
-
31
-
32
-
33
-
34
-
35
-
36
-
37
-
38
-
39
-
40
-
41
-
42
-
43
-
44
-
45
-
46
-
47
-
48
-
49
-
50
-
51
-
52
-
53
-
54
-
55
-
56
-
57
-
58
-
59
-
60
-
61
-
62
-
63
-
64
-
65
-
66
-
67
-
68
-
69
-
70
-
71
-
72
-
73
-
74
-
75
-
76
-
77
-
78
-
79
-
80
-
81
-
82
-
83
-
84
-
85
-
86
-
87
-
88
-
89
-
90
-
91
-
92
-
93
-
94
-
95
-
96
-
97
-
98
-
99
-
100
-
101
-
102
-
103
-
104
-
105
-
106
-
107
-
108
-
109
-
110
-
111
-
112
-
113
-
114
-
115
-
116
-
117
-
118
-
119
-
120
-
121
-
122
-
123
-
124
-
125
-
126
-
127
-
128
-
129
-
130
-
131
-
132
-
133
-
134
-
135
-
136
-
137
-
138
-
139
-
140
-
141
-
142
-
143
-
144
-
145
-
146
-
147
-
148
-
149
-
150
-
151
-
152
-
153
-
154
-
155
-
156
-
157
-
158
-
159
-
160
-
161
-
162
-
163
-
164
-
165
-
166
-
167
-
168
-
169
-
170
-
171
-
172
-
173
-
174
-
175
-
176
-
177
-
178
-
179
-
180
-
181
-
182
-
183
-
184
-
185
-
186
-
187
-
188
-
189
-
190
-
191
-
192
-
193
-
194
-
195
-
196
-
197
-
198
-
199
-
200
-
201
-
202
-
203
-
204
-
205
-
206
-
207
-
208
-
209
-
210
-
211
-
212
-
213
-
214
-
215
-
216
-
217
-
218
-
219
-
220
-
221
-
222
-
223
-
224
-
225
-
226
-
227
-
228
-
229
-
230
-
231
-
232
-
233
-
234
-
235
-
236
-
237
-
238
-
239
-
240
-
241
-
242
-
243
-
244
-
245
-
246
-
247
-
248
-
249
-
250
-
251
-
252
-
253
-
254
-
255
-
256
-
257
-
258
-
259
-
260
-
261
-
262
-
263
-
264
-
265
-
266
-
267
-
268
-
269
-
270
-
271
-
272
-
273
-
274
-
275
-
276
-
277
-
278
-
279
-
280
-
281
-
282
-
283
-
284
-
285
-
286
-
287
-
288
-
289
-
290
-
291
-
292
-
293
-
294
-
295
-
296
-
297
-
298
-
299
-
300
-
301
-
302
-
303
-
304
-
305
-
306
-
307
-
308
-
309
-
310
-
311
-
312
-
313
-
314
-
315
-
316
-
317
-
318
-
319
-
320
-
321
-
322
-
323
-
324
-
325
-
326
-
327
-
328
-
329
-
330
-
331
-
332
-
333
-
334
-
335
-
336
-
337
-
338
-
339
 |
 |
