HP Brocade BladeSystem 4/12 HP StorageWorks Fabric OS 6.1.1 administrator guid - Page 75
SAN Director and DC SAN Backbone Director short name, DC Director models send their
 |
View all HP Brocade BladeSystem 4/12 manuals
Add to My Manuals
Save this manual to your list of manuals |
Page 75 highlights
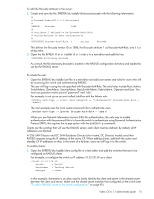
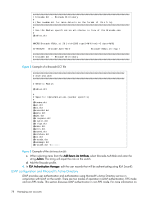
To add the Brocade attribute to the server: 1. Create and save the file $PREFIX/etc/raddb/dictionary.brocade with the following information: # # Brocade FabricOS 5.0.1 dictionary # VENDOR Brocade 1588 # # attribute 1 defined to be Brocade-Auth-Role # string defined in user configuration # ATTRIBUTE Brocade-Auth-Role 1 string Brocade This defines the Brocade vendor ID as 1588, the Brocade attribute 1 as Brocade-Auth-Role, and it is a string value. 2. Open the file $PREFIX/etc/raddb/dictionary in a text editor and add the line: $INCLUDE dictionary.brocade As a result, the file dictionary.brocade is located in the RADIUS configuration directory and loaded for use by the RADIUS server. To create the user: • Open the $PREFIX/etc/raddb/user file in a text editor and add user names and roles for users who will be accessing the switch and authenticating RADIUS. The user will log in using the role specified with Brocade-Auth-Role. The valid roles include Root, Admin, SwitchAdmin, ZoneAdmin, SecurityAdmin, BasicSwitchAdmin, FabricAdmin, Operator and User. You must use quotation marks around "password" and "role". For example, to set up an account called JohnDoe with the Admin role: JohnDoe Auth-Type := Local, User-Password == "johnPassword" Brocade-Auth-Role = "admin" The next example uses the local system password file to authenticate users. JohnDoe Auth-Type := System, Brocade-Auth-Role = "admin" When you use Network Information Service (NIS) for authentication, the only way to enable authentication with the password file is to force the switch to authenticate using Password Authentication Protocol (PAP); this requires the -a pap option with the aaaConfig command. Clients are the switches that will use the RADIUS server; each client must be defined. By default, all IP addresses are blocked. 4/256 SAN Director and DC SAN Backbone Director (short name, DC Director) models send their RADIUS requests using the IP address of the active CP. When adding clients, add both the active and standby CP IP addresses so that, in the event of a failover, users can still log in to the switch. To enable clients: 1. Open the $PREFIX/etc/raddb/client.config file in a text editor and add the switches that are to be configured as RADIUS clients. For example, to configure the switch at IP address 10.32.170.59 as a client: client 10.32.170.59 secret = Secret shortname = Testing Switch nastype = other In this example, shortname is an alias used to easily identify the client and secret is the shared secret between the client and server. Make sure the shared secret matches that configured on the switch (see "To add a RADIUS server to the switch configuration:" on page 81). Fabric OS 6.1.1 administrator guide 75
-
 1
1 -
2
-
3
-
4
-
5
-
6
-
7
-
8
-
9
-
10
-
11
-
12
-
13
-
14
-
15
-
16
-
17
-
18
-
19
-
20
-
21
-
22
-
23
-
24
-
25
-
26
-
27
-
28
-
29
-
30
-
31
-
32
-
33
-
34
-
35
-
36
-
37
-
38
-
39
-
40
-
41
-
42
-
43
-
44
-
45
-
46
-
47
-
48
-
49
-
50
-
51
-
52
-
53
-
54
-
55
-
56
-
57
-
58
-
59
-
60
-
61
-
62
-
63
-
64
-
65
-
66
-
67
-
68
-
69
-
 70
70 -
 71
71 -
 72
72 -
 73
73 -
 74
74 -
 75
75 -
 76
76 -
 77
77 -
 78
78 -
 79
79 -
 80
80 -
81
-
82
-
83
-
84
-
85
-
86
-
87
-
88
-
89
-
90
-
91
-
92
-
93
-
94
-
95
-
96
-
97
-
98
-
99
-
100
-
101
-
102
-
103
-
104
-
105
-
106
-
107
-
108
-
109
-
110
-
111
-
112
-
113
-
114
-
115
-
116
-
117
-
118
-
119
-
120
-
121
-
122
-
123
-
124
-
125
-
126
-
127
-
128
-
129
-
130
-
131
-
132
-
133
-
134
-
135
-
136
-
137
-
138
-
139
-
140
-
141
-
142
-
143
-
144
-
145
-
146
-
147
-
148
-
149
-
150
-
151
-
152
-
153
-
154
-
155
-
156
-
157
-
158
-
159
-
160
-
161
-
162
-
163
-
164
-
165
-
166
-
167
-
168
-
169
-
170
-
171
-
172
-
173
-
174
-
175
-
176
-
177
-
178
-
179
-
180
-
181
-
182
-
183
-
184
-
185
-
186
-
187
-
188
-
189
-
190
-
191
-
192
-
193
-
194
-
195
-
196
-
197
-
198
-
199
-
200
-
201
-
202
-
203
-
204
-
205
-
206
-
207
-
208
-
209
-
210
-
211
-
212
-
213
-
214
-
215
-
216
-
217
-
218
-
219
-
220
-
221
-
222
-
223
-
224
-
225
-
226
-
227
-
228
-
229
-
230
-
231
-
232
-
233
-
234
-
235
-
236
-
237
-
238
-
239
-
240
-
241
-
242
-
243
-
244
-
245
-
246
-
247
-
248
-
249
-
250
-
251
-
252
-
253
-
254
-
255
-
256
-
257
-
258
-
259
-
260
-
261
-
262
-
263
-
264
-
265
-
266
-
267
-
268
-
269
-
270
-
271
-
272
-
273
-
274
-
275
-
276
-
277
-
278
-
279
-
280
-
281
-
282
-
283
-
284
-
285
-
286
-
287
-
288
-
289
-
290
-
291
-
292
-
293
-
294
-
295
-
296
-
297
-
298
-
299
-
300
-
301
-
302
-
303
-
304
-
305
-
306
-
307
-
308
-
309
-
310
-
311
-
312
-
313
-
314
-
315
-
316
-
317
-
318
-
319
-
320
-
321
-
322
-
323
-
324
-
325
-
326
-
327
-
328
-
329
-
330
-
331
-
332
-
333
-
334
-
335
-
336
-
337
-
338
-
339
-
340
-
341
-
342
-
343
-
344
-
345
-
346
-
347
-
348
-
349
-
350
-
351
-
352
-
353
-
354
-
355
-
356
-
357
-
358
-
359
-
360
-
361
-
362
-
363
-
364
-
365
-
366
-
367
-
368
-
369
-
370
-
371
-
372
-
373
-
374
-
375
-
376
-
377
-
378
-
379
-
380
-
381
-
382
-
383
-
384
-
385
-
386
-
387
-
388
-
389
-
390
-
391
-
392
-
393
-
394
-
395
-
396
-
397
-
398
-
399
-
400
-
401
-
402
-
403
-
404
-
405
-
406
-
407
-
408
-
409
-
410
-
411
-
412
-
413
-
414
-
415
-
416
-
417
-
418
-
419
-
420
-
421
-
422
-
423
-
424
-
425
-
426
-
427
-
428
-
429
-
430
-
431
-
432
-
433
-
434
-
435
-
436
-
437
-
438
-
439
-
440
-
441
-
442
-
443
-
444
-
445
-
446
-
447
-
448
-
449
-
450
-
451
-
452
-
453
-
454
-
455
-
456
-
457
-
458
-
459
-
460
-
461
-
462
-
463
-
464
-
465
-
466
-
467
-
468
-
469
-
470
-
471
-
472
-
473
-
474
-
475
-
476
-
477
-
478
-
479
-
480
-
481
-
482
-
483
-
484
-
485
-
486
-
487
-
488
-
489
-
490
-
491
-
492
-
493
-
494
-
495
-
496
 |
 |
