HP CP3505 HP Color LaserJet CP3505 Series Printers - User Guide - Page 142
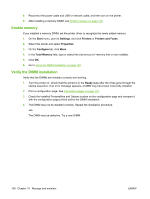
Enable memory, Verify the DIMM installation, Start, Settings, Printers, Printers and Faxes, Properties
 |
View all HP CP3505 manuals
Add to My Manuals
Save this manual to your list of manuals |
Page 142 highlights
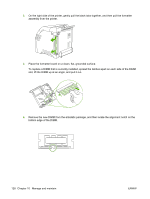
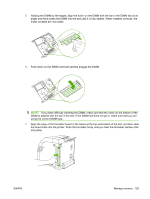
8. Reconnect the power cable and USB or network cable, and then turn on the printer. 9. After installing a memory DIMM, see Enable memory on page 130. Enable memory If you installed a memory DIMM, set the printer driver to recognize the newly added memory. 1. On the Start menu, point to Settings, and click Printers or Printers and Faxes. 2. Select this printer and select Properties. 3. On the Configure tab, click More. 4. In the Total Memory field, type or select the total amount of memory that is now installed. 5. Click OK. 6. Go to Verify the DIMM installation on page 130. Verify the DIMM installation Verify that the DIMMs are installed correctly and working. 1. Turn the printer on. Check that the printer is in the Ready state after the it has gone through the startup sequence. If an error message appears, a DIMM may have been incorrectly installed. 2. Print a configuration page. See Information pages on page 110. 3. Check the Installed Personalities and Options section on the configuration page and compare it with the configuration page printed before the DIMM installation. 4. The DIMM may not be installed correctly. Repeat the installation procedure. -orThe DIMM may be defective. Try a new DIMM. 130 Chapter 10 Manage and maintain ENWW
-
 1
1 -
2
-
3
-
4
-
5
-
6
-
7
-
8
-
9
-
10
-
11
-
12
-
13
-
14
-
15
-
16
-
17
-
18
-
19
-
20
-
21
-
22
-
23
-
24
-
25
-
26
-
27
-
28
-
29
-
30
-
31
-
32
-
33
-
34
-
35
-
36
-
37
-
38
-
39
-
40
-
41
-
42
-
43
-
44
-
45
-
46
-
47
-
48
-
49
-
50
-
51
-
52
-
53
-
54
-
55
-
56
-
57
-
58
-
59
-
60
-
61
-
62
-
63
-
64
-
65
-
66
-
67
-
68
-
69
-
70
-
71
-
72
-
73
-
74
-
75
-
76
-
77
-
78
-
79
-
80
-
81
-
82
-
83
-
84
-
85
-
86
-
87
-
88
-
89
-
90
-
91
-
92
-
93
-
94
-
95
-
96
-
97
-
98
-
99
-
100
-
101
-
102
-
103
-
104
-
105
-
106
-
107
-
108
-
109
-
110
-
111
-
112
-
113
-
114
-
115
-
116
-
117
-
118
-
119
-
120
-
121
-
122
-
123
-
124
-
125
-
126
-
127
-
128
-
129
-
130
-
131
-
132
-
133
-
134
-
135
-
136
-
 137
137 -
 138
138 -
 139
139 -
 140
140 -
 141
141 -
 142
142 -
 143
143 -
 144
144 -
 145
145 -
 146
146 -
 147
147 -
148
-
149
-
150
-
151
-
152
-
153
-
154
-
155
-
156
-
157
-
158
-
159
-
160
-
161
-
162
-
163
-
164
-
165
-
166
-
167
-
168
-
169
-
170
-
171
-
172
-
173
-
174
-
175
-
176
-
177
-
178
-
179
-
180
-
181
-
182
-
183
-
184
-
185
-
186
-
187
-
188
-
189
-
190
-
191
-
192
-
193
-
194
-
195
-
196
-
197
-
198
-
199
-
200
-
201
-
202
-
203
-
204
-
205
-
206
-
207
-
208
-
209
-
210
-
211
-
212
-
213
-
214
-
215
-
216
-
217
-
218
-
219
-
220
-
221
-
222
-
223
-
224
-
225
-
226
 |
 |
