HP CP3505 HP Color LaserJet CP3505 Series Printers - User Guide - Page 160
Common causes of jams - fuser replacement
 |
View all HP CP3505 manuals
Add to My Manuals
Save this manual to your list of manuals |
Page 160 highlights
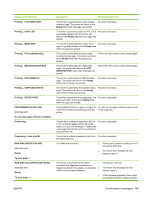
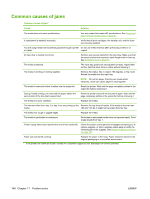
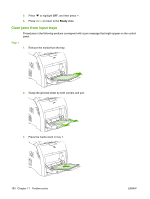
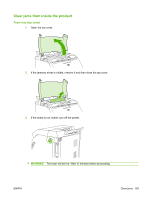
Common causes of jams Common causes of jams1 Cause Solution The media does not meet specifications. Use only media that meets HP specifications. See Supported paper and print media sizes on page 61. A component is installed incorrectly. Verify that all print cartridges, the transfer unit, and the fuser are correctly installed. You are using media that has already passed through a printer Do not use media that has been previously printed on or or copier. copied. An input tray is loaded incorrectly. Remove any excess media from the input tray. Make sure that the stack is below the maximum stack height mark in the tray. See Configure trays on page 73. The media is skewed. The input-tray guides are not adjusted correctly. Adjust them so they hold the stack firmly in place without bending it. The media is binding or sticking together. Remove the media, flex it, rotate it 180 degrees, or flip it over. Reload the media into the input tray. NOTE: Do not fan paper. Fanning can create static electricity, which can cause paper to stick together. The media is removed before it settles into the output bin. Reset the printer. Wait until the page completely settles in the output bin before removing it. During 2-sided printing, you removed the paper before the second side of the document was printed. Reset the printer and print the document again. Wait until the page completely settles in the output bin before removing it. The media is in poor condition. Replace the media. The internal rollers from tray 2 or tray 3 are not picking up the Remove the top sheet of media. If the media is heavier than media. 163 g/m2 (43 lb), it might not be picked from the tray. The media has rough or jagged edges. Replace the media. The media is perforated or embossed. Perforated or embossed media does not separate easily. Feed single sheets from tray 1. Printer supply items have reached the end of their useful life. Check the printer control panel for messages prompting you to replace supplies, or print a supplies status page to verify the remaining life of the supplies. See Replace supplies and parts on page 123. Paper was not stored correctly. Replace the paper in the trays. Paper should be stored in the original packaging in a controlled environment. 1 If the printer still continues to jam, contact HP Customer Support or your authorized HP service provider. 148 Chapter 11 Problem solve ENWW
-
 1
1 -
2
-
3
-
4
-
5
-
6
-
7
-
8
-
9
-
10
-
11
-
12
-
13
-
14
-
15
-
16
-
17
-
18
-
19
-
20
-
21
-
22
-
23
-
24
-
25
-
26
-
27
-
28
-
29
-
30
-
31
-
32
-
33
-
34
-
35
-
36
-
37
-
38
-
39
-
40
-
41
-
42
-
43
-
44
-
45
-
46
-
47
-
48
-
49
-
50
-
51
-
52
-
53
-
54
-
55
-
56
-
57
-
58
-
59
-
60
-
61
-
62
-
63
-
64
-
65
-
66
-
67
-
68
-
69
-
70
-
71
-
72
-
73
-
74
-
75
-
76
-
77
-
78
-
79
-
80
-
81
-
82
-
83
-
84
-
85
-
86
-
87
-
88
-
89
-
90
-
91
-
92
-
93
-
94
-
95
-
96
-
97
-
98
-
99
-
100
-
101
-
102
-
103
-
104
-
105
-
106
-
107
-
108
-
109
-
110
-
111
-
112
-
113
-
114
-
115
-
116
-
117
-
118
-
119
-
120
-
121
-
122
-
123
-
124
-
125
-
126
-
127
-
128
-
129
-
130
-
131
-
132
-
133
-
134
-
135
-
136
-
137
-
138
-
139
-
140
-
141
-
142
-
143
-
144
-
145
-
146
-
147
-
148
-
149
-
150
-
151
-
152
-
153
-
154
-
 155
155 -
 156
156 -
 157
157 -
 158
158 -
 159
159 -
 160
160 -
 161
161 -
 162
162 -
 163
163 -
 164
164 -
 165
165 -
166
-
167
-
168
-
169
-
170
-
171
-
172
-
173
-
174
-
175
-
176
-
177
-
178
-
179
-
180
-
181
-
182
-
183
-
184
-
185
-
186
-
187
-
188
-
189
-
190
-
191
-
192
-
193
-
194
-
195
-
196
-
197
-
198
-
199
-
200
-
201
-
202
-
203
-
204
-
205
-
206
-
207
-
208
-
209
-
210
-
211
-
212
-
213
-
214
-
215
-
216
-
217
-
218
-
219
-
220
-
221
-
222
-
223
-
224
-
225
-
226
 |
 |