HP Chromebook x360 13.3 inch 13b-ca0000 Maintenance and Service Guide - Page 31
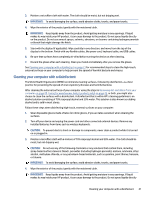
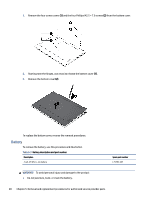
the tape out from behind the panel, Be sure not to place the tool on the camera module.
 |
View all HP Chromebook x360 13.3 inch 13b-ca0000 manuals
Add to My Manuals
Save this manual to your list of manuals |
Page 31 highlights
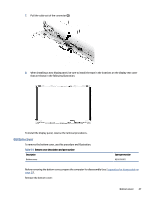
3. Disconnect the battery cable from the system board (see Battery on page 28). Remove the display panel: 1. Open the computer to 90° (1). 2. Place suction cups in the middle on both sides of the top of the display (2). NOTE: Be sure not to place the suction cups on the camera module. 3. While pulling the suction cups away from each other, use a tool to separate the display enough to get to the tape (3). NOTE: Be sure not to place the tool on the camera module. 4. On the left and right sides of the panel, grasp the tape with tweezers and roll the tweezers while pulling the tape out from behind the panel (4). 5. Rotate the panel over and place it on the keyboard (5). 6. Peel the tape off the connector on the back of the display panel (1). 26 Chapter 5 Removal and replacement procedures for authorized service provider parts
-
 1
1 -
2
-
3
-
4
-
5
-
6
-
7
-
8
-
9
-
10
-
11
-
12
-
13
-
14
-
15
-
16
-
17
-
18
-
19
-
20
-
21
-
22
-
23
-
24
-
25
-
 26
26 -
 27
27 -
 28
28 -
 29
29 -
 30
30 -
 31
31 -
 32
32 -
 33
33 -
 34
34 -
 35
35 -
 36
36 -
37
-
38
-
39
-
40
-
41
-
42
-
43
-
44
-
45
-
46
-
47
-
48
-
49
-
50
-
51
-
52
-
53
-
54
-
55
-
56
-
57
-
58
-
59
-
60
-
61
-
62
 |
 |
