HP Color LaserJet CM4730 HP Color LaserJet CM4730 MFP - Software Technical Ref - Page 112
Specify TCP/IP Port, New TCP/IP Port
 |
View all HP Color LaserJet CM4730 manuals
Add to My Manuals
Save this manual to your list of manuals |
Page 112 highlights
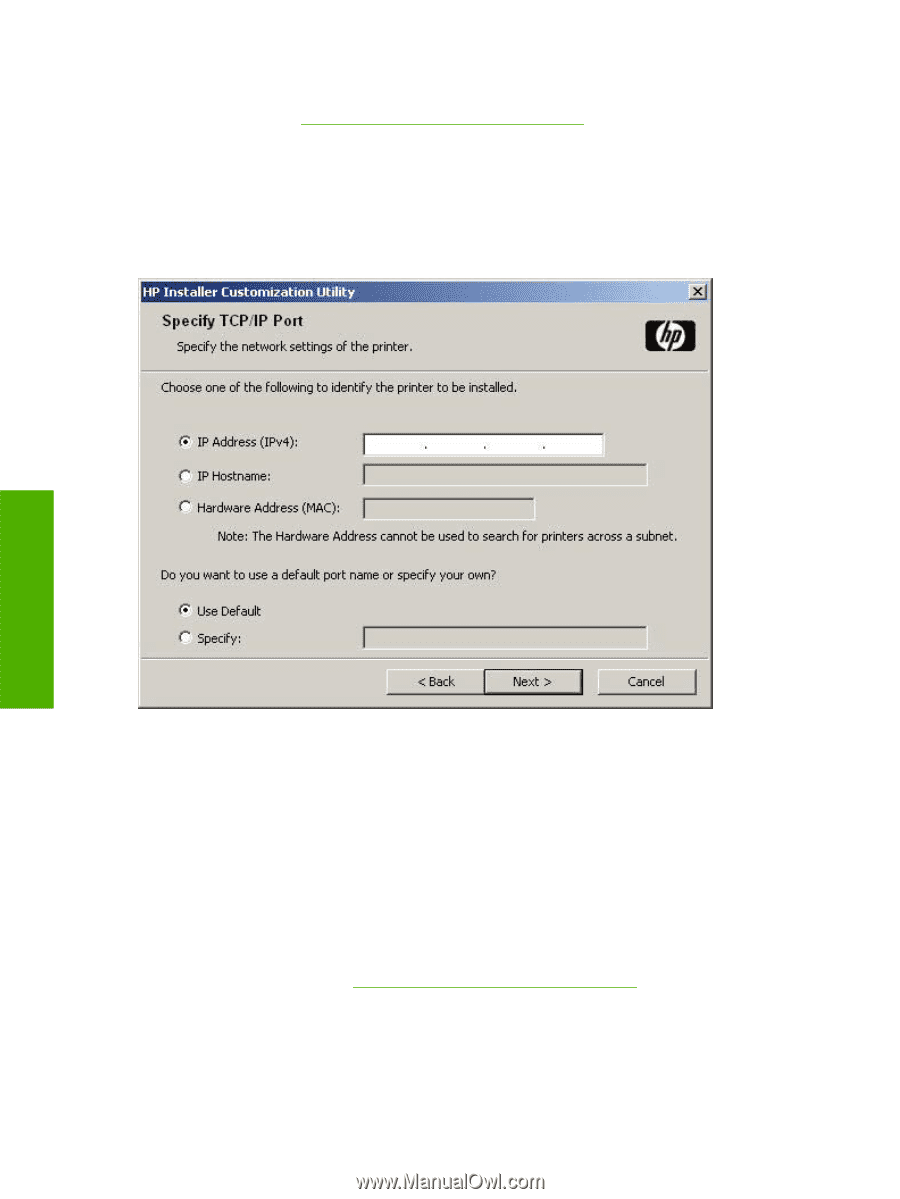
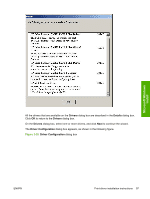
In the Printer Port dialog box, click Local (direct connect) port, and then click Next to open the Drivers dialog box (see Figure 3-36 Drivers dialog box on page 95). In the Printer Port dialog box, click New TCP/IP Port, and then click Next to open the Specify TCP/ IP Port dialog box, as shown in the following figure. The Printer Port dialog box includes all custom network ports that are available on the local system. To use any custom network port for the customized installer, the port must be created identically on the system where it will be used. Figure 3-33 Specify TCP/IP Port dialog box Microsoft Windows install Click IP Address to make the field available for typing the TCP/IP address for the device. Only numerals are allowed, and you must type at least one digit in the field to prevent an error message from prompting for a valid IP address. Click IP Hostname to make the field available for typing the IP hostname for the device. Any characters are allowed, but no spaces. You must type at least one character in the field to prevent an error message from prompting for a valid IP hostname. Click Hardware Address to make the field available for typing the hardware address of the MAC device. Any characters are allowed, but the entry is limited to 12 characters. You must type at least one character in the field to prevent an error message from prompting for a valid hardware address. After selecting any of the options, type the appropriate name or address and then click Next. The Drivers dialog box opens. (See Figure 3-36 Drivers dialog box on page 95.) For each of the options in the Specify TCP/IP Port dialog box, either use the default port name (as specified in each of the three options) or specify a different name. To use the default port name, select Use Default and click Next. 94 Chapter 3 Install Microsoft Windows printing-system components ENWW
-
 1
1 -
2
-
3
-
4
-
5
-
6
-
7
-
8
-
9
-
10
-
11
-
12
-
13
-
14
-
15
-
16
-
17
-
18
-
19
-
20
-
21
-
22
-
23
-
24
-
25
-
26
-
27
-
28
-
29
-
30
-
31
-
32
-
33
-
34
-
35
-
36
-
37
-
38
-
39
-
40
-
41
-
42
-
43
-
44
-
45
-
46
-
47
-
48
-
49
-
50
-
51
-
52
-
53
-
54
-
55
-
56
-
57
-
58
-
59
-
60
-
61
-
62
-
63
-
64
-
65
-
66
-
67
-
68
-
69
-
70
-
71
-
72
-
73
-
74
-
75
-
76
-
77
-
78
-
79
-
80
-
81
-
82
-
83
-
84
-
85
-
86
-
87
-
88
-
89
-
90
-
91
-
92
-
93
-
94
-
95
-
96
-
97
-
98
-
99
-
100
-
101
-
102
-
103
-
104
-
105
-
106
-
 107
107 -
 108
108 -
 109
109 -
 110
110 -
 111
111 -
 112
112 -
 113
113 -
 114
114 -
 115
115 -
 116
116 -
 117
117 -
118
-
119
-
120
-
121
-
122
-
123
-
124
-
125
-
126
-
127
-
128
-
129
-
130
-
131
-
132
-
133
-
134
-
135
-
136
-
137
-
138
-
139
-
140
-
141
-
142
-
143
-
144
-
145
-
146
-
147
-
148
-
149
-
150
-
151
-
152
-
153
-
154
-
155
-
156
-
157
-
158
-
159
-
160
-
161
-
162
-
163
-
164
-
165
-
166
-
167
-
168
-
169
-
170
-
171
-
172
-
173
-
174
-
175
-
176
-
177
-
178
-
179
-
180
-
181
-
182
-
183
-
184
-
185
-
186
-
187
-
188
-
189
-
190
-
191
-
192
-
193
-
194
-
195
-
196
-
197
-
198
-
199
-
200
-
201
-
202
-
203
-
204
-
205
-
206
-
207
-
208
-
209
-
210
-
211
-
212
-
213
-
214
-
215
-
216
-
217
-
218
-
219
-
220
-
221
-
222
-
223
-
224
-
225
-
226
-
227
-
228
-
229
-
230
-
231
-
232
-
233
-
234
-
235
-
236
-
237
-
238
-
239
-
240
-
241
-
242
-
243
-
244
-
245
-
246
-
247
-
248
-
249
-
250
-
251
-
252
-
253
-
254
-
255
-
256
-
257
-
258
-
259
-
260
-
261
-
262
-
263
-
264
-
265
-
266
-
267
-
268
-
269
-
270
-
271
-
272
-
273
-
274
-
275
-
276
-
277
-
278
-
279
-
280
-
281
-
282
-
283
-
284
-
285
-
286
-
287
-
288
-
289
-
290
-
291
-
292
-
293
-
294
-
295
-
296
-
297
-
298
-
299
-
300
-
301
-
302
-
303
-
304
-
305
-
306
-
307
-
308
-
309
-
310
-
311
-
312
-
313
-
314
-
315
-
316
-
317
-
318
 |
 |