HP Color LaserJet Enterprise Flow MFP X58045z User Guide - Page 77
Step four: Con the Quick Sets (optional)
 |
View all HP Color LaserJet Enterprise Flow MFP X58045z manuals
Add to My Manuals
Save this manual to your list of manuals |
Page 77 highlights
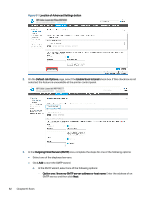
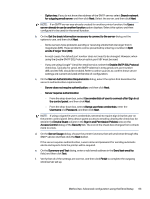
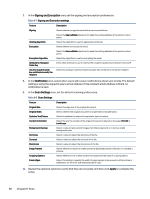
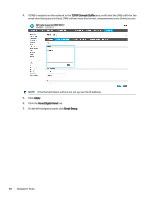
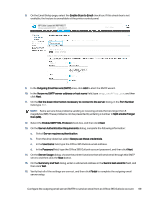
Step four: Configure the Quick Sets (optional) Quick Sets are optional short-cut jobs that can be accessed on the main Home screen or within the Quick Sets application at the printer. Use the following procedure to configure the Quick Sets. 1. In the Email Setup area of the left navigation pane, click Quick Sets. 2. Select one of the following options: ● Select an existing Quick Set under Quick Sets Application in the table. -OR- ● Click Add to start the Quick Set Wizard. 3. If you selected Add, the Quick Sets Setup page opens. Complete the following information: ● Quick Set Name: Enter a title for the new Quick Set. ● Quick Set Description: Enter a description of the Quick Set. ● Quick Set Start Option: To set how the Quick Set starts, click either Enter application, then user presses Start or Start instantly when selected from the Home Screen. 4. Define the following settings for the Quick Set: Address and Message Field Control, Signing and Encryption, Notification, Scan Settings, File Settings. 5. Click Finish to save the Quick Set. Step five: Set up Send to Email to use Office 365 Outlook (optional) Enable the printer to send an email with an Office 365 Outlook account from the control panel. Introduction Microsoft Office 365 Outlook is a cloud-based email system provided by Microsoft which uses Microsoft's Simple Mail Transfer Protocol (SMTP) server to send or receive emails. Complete the following to enable the printer to send an email with an Office 365 Outlook account from the control panel. NOTE: You must have an email address account with Office 365 Outlook to configure the settings in the EWS. Configure the outgoing email server (SMTP) to send an email from an Office 365 Outlook account Configure the outgoing email server using the following procedure. 1. Using the EWS top navigation tabs, click Networking. 2. In the left navigation pane, click TCP/IP Settings. 3. In the TCP/IP Settings area, click the Network Identification tab. Step four: Configure the Quick Sets (optional) 67
-
 1
1 -
2
-
3
-
4
-
5
-
6
-
7
-
8
-
9
-
10
-
11
-
12
-
13
-
14
-
15
-
16
-
17
-
18
-
19
-
20
-
21
-
22
-
23
-
24
-
25
-
26
-
27
-
28
-
29
-
30
-
31
-
32
-
33
-
34
-
35
-
36
-
37
-
38
-
39
-
40
-
41
-
42
-
43
-
44
-
45
-
46
-
47
-
48
-
49
-
50
-
51
-
52
-
53
-
54
-
55
-
56
-
57
-
58
-
59
-
60
-
61
-
62
-
63
-
64
-
65
-
66
-
67
-
68
-
69
-
70
-
71
-
 72
72 -
 73
73 -
 74
74 -
 75
75 -
 76
76 -
 77
77 -
 78
78 -
 79
79 -
 80
80 -
 81
81 -
 82
82 -
83
-
84
-
85
-
86
-
87
-
88
-
89
-
90
-
91
-
92
-
93
-
94
-
95
-
96
-
97
-
98
-
99
-
100
-
101
-
102
-
103
-
104
-
105
-
106
-
107
-
108
-
109
-
110
-
111
-
112
-
113
-
114
-
115
-
116
-
117
-
118
-
119
-
120
-
121
-
122
-
123
-
124
-
125
-
126
-
127
-
128
-
129
-
130
-
131
-
132
-
133
-
134
-
135
-
136
-
137
-
138
-
139
-
140
-
141
-
142
-
143
-
144
-
145
-
146
-
147
-
148
-
149
-
150
-
151
-
152
-
153
-
154
-
155
-
156
-
157
-
158
-
159
-
160
-
161
-
162
-
163
-
164
-
165
-
166
-
167
-
168
-
169
-
170
-
171
-
172
-
173
-
174
-
175
-
176
-
177
-
178
-
179
-
180
-
181
-
182
-
183
-
184
-
185
-
186
-
187
-
188
-
189
-
190
-
191
-
192
-
193
-
194
-
195
-
196
-
197
-
198
-
199
-
200
-
201
-
202
-
203
-
204
-
205
-
206
-
207
-
208
-
209
-
210
-
211
-
212
-
213
-
214
-
215
-
216
-
217
-
218
-
219
-
220
-
221
-
222
-
223
-
224
 |
 |