HP Color LaserJet Enterprise MFP M682 User Guide - Page 174
Manually con IPv4 TCP/IP parameters from the control panel, Device Information, Device Name
 |
View all HP Color LaserJet Enterprise MFP M682 manuals
Add to My Manuals
Save this manual to your list of manuals |
Page 174 highlights
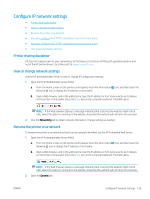
3. On the Device Information page, the default printer name is in the Device Name field. You can change this name to uniquely identify this printer. NOTE: Completing the other fields on this page is optional. 4. Click the Apply button to save the changes. Manually configure IPv4 TCP/IP parameters from the control panel Use the control-panel Settings menus to manually set an IPv4 address, subnet mask, and default gateway. 1. From the Home screen on the printer control panel, swipe until the Settings menu displays. Touch the Settings icon to open the menu. 2. Open the following menus: ● Networking ● Ethernet ● TCP/IP ● IPV 4 Settings ● Config Method 3. Select the Manual option, and then touch the Save button. 4. Open the Manual Settings menu. 5. Touch the IP Address, Subnet Mask, or Default Gateway option. 6. Touch the first field to open a keypad. Enter the correct digits for the field, and then touch the OK button. Repeat the process for each field, and then touch the Save button. Manually configure IPv6 TCP/IP parameters from the control panel Use the control-panel Settings menus to manually set an IPv6 address. 1. From the Home screen on the printer control panel, swipe until the Settings menu displays. Touch the Settings icon to open the menu. 2. To enable manual configuration, open the following menus: ● Networking ● Ethernet ● TCP/IP ● IPV6 Settings 3. Select Enable, and then select On. 4. Select the Enable Manual Settings option, and then touch the Done button. 5. To configure the address, open the Address menu, and then touch the field to open a keypad. 160 Chapter 8 Manage the printer ENWW
-
 1
1 -
2
-
3
-
4
-
5
-
6
-
7
-
8
-
9
-
10
-
11
-
12
-
13
-
14
-
15
-
16
-
17
-
18
-
19
-
20
-
21
-
22
-
23
-
24
-
25
-
26
-
27
-
28
-
29
-
30
-
31
-
32
-
33
-
34
-
35
-
36
-
37
-
38
-
39
-
40
-
41
-
42
-
43
-
44
-
45
-
46
-
47
-
48
-
49
-
50
-
51
-
52
-
53
-
54
-
55
-
56
-
57
-
58
-
59
-
60
-
61
-
62
-
63
-
64
-
65
-
66
-
67
-
68
-
69
-
70
-
71
-
72
-
73
-
74
-
75
-
76
-
77
-
78
-
79
-
80
-
81
-
82
-
83
-
84
-
85
-
86
-
87
-
88
-
89
-
90
-
91
-
92
-
93
-
94
-
95
-
96
-
97
-
98
-
99
-
100
-
101
-
102
-
103
-
104
-
105
-
106
-
107
-
108
-
109
-
110
-
111
-
112
-
113
-
114
-
115
-
116
-
117
-
118
-
119
-
120
-
121
-
122
-
123
-
124
-
125
-
126
-
127
-
128
-
129
-
130
-
131
-
132
-
133
-
134
-
135
-
136
-
137
-
138
-
139
-
140
-
141
-
142
-
143
-
144
-
145
-
146
-
147
-
148
-
149
-
150
-
151
-
152
-
153
-
154
-
155
-
156
-
157
-
158
-
159
-
160
-
161
-
162
-
163
-
164
-
165
-
166
-
167
-
168
-
 169
169 -
 170
170 -
 171
171 -
 172
172 -
 173
173 -
 174
174 -
 175
175 -
 176
176 -
 177
177 -
 178
178 -
 179
179 -
180
-
181
-
182
-
183
-
184
-
185
-
186
-
187
-
188
-
189
-
190
-
191
-
192
-
193
-
194
-
195
-
196
-
197
-
198
-
199
-
200
-
201
-
202
-
203
-
204
-
205
-
206
-
207
-
208
-
209
-
210
-
211
-
212
-
213
-
214
-
215
-
216
-
217
-
218
-
219
-
220
-
221
-
222
-
223
-
224
-
225
-
226
-
227
-
228
-
229
-
230
-
231
-
232
-
233
-
234
-
235
-
236
-
237
-
238
-
239
-
240
-
241
-
242
-
243
-
244
-
245
-
246
-
247
-
248
-
249
-
250
-
251
-
252
-
253
-
254
-
255
-
256
-
257
-
258
-
259
-
260
-
261
-
262
-
263
-
264
 |
 |
