HP ENVY 15-ah100 Maintenance and Service Guide - Page 67
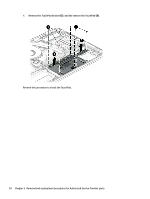
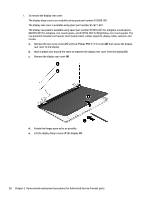
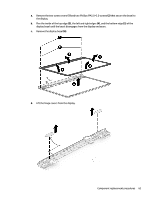
Position the display assembly with the top edge toward you.
 |
View all HP ENVY 15-ah100 manuals
Add to My Manuals
Save this manual to your list of manuals |
Page 67 highlights
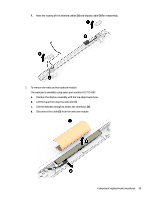
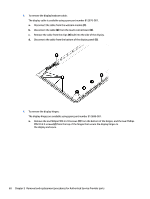
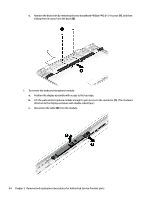
f. Note the routing of the antenna cables (2) and display cable (3) for reassembly. 2. To remove the webcam/microphone module: The webcam is available using spare part number 812715-001. a. Position the display assembly with the top edge toward you. b. Lift the tape from atop the webcam (1). c. Lift the webcam enough to access the connector (2). d. Disconnect the cable (3) from the webcam module. Component replacement procedures 59
-
 1
1 -
2
-
3
-
4
-
5
-
6
-
7
-
8
-
9
-
10
-
11
-
12
-
13
-
14
-
15
-
16
-
17
-
18
-
19
-
20
-
21
-
22
-
23
-
24
-
25
-
26
-
27
-
28
-
29
-
30
-
31
-
32
-
33
-
34
-
35
-
36
-
37
-
38
-
39
-
40
-
41
-
42
-
43
-
44
-
45
-
46
-
47
-
48
-
49
-
50
-
51
-
52
-
53
-
54
-
55
-
56
-
57
-
58
-
59
-
60
-
61
-
 62
62 -
 63
63 -
 64
64 -
 65
65 -
 66
66 -
 67
67 -
 68
68 -
 69
69 -
 70
70 -
 71
71 -
 72
72 -
73
-
74
-
75
-
76
-
77
-
78
-
79
-
80
-
81
-
82
-
83
-
84
-
85
-
86
-
87
-
88
-
89
-
90
-
91
-
92
-
93
-
94
-
95
-
96
-
97
-
98
-
99
-
100
-
101
-
102
 |
 |

f.
Note the routing of the antenna cables
(2)
and display cable
(3)
for reassembly.
2.
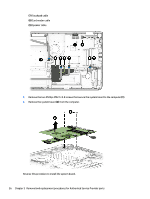
To remove the webcam/microphone module:
The webcam is available using spare part number 812715-001.
a.
Position the display assembly with the top edge toward you.
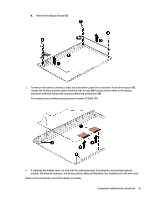
b.
Lift the tape from atop the webcam
(1)
.
c.
Lift the webcam enough to access the connector
(2)
.
d.
Disconnect the cable
(3)
from the webcam module.
Component replacement procedures
59