HP Envy 15-1000se HP ENVY 15 - Maintenance and Service Guide - Page 71
Display assembly, Disconnect the following cables
 |
View all HP Envy 15-1000se manuals
Add to My Manuals
Save this manual to your list of manuals |
Page 71 highlights
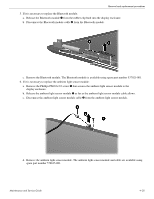
Removal and replacement procedures Display assembly ✎ The display assembly spare part kit includes a webcam/microphone module and cable, 2 WLAN antenna transceivers and cables, nameplate, and logo. Description With bronze finish: 15.6-in, WVA, AntiGlare LED display assembly 15.6-in, WVA, BrightView LED display assembly 15.6-in, SVA, BrightView LED display assembly With black finish: 15.6-in, WVA, AntiGlare LED display assembly 15.6-in, WVA, BrightView LED display assembly 15.6-in, SVA, BrightView LED display assembly Spare part number 591172-001 576803-001 576802-001 591173-001 580127-001 580126-001 Before removing the display assembly, follow these steps: 1. Shut down the computer. 2. Disconnect all external devices connected to the computer. 3. Disconnect the power from the computer by first unplugging the power cord from the AC outlet, and then unplugging the AC adapter from the computer. 4. Remove the battery (see "Battery" on page 4-7). 5. Remove the memory module compartment cover (see "Expansion memory module" on page 4-8). 6. Remove the top cover (see "Top cover" on page 4-10). Remove the display assembly: 1. Disconnect the following cables: ❏ Bluetooth module cable 1 ❏ Ambient light sensor module cable 2 ❏ Display panel cable 3 ❏ Wireless antenna cables 4 Maintenance and Service Guide 4-33
-
 1
1 -
2
-
3
-
4
-
5
-
6
-
7
-
8
-
9
-
10
-
11
-
12
-
13
-
14
-
15
-
16
-
17
-
18
-
19
-
20
-
21
-
22
-
23
-
24
-
25
-
26
-
27
-
28
-
29
-
30
-
31
-
32
-
33
-
34
-
35
-
36
-
37
-
38
-
39
-
40
-
41
-
42
-
43
-
44
-
45
-
46
-
47
-
48
-
49
-
50
-
51
-
52
-
53
-
54
-
55
-
56
-
57
-
58
-
59
-
60
-
61
-
62
-
63
-
64
-
65
-
 66
66 -
 67
67 -
 68
68 -
 69
69 -
 70
70 -
 71
71 -
 72
72 -
 73
73 -
 74
74 -
 75
75 -
 76
76 -
77
-
78
-
79
-
80
-
81
-
82
-
83
-
84
-
85
-
86
-
87
-
88
-
89
-
90
-
91
-
92
-
93
-
94
-
95
-
96
-
97
-
98
-
99
-
100
-
101
-
102
-
103
-
104
-
105
-
106
-
107
-
108
-
109
-
110
-
111
-
112
-
113
-
114
-
115
-
116
-
117
-
118
-
119
-
120
-
121
-
122
-
123
-
124
-
125
-
126
-
127
-
128
-
129
-
130
-
131
 |
 |
