HP K850 Getting Started Guide - Page 10
Folgen Sie den Anweisungen für Ihren Anschlusstyp USB, parallel
 |
UPC - 882780027831
View all HP K850 manuals
Add to My Manuals
Save this manual to your list of manuals |
Page 10 highlights
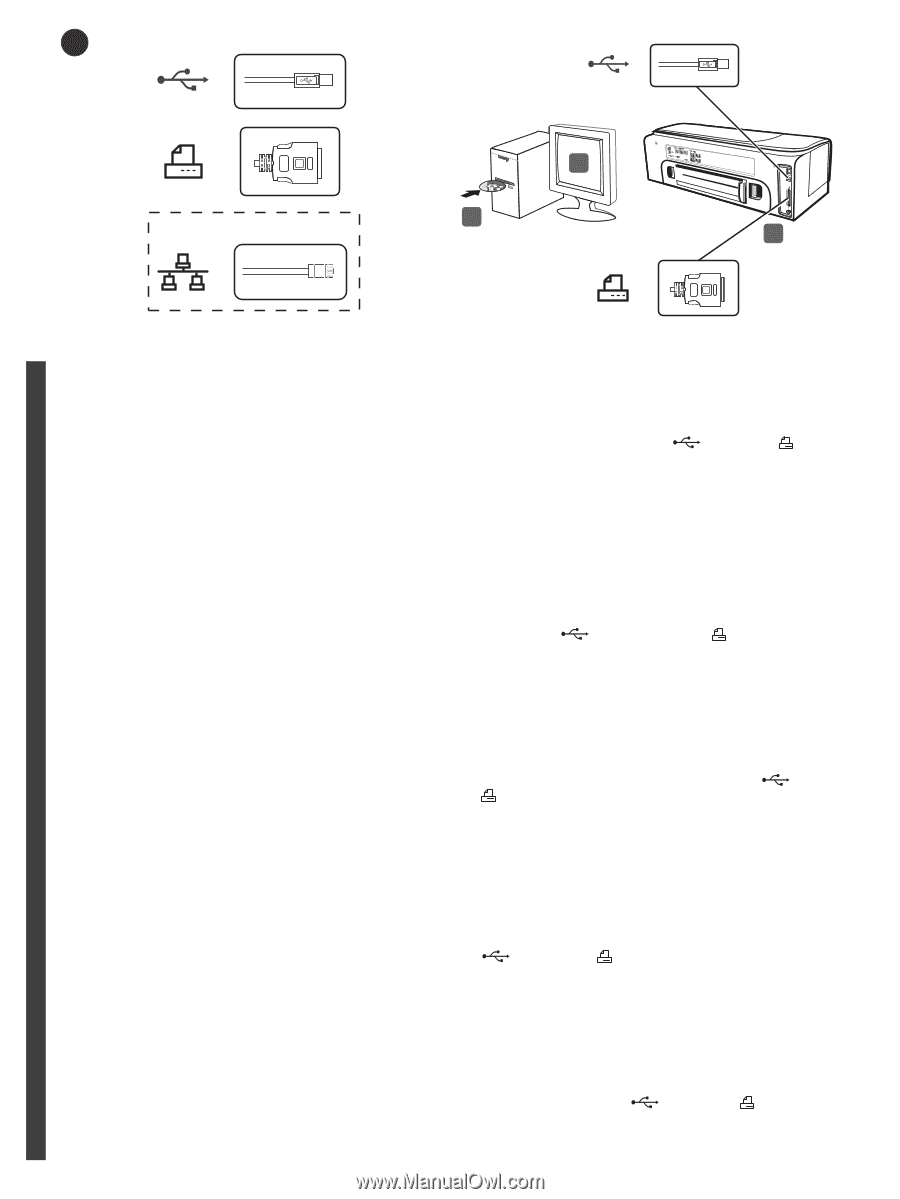
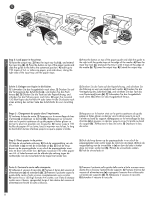
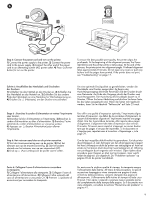
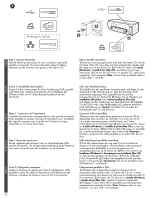
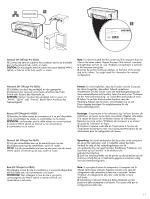
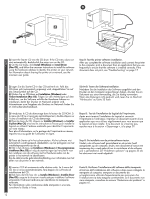
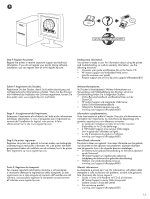
7 2 HP Officejet Pro K850dn 1 3 English Step 7: Connect the printer. See the following instructions for your connection type (USB, parallel, or network). For more information about installing software, see the onscreen user guide on the Starter CD. USB or parallel connection: 1) Close any running applications and insert the Starter CD into the CD drive. If the CD menu does not start automatically, double-click the setup icon on the Starter CD. 2) On the CD menu, click Install (Windows) or Install Driver (Mac OS), and follow the onscreen instructions. 3) Connect the USB ( ) or parallel ( ) cable (sold separately) when prompted. Note: Connect only a parallel cable or a USB cable - not both. Deutsch Français Schritt 7: Anschließen des Druckers. Folgen Sie den Anweisungen für Ihren Anschlusstyp (USB, parallel oder Netzwerk). Weitere Informationen zum Installieren der Software finden Sie im Online-Benutzerhandbuch auf der Starter-CD. Étape 7 : Connexion de l'imprimante. Consultez les instructions correspondant à votre type de connexion (USB, parallèle ou réseau). Pour plus d'informations sur l'installation des logiciels, reportez-vous au guide de l'utilisateur en ligne, disponible sur le CD de démarrage. Stap 7: De printer aansluiten. Zie de volgende aanwijzingen voor uw verbindingstype (USB, parallel of netwerk). Zie de gebruikershandleiding op de Starter-cd voor meer informatie over het installeren van de software. Punto 7: Collegare la stampante. Vedere le istruzioni di seguito per il tipo di collegamento (USB, parallelo o rete). Per ulteriori informazioni sull'installazione del software, consultare la Guida in linea sul CD di avviamento. USB- oder Parallelanschluss: 1) Schließen Sie alle geöffneten Anwendungen, und legen Sie die Starter-CD in das CD-Laufwerk ein. Falls das CD-Menü nicht automatisch angezeigt wird, doppelklicken Sie auf das Setup-Symbol auf der Starter-CD. 2) Klicken Sie im CD-Menü auf Installation (Windows) oder Treiber-Installation (Mac OS), und folgen Sie den Anleitungen auf dem Bildschirm. 3) Schließen Sie das USB- ( ) oder Parallelkabel ( ) (getrennt erhältlich) nach Aufforderung an. Hinweis: Schließen Sie entweder ein Parallelkabel oder ein USB-Kabel an. Connexion USB ou parallèle : 1) Fermez toutes les applications ouvertes et insérez le CD de démarrage dans le lecteur de CD-ROM. Si le menu du CD ne s'ouvre pas automatiquement, double-cliquez sur l'icône d'installation du CD de démarrage. 2) Dans le menu du CD, cliquez sur Installer (Windows) ou Installer le pilote (Mac OS) et suivez les instructions à l'écran. 3) Branchez le câble USB ( ) ou parallèle ( ) (vendu séparément) lorsque vous y êtes invité. Remarque : branchez uniquement le câble parallèle ou le câble USB, pas les deux. USB-verbinding of parallelle verbinding: 1) Sluit alle toepassingen die nog open zijn af en plaats de Starter-cd in het cd-rom-station. Als het cd-menu niet automatisch wordt geopend, dubbelklikt u op het pictogram van het installatieprogramma op de Starter-cd. 2) Klik in het cd-menu op Installeren (Windows) of Stuurprogramma installeren (Mac OS) en volg de aanwijzingen op het scherm. 3) Sluit de USB-kabel ( ) of parallelle ( ) kabel (niet meegeleverd) aan wanneer hierom wordt gevraagd. Opmerking: Sluit óf een parallelle óf een USB-kabel aan - nooit beide. Collegamento parallelo o USB: 1) Chiudere tutte le applicazioni aperte e inserire il CD di avviamento nella relativa unità. Se il menu del CD non si avvia automaticamente, fare doppio clic sull'icona di installazione del CD di avviamento. 2) Dal menu del CD, fare clic su Installa (Windows) o Installa driver (Mac OS) e seguire le istruzioni visualizzate. 3) Collegare il cavo USB ( ) o parallelo ( ) (da acquistare separatamente) quando richiesto. Nota: Collegare solo un cavo parallelo o un cavo USB - non entrambi. Nederlands Italiano 10
-
 1
1 -
2
-
3
-
4
-
 5
5 -
 6
6 -
 7
7 -
 8
8 -
 9
9 -
 10
10 -
 11
11 -
 12
12 -
 13
13 -
 14
14 -
 15
15 -
16
-
17
-
18
-
19
-
20
-
21
-
22
-
23
-
24
-
25
-
26
-
27
-
28
-
29
-
30
-
31
-
32
-
33
-
34
-
35
-
36
-
37
-
38
-
39
-
40
-
41
-
42
-
43
-
44
-
45
-
46
-
47
-
48
-
49
-
50
-
51
-
52
-
53
-
54
-
55
-
56
 |
 |