HP K850 Getting Started Guide - Page 14
Control panel - i
 |
UPC - 882780027831
View all HP K850 manuals
Add to My Manuals
Save this manual to your list of manuals |
Page 14 highlights
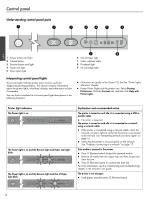
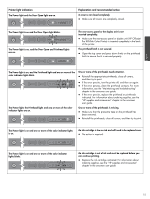
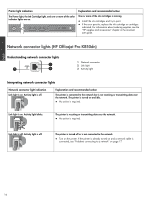
Control panel Understanding control panel parts 1 2 3 4 6 7 9 English 1 Power button and light 2 Cancel button 3 Resume button and light 4 Paper Jam light 5 Door Open light 5 8 6 Out of Paper light 7 Color indicator lights 8 Printhead light 9 Ink Cartridge light Interpreting control panel lights The printer lights indicate printer status and are useful for diagnosing printing problems. This section contains information about the printer lights, what they indicate, and what action to take if necessary. You can find a complete list of control panel light descriptions in the following locations: z Onscreen user guide on the Starter CD: See the "Printer lights reference" chapter. z Printer Driver: Right-click the printer icon. Select Printing Preferences. Click the Services tab, and then click Help with Printer Lights. Printer light indication The Power light is on. The Power light is on and the Resume light and Paper Jam light blink. The Power light is on and the Resume light and Out of Paper light blink. Explanation and recommended action The printer is turned on and idle. It is connected using a USB or parallel cable. z No action is required. The printer is turned on and idle. It is connected to a network using a network cable. z If the printer is connected using a network cable, check the network connector lights to verify that the printer is connected to the network. See "Interpreting network connector lights" on page 16. z Verify that the printer is set up properly on the network. See "Problems connecting to a network" on page 17. Print media is jammed in the printer. z Press (Resume button) to eject the jammed media. z Remove all media from the output tray, and then locate and clear the jam. z Press (Resume button) to continue the print job. For more information, see the "Maintaining and troubleshooting" chapter in the onscreen user guide. The printer is out of paper. z Load paper, and then press (Resume button). 14
-
 1
1 -
2
-
3
-
4
-
5
-
6
-
7
-
8
-
 9
9 -
 10
10 -
 11
11 -
 12
12 -
 13
13 -
 14
14 -
 15
15 -
 16
16 -
 17
17 -
 18
18 -
 19
19 -
20
-
21
-
22
-
23
-
24
-
25
-
26
-
27
-
28
-
29
-
30
-
31
-
32
-
33
-
34
-
35
-
36
-
37
-
38
-
39
-
40
-
41
-
42
-
43
-
44
-
45
-
46
-
47
-
48
-
49
-
50
-
51
-
52
-
53
-
54
-
55
-
56
 |
 |
