HP K850 Getting Started Guide - Page 9
Ausrichtungsseiten. Die Ausrichtung des Druckkopfs dauert ca. 8
 |
UPC - 882780027831
View all HP K850 manuals
Add to My Manuals
Save this manual to your list of manuals |
Page 9 highlights
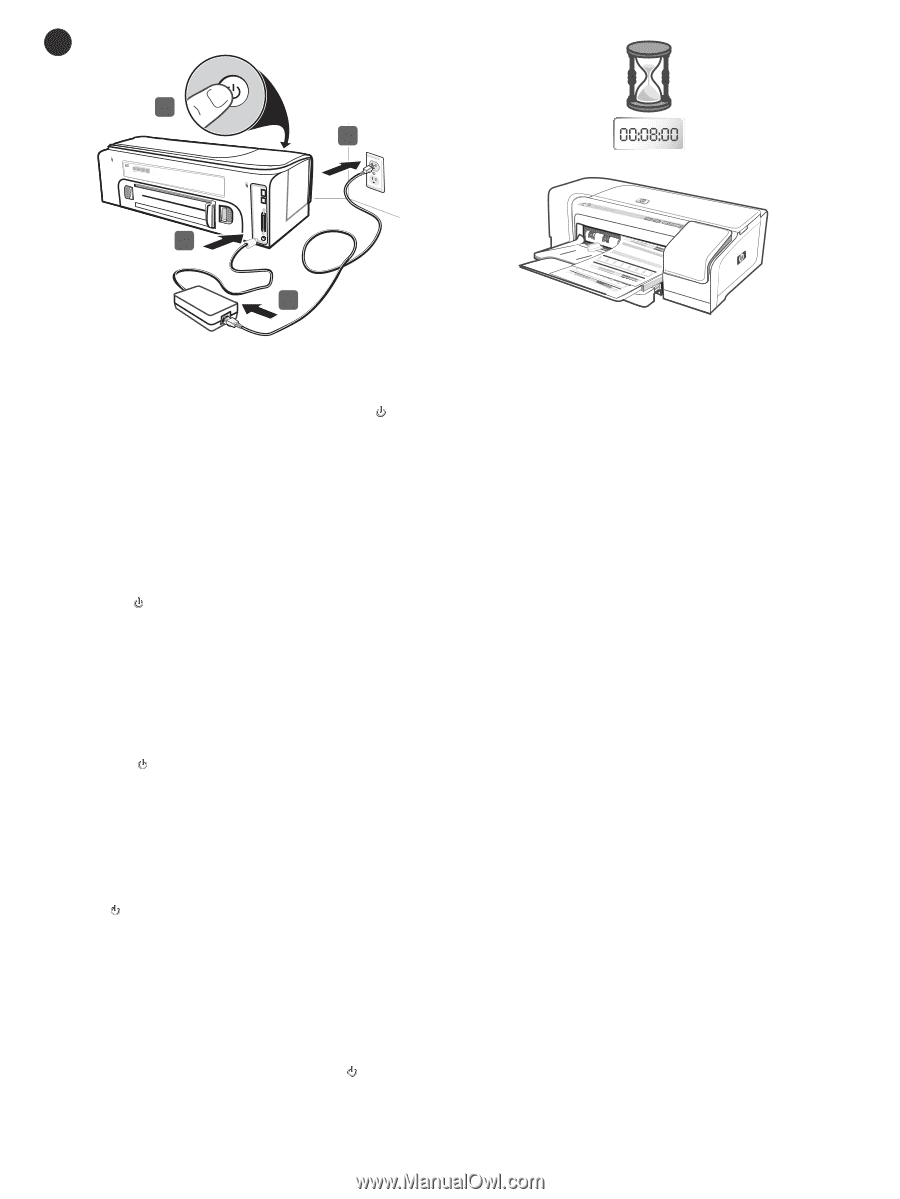
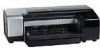
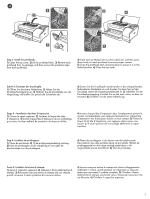
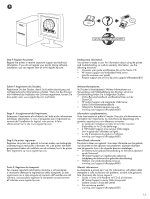
6 4 3 1 2 Step 6: Connect the power cord and turn on the printer. 1) Connect the power supply to the printer. 2) Connect the power cord to the power supply. 3) Connect the other end of the power cord to an alternating current (AC) power outlet. 4) Press (Power button) to turn on the printer. To ensure the best possible print quality, the printer aligns the printheads. At the beginning of the alignment process, the Power light blinks and the printer prints a status page. At the end of the process, the printer prints two alignment pages. Printhead alignment takes approximately 8 minutes. Do not open any covers or push any buttons until the pages have printed. If the printer does not print, see "Troubleshooting" on page 17. Schritt 6: Anschließen des Netzkabels und Einschalten des Druckers. 1) Schließen Sie das Netzteil an den Drucker an. 2) Schließen Sie das Netzkabel an das Netzteil an. 3) Schließen Sie das andere Ende des Netzkabels an eine Steckdose für Wechselspannung an. 4) Drücken Sie (Netztaste), um den Drucker einzuschalten. Um eine optimale Druckqualität zu gewährleisten, werden die Druckköpfe vom Drucker ausgerichtet. Zu Beginn des Ausrichtungsvorgangs blinkt die Power-LED und der Drucker druckt eine Statusseite. Am Ende des Vorgangs druckt der Drucker zwei Ausrichtungsseiten. Die Ausrichtung des Druckkopfs dauert ca. 8 Minuten. Öffnen Sie keine Abdeckung und drücken Sie keine Taste, bis die Seiten ausgedruckt sind. Wenn die Seiten nicht gedruckt werden, lesen Sie im Abschnitt "Fehlersuche" auf Seite 23 nach. Étape 6 : Branchez le cordon d'alimentation et mettez l'imprimante sous tension. 1) Branchez le bloc d'alimentation à l'imprimante. 2) Branchez le cordon d'alimentation au bloc d'alimentation. 3) Branchez l'autre extrémité du cordon d'alimentation sur une prise secteur. 4) Appuyez sur (bouton Alimentation) pour allumer l'imprimante. Pour offrir une qualité d'impression optimale, l'imprimante aligne les têtes d'impression. Au début de la procédure d'alignement, le voyant d'alimentation clignote et l'imprimante imprime une page d'état. Une fois la procédure terminée, elle imprime deux pages d'alignement. L'alignement des têtes d'impression dure environ 8 minutes. N'ouvrez aucun capot et n'appuyez sur aucun bouton tant que les pages n'ont pas été imprimées. Si le document ne s'imprime pas, reportez-vous à la section « Dépannage », à la page 29. Stap 6: Het netsnoer aansluiten en de printer aanzetten. 1) Sluit de stroomvoorziening aan op de printer. 2) Sluit het netsnoer aan op de stroomvoorziening. 3) Sluit het andere uiteinde van het netsnoer aan op een stopcontact (AC). 4) Druk op (Aan/uit-knop) om de printer aan te zetten. Om de best mogelijke afdrukkwaliteit te garanderen, lijnt de printer de printkoppen uit. Aan het begin van het uitlijningsproces knippert het Aan/uit-lampje en drukt de printer een statuspagina af. Aan het einde van het proces drukt de printer twee testpagina's af. Uitlijning van printkoppen duurt ongeveer acht minuten. Open tijdens deze procedure geen kleppen en druk niet op knoppen, maar wacht totdat de pagina's zijn afgedrukt. Zie "Problemen oplossen" op pagina 35 als de printer niet afdrukt. Punto 6: Collegare il cavo di alimentazione e accendere la stampante. 1) Collegare l'alimentatore alla stampante. 2) Collegare il cavo di alimentazione all'alimentatore. 3) Collegare l'altra estremità del cavo di alimentazione a una presa CA. 4) Premere (pulsante di accensione) per accendere la stampante. Per assicurare la migliore qualità di stampa, la stampante esegue l'allineamento delle testine. All'inizio di tale procedura, la spia di accensione lampeggia e viene stampata una pagina di stato. Al termine della procedura, vengono stampate due pagine di allineamento. L'allineamento delle testine di stampa richiede circa 8 minuti. Non aprire i coperchi o premere nessun pulsante prima del completamento della stampa delle pagine. Se il documento non viene stampato, consultare la sezione "Risoluzione dei problemi" a pagina 41. 9
-
 1
1 -
2
-
3
-
 4
4 -
 5
5 -
 6
6 -
 7
7 -
 8
8 -
 9
9 -
 10
10 -
 11
11 -
 12
12 -
 13
13 -
 14
14 -
15
-
16
-
17
-
18
-
19
-
20
-
21
-
22
-
23
-
24
-
25
-
26
-
27
-
28
-
29
-
30
-
31
-
32
-
33
-
34
-
35
-
36
-
37
-
38
-
39
-
40
-
41
-
42
-
43
-
44
-
45
-
46
-
47
-
48
-
49
-
50
-
51
-
52
-
53
-
54
-
55
-
56
 |
 |