HP KY616AA HP DreamScreen Wireless Connected Screen - User's Guide - Page 53
Cleaning and Care Tips, Cleaning the screen, Cleaning the HP DreamScreen and backing
 |
UPC - 884420871576
View all HP KY616AA manuals
Add to My Manuals
Save this manual to your list of manuals |
Page 53 highlights
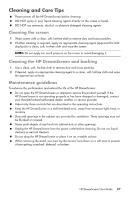
Cleaning and Care Tips Please power off the HP DreamScreen before cleaning. DO NOT spray or pour liquid cleaning agents directly on the screen or bezel. DO NOT use ammonia, alcohol, or abrasive detergent cleaning agents. Cleaning the screen 1 Wipe screen with a clean, soft, lint-free cloth to remove dust and loose particles. 2 If further cleaning is required, apply an appropriate cleaning agent (approved for LCD displays) to a clean, soft, lint-free cloth and wipe the screen. NOTE: Do not apply too much pressure on the screen to avoid damaging it. Cleaning the HP DreamScreen and backing 1 Use a clean, soft, lint-free cloth to remove dust and loose particles. 2 If desired, apply an appropriate cleaning agent to a clean, soft, lint-free cloth and wipe the appropriate surfaces. Maintenance guidelines To enhance the performance and extend the life of the HP DreamScreen: Do not open the HP DreamScreen or attempt to service this product yourself. If the HP DreamScreen is not operating properly or has been dropped or damaged, contact your Hewlett-Packard authorized dealer, reseller, or service provider. Adjust only those controls that are described in the operating instructions. Keep the HP DreamScreen in a well-ventilated area, away from excessive light, heat, or moisture. Slots and openings in the cabinet are provided for ventilation. These openings must not be blocked or covered. Never push objects of any kind into cabinet slots or other openings. Unplug the HP DreamScreen from the power outlet before cleaning. Do not use liquid cleaners or aerosol cleaners. Do not drop the HP DreamScreen or place it on an unstable surface. When removing the stand, you must lay the monitor face down on a soft area to prevent it from getting scratched, defaced, or broken. HP DreamScreen User Guide 47
-
 1
1 -
2
-
3
-
4
-
5
-
6
-
7
-
8
-
9
-
10
-
11
-
12
-
13
-
14
-
15
-
16
-
17
-
18
-
19
-
20
-
21
-
22
-
23
-
24
-
25
-
26
-
27
-
28
-
29
-
30
-
31
-
32
-
33
-
34
-
35
-
36
-
37
-
38
-
39
-
40
-
41
-
42
-
43
-
44
-
45
-
46
-
47
-
 48
48 -
 49
49 -
 50
50 -
 51
51 -
 52
52 -
 53
53 -
 54
54 -
 55
55 -
 56
56 -
 57
57 -
 58
58
 |
 |
