HP Kayak XU 03xx HP Kayak XU Series 03xx, Accessories Installation Guide
HP Kayak XU 03xx Manual
 |
View all HP Kayak XU 03xx manuals
Add to My Manuals
Save this manual to your list of manuals |
HP Kayak XU 03xx manual content summary:
- HP Kayak XU 03xx | HP Kayak XU Series 03xx, Accessories Installation Guide - Page 1
HP Kayak XU 03xx PC Workstation - Installing Accessories In Your HP PC Workstation Explains in detail how to install accessories, such as extra memory, accessory boards, and additional disk drives. - HP Kayak XU 03xx | HP Kayak XU Series 03xx, Accessories Installation Guide - Page 2
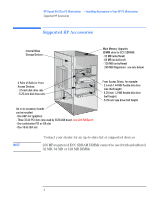
HP Kayak XU 03xx PC Workstation - Installing Accessories In Your HP PC Workstation Supported HP Accessories Supported HP Accessories Internal Mass Storage Devices Main Memory Upgrades (DIMM slots for ECC SDRAM): - 32 MB (unbuffered) - 64 MB (un-buffered) - 128 MB (un-buffered) - 256 - HP Kayak XU 03xx | HP Kayak XU Series 03xx, Accessories Installation Guide - Page 3
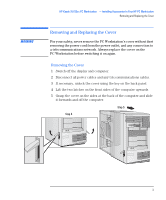
WARNING HP Kayak XU 03xx PC Workstation - Installing Accessories In Your HP PC Workstation Removing and Replacing the Cover Removing and Replacing the Cover For your safety, never remove the PC Workstation's cover without first removing the - HP Kayak XU 03xx | HP Kayak XU Series 03xx, Accessories Installation Guide - Page 4
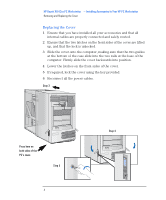
HP Kayak XU 03xx PC Workstation - Installing Accessories In Your HP PC Workstation Removing and Replacing the Cover that the lock is unlocked. 3 Slide the cover onto the computer, making sure that the two guides at the bottom of the case slide into the two rails at the base of the computer. - HP Kayak XU 03xx | HP Kayak XU Series 03xx, Accessories Installation Guide - Page 5
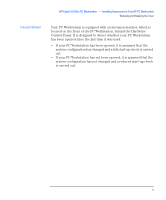
Intrusion Monitor HP Kayak XU 03xx PC Workstation - Installing Accessories In Your HP PC Workstation Removing and Replacing the Cover Your PC Workstation is equipped with an intrusion monitor, which is located on the front of the PC Workstation, behind the Hardware Control Panel. It is designed to - HP Kayak XU 03xx | HP Kayak XU Series 03xx, Accessories Installation Guide - Page 6
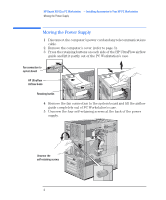
HP Kayak XU 03xx PC Workstation - Installing Accessories In Your HP PC Workstation Moving the Power Supply Moving the each side of the HP UltraFlow airflow guide and lift it partly out of the PC Workstation's case. Fan connection to system board HP UltraFlow Airflow Guide Retaining button 4 Remove - HP Kayak XU 03xx | HP Kayak XU Series 03xx, Accessories Installation Guide - Page 7
WARNING HP Kayak XU 03xx PC Workstation - Installing Accessories In Your HP PC Workstation Moving the Power Supply To avoid electrical shock, do into the computer. 3 Tighten the four self-retaining screws. 4 Replace the HP UltraFlow airflow guide. 5 Reconnect the fan to the system board. English 7 - HP Kayak XU 03xx | HP Kayak XU Series 03xx, Accessories Installation Guide - Page 8
CAUTION NOTE HP Kayak XU 03xx PC Workstation - Installing Accessories In Your HP PC Workstation Installing Memory cover (refer to page 3). 3 Press the retaining buttons on each side of the HP UltraFlow airflow guide and lift it partly out of the PC Workstation's case. 4 Remove the fan connection - HP Kayak XU 03xx | HP Kayak XU Series 03xx, Accessories Installation Guide - Page 9
HP Kayak XU 03xx PC Workstation - Installing Accessories In Your HP PC Workstation Installing Memory 8 The location of the memory module slots is shown here. 9 all cables and power cords. Replace the cover (refer to page 4). 12 Check the HP Summary Screen to verify the new configuration. English 9 - HP Kayak XU 03xx | HP Kayak XU Series 03xx, Accessories Installation Guide - Page 10
CAUTION HP Kayak XU 03xx PC Workstation - Installing Accessories In Your HP PC Workstation Installing Memory Installing More Memory on the Video Adapter Your PC Workstation is equipped with a video adapter that supports 2D and 3D graphics. If you need to have more video memory to display more - HP Kayak XU 03xx | HP Kayak XU Series 03xx, Accessories Installation Guide - Page 11
HP Kayak XU 03xx PC Workstation - Installing Accessories In Your HP PC Workstation Installing Memory Completing the Video Memory Installation Procedure 1 Switch on the PC Workstation. 2 Check the HP Summary Screen to verify the new configuration. NOTE If you need to use a special video driver - HP Kayak XU 03xx | HP Kayak XU Series 03xx, Accessories Installation Guide - Page 12
HP Kayak XU 03xx PC Workstation - Installing Accessories In Your HP PC Workstation Installing Mass Storage Devices Installing Mass Storage Devices The computer has two internal shelves (for hard disk drives) and five front-access drive - HP Kayak XU 03xx | HP Kayak XU Series 03xx, Accessories Installation Guide - Page 13
HP Kayak XU 03xx PC Workstation - Installing Accessories In Your HP PC Workstation Installing Mass Storage Devices SCSI with two connectors. • A flexible disk drive cable with a single connector. This supports a flexible disk drive (the connector is attached to the flexible disk drive supplied). • - HP Kayak XU 03xx | HP Kayak XU Series 03xx, Accessories Installation Guide - Page 14
HP Kayak XU 03xx PC Workstation - Installing Accessories In Your HP PC Workstation Installing Mass Storage Devices Which Power Ultra ATA-33 IDE controller. • The Ultra ATA-33 IDE controller, on the PCI bus, supports up to two fast (33 MB per second) IDE devices. • The Ultra wide 16-bit SCSI controller - HP Kayak XU 03xx | HP Kayak XU Series 03xx, Accessories Installation Guide - Page 15
HP Kayak XU 03xx PC Workstation - Installing Accessories In Your HP Plug and Play SCSI hard disks (SCSI hard disks that support the SCAM protocol). SCAM is disabled if the RAIDport adapter SCSI hard disk drive. Refer to the installation guide supplied with the drive for information on selecting a - HP Kayak XU 03xx | HP Kayak XU Series 03xx, Accessories Installation Guide - Page 16
CAUTION HP Kayak XU 03xx PC Workstation - Installing Accessories In Your HP PC Workstation Installing Mass Storage to the illustration on page 6). 4 Press the retaining buttons on each side of the HP UltraFlow airflow guide and lift it out of the PC Workstation's case. 5 Slide the power supply out - HP Kayak XU 03xx | HP Kayak XU Series 03xx, Accessories Installation Guide - Page 17
HP Kayak XU 03xx PC Workstation - Installing Accessories In Your HP PC Workstation Installing Mass Storage Devices 7 Secure the drive with the four self-retaining screws. 8 Locate the appropriate data cable for the hard disk drive. - HP Kayak XU 03xx | HP Kayak XU Series 03xx, Accessories Installation Guide - Page 18
NOTE HP Kayak XU 03xx PC Workstation - Installing Accessories In Your HP PC Workstation Installing Mass Storage system board (refer to page 6). 4 Press the retaining buttons on each side of the HP UltraFlow airflow guide and lift it out of the PC Workstation's case. 5 Slide out the power supply to - HP Kayak XU 03xx | HP Kayak XU Series 03xx, Accessories Installation Guide - Page 19
Set the drive on the tray HP Kayak XU 03xx PC Workstation - Installing Accessories In Your HP PC Workstation Installing Mass Storage Devices 7 Mount the drive on the tray as shown below. Fix the drive to the tray 8 Slide the drive tray - HP Kayak XU 03xx | HP Kayak XU Series 03xx, Accessories Installation Guide - Page 20
HP Kayak XU 03xx PC Workstation - Installing Accessories In Your HP PC Workstation Installing Mass Storage Devices 9 Locate and tighten the four selfretaining screws (refer to page 7). 12 Replace the HP UltraFlow airflow guide and reconnect the fan to the system board (refer to the illustration on - HP Kayak XU 03xx | HP Kayak XU Series 03xx, Accessories Installation Guide - Page 21
HP Kayak XU 03xx PC Workstation - Installing Accessories In Your HP 3 If an error message appears, follow the instructions provided by the Error Message Utility. When prompted, automatically. Installing a Drive in a Front-Access Shelf These instructions explain how to install a drive (such as a - HP Kayak XU 03xx | HP Kayak XU Series 03xx, Accessories Installation Guide - Page 22
HP Kayak XU 03xx PC Workstation - Installing Accessories In Your HP PC Workstation Installing Mass Storage Devices Before Installing an IDE Device Before Installing a SCSI Device Refer to the drive's installation guide to see if you must set jumpers or if there is a special installation procedure - HP Kayak XU 03xx | HP Kayak XU Series 03xx, Accessories Installation Guide - Page 23
HP Kayak XU 03xx PC Workstation - Installing Accessories In Your HP PC Workstation Installing Mass Storage Devices 8 Connect the data and power cables to the rear of the device. (The connectors are shaped to go in - HP Kayak XU 03xx | HP Kayak XU Series 03xx, Accessories Installation Guide - Page 24
HP Kayak XU 03xx PC Workstation - Installing Accessories In Your HP PC Workstation Installing Mass Storage Devices Completing the Installation of a Drive When an IDE CD-ROM Drive Is Installed 1 Switch on the computer and press - HP Kayak XU 03xx | HP Kayak XU Series 03xx, Accessories Installation Guide - Page 25
CAUTION NOTE HP Kayak XU 03xx PC Workstation - Installing Accessories In Your HP PC Workstation Installing Accessory Boards Installing Accessory Boards Static electricity can PCI). Some boards may have preferred locations and special installation instructions detailed in their manuals. English 25 - HP Kayak XU 03xx | HP Kayak XU Series 03xx, Accessories Installation Guide - Page 26
HP Kayak XU 03xx PC Workstation - Installing Accessories In Your HP PC Workstation Installing Accessory Boards 4 Unscrew and remove the slot cover. Store it in a safe place. If the slot cover is tight, loosen the screws - HP Kayak XU 03xx | HP Kayak XU Series 03xx, Accessories Installation Guide - Page 27
HP Kayak XU 03xx PC Workstation - Installing Accessories In Your HP PC Workstation Installing Accessory Boards 7 Secure Configuration submenu. A list of IRQs and the devices that use them are displayed. Highlight the IRQ field you want to change, for example IRQ 11. 3 You can use the space bar or - HP Kayak XU 03xx | HP Kayak XU Series 03xx, Accessories Installation Guide - Page 28
HP Kayak XU 03xx PC Workstation - Installing Accessories In Your HP PC Workstation Installing a Processor Installing a Processor Some operating systems support HP UltraFlow airflow guide and lift it partly out of the PC Workstation's case. Fan connection to system board HP UltraFlow Airflow Guide - HP Kayak XU 03xx | HP Kayak XU Series 03xx, Accessories Installation Guide - Page 29
NOTE HP Kayak XU 03xx PC Workstation - Installing Accessories In Your HP PC Workstation Installing a Processor 7 The system the processor in the VRM socket. 10 Replace the transparent section of the HP UltraFlow airflow guide covering the processor sockets. 11 Slide the power supply back into the - HP Kayak XU 03xx | HP Kayak XU Series 03xx, Accessories Installation Guide - Page 30
Installation of a Processor NOTE HP Kayak XU 03xx PC Workstation - Installing Accessories In Your HP PC Workstation Installing a speed and processor speed. Refer to the manual supplied with the processor to verify which bus and processor speeds are supported. NOTE Switch 1 UP1 Switch 2 UP
-
 1
1 -
 2
2 -
 3
3 -
 4
4 -
 5
5 -
 6
6 -
 7
7 -
8
-
9
-
10
-
11
-
12
-
13
-
14
-
15
-
16
-
17
-
18
-
19
-
20
-
21
-
22
-
23
-
24
-
25
-
26
-
27
-
28
-
29
-
30
 |
 |

HP Kayak XU 03xx PC Workstation —
Installing Accessories
In Your HP PC Workstation
Explains in detail how to install accessories, such as extra memory,
accessory boards, and additional disk drives.