HP Kayak XU 03xx HP Kayak XU Series 03xx, Accessories Installation Guide - Page 20
Replace the HP UltraFlow airflow guide and reconnect the fan to the, retaining screws refer
 |
View all HP Kayak XU 03xx manuals
Add to My Manuals
Save this manual to your list of manuals |
Page 20 highlights
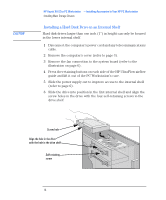
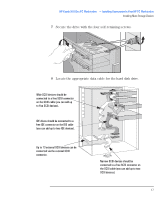
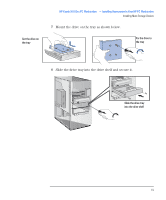
HP Kayak XU 03xx PC Workstation - Installing Accessories In Your HP PC Workstation Installing Mass Storage Devices 9 Locate the appropriate data cable for the disk drive. Wide SCSI devices should be connected to a free SCSI connector on the SCSI cable (you can add up to five SCSI devices). IDE drives should be connected to a free IDE connector on the IDE cable (you can add up to two IDE devices). Up to 13 external SCSI devices can be connected via the external SCSI connector. Narrow SCSI devices should be connected to a free SCSI connector on the SCSI cable (you can add up to two SCSI devices). 10 Connect the data and power cables to the rear of the device. (The connectors are shaped to go in one way only.) Data Cable Power Cable 11 Slide the power supply back into position, and tighten the four selfretaining screws (refer to page 7). 12 Replace the HP UltraFlow airflow guide and reconnect the fan to the system board (refer to the illustration on page 6). 13 Install any other accessories before replacing the cover and completing the installation. 14 Follow the instructions below to complete the installation. 20 English
-
 1
1 -
2
-
3
-
4
-
5
-
6
-
7
-
8
-
9
-
10
-
11
-
12
-
13
-
14
-
 15
15 -
 16
16 -
 17
17 -
 18
18 -
 19
19 -
 20
20 -
 21
21 -
 22
22 -
 23
23 -
 24
24 -
 25
25 -
26
-
27
-
28
-
29
-
30
 |
 |
