HP Kayak XU 03xx HP Kayak XU Series 03xx, Accessories Installation Guide - Page 16
Installing a Hard Disk Drive in an Internal Shelf, guide and lift it out of the PC Workstation's case.
 |
View all HP Kayak XU 03xx manuals
Add to My Manuals
Save this manual to your list of manuals |
Page 16 highlights
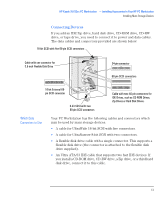
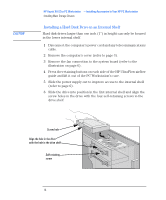
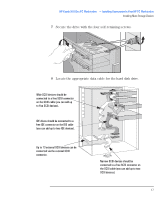
CAUTION HP Kayak XU 03xx PC Workstation - Installing Accessories In Your HP PC Workstation Installing Mass Storage Devices Installing a Hard Disk Drive in an Internal Shelf Hard disk drives larger than one inch (1") in height can only be housed in the lower internal shelf. 1 Disconnect the computer's power cord and any telecommunications cable. 2 Remove the computer's cover (refer to page 3). 3 Remove the fan connection to the system board (refer to the illustration on page 6). 4 Press the retaining buttons on each side of the HP UltraFlow airflow guide and lift it out of the PC Workstation's case. 5 Slide the power supply out to improve access to the internal shelf (refer to page 6). 6 Slide the drive into position in the first internal shelf and align the screw holes in the drive with the four self-retaining screws in the drive shelf. Screw hole Align the hole in the drive with the hole in the drive shelf Self-retaining screw 16 English
-
 1
1 -
2
-
3
-
4
-
5
-
6
-
7
-
8
-
9
-
10
-
 11
11 -
 12
12 -
 13
13 -
 14
14 -
 15
15 -
 16
16 -
 17
17 -
 18
18 -
 19
19 -
 20
20 -
 21
21 -
22
-
23
-
24
-
25
-
26
-
27
-
28
-
29
-
30
 |
 |
