HP Kayak XU 03xx HP Kayak XU Series 03xx, Accessories Installation Guide - Page 23
Remove the plastic panel from the cover by pulling the panel
 |
View all HP Kayak XU 03xx manuals
Add to My Manuals
Save this manual to your list of manuals |
Page 23 highlights
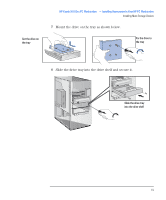
HP Kayak XU 03xx PC Workstation - Installing Accessories In Your HP PC Workstation Installing Mass Storage Devices 8 Connect the data and power cables to the rear of the device. (The connectors are shaped to go in one way only.) Data Cable Power Cable 9 Slide the power supply back into position, and tighten the four selfretaining screws. 10 Remove the plastic panel from the cover by pulling the panel from the left and unhinging its right-hand side. Store the panel in a safe place. Unclip and lift out the plastic panel 11 Install any other accessories before replacing the cover and completing the installation. English 23
-
 1
1 -
2
-
3
-
4
-
5
-
6
-
7
-
8
-
9
-
10
-
11
-
12
-
13
-
14
-
15
-
16
-
17
-
 18
18 -
 19
19 -
 20
20 -
 21
21 -
 22
22 -
 23
23 -
 24
24 -
 25
25 -
 26
26 -
 27
27 -
 28
28 -
29
-
30
 |
 |

English
23
HP Kayak XU 03xx PC Workstation
— Installing Accessories In Your HP PC Workstation
Installing Mass Storage Devices
8
Connect the data and power cables to the rear of the device. (
The
connectors are shaped to go in one way only
.)
9
Slide the power supply back into position, and tighten the four self-
retaining screws.
10
Remove the plastic panel from the cover by pulling the panel from
the left and unhinging its right-hand side. Store the panel in a safe
place.
11
Install any other accessories before replacing the cover and
completing the installation.
Power Cable
Data Cable
Unclip and lift out
the plastic panel