HP Kayak XU 03xx HP Kayak XU Series 03xx, Accessories Installation Guide - Page 3
Removing and Replacing the Cover, Removing the Cover
 |
View all HP Kayak XU 03xx manuals
Add to My Manuals
Save this manual to your list of manuals |
Page 3 highlights
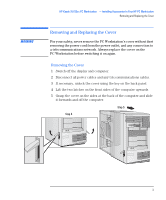
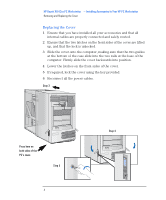
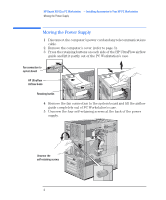
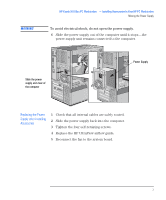
WARNING HP Kayak XU 03xx PC Workstation - Installing Accessories In Your HP PC Workstation Removing and Replacing the Cover Removing and Replacing the Cover For your safety, never remove the PC Workstation's cover without first removing the power cord from the power outlet, and any connection to a telecommunications network. Always replace the cover on the PC Workstation before switching it on again. Removing the Cover 1 Switch off the display and computer. 2 Disconnect all power cables and any telecommunications cables. 3 If necessary, unlock the cover using the key on the back panel. 4 Lift the two latches on the front sides of the computer upwards. 5 Grasp the cover on the sides at the back of the computer and slide it forwards and off the computer. Step 5 Step 4 English 3
-
 1
1 -
 2
2 -
 3
3 -
 4
4 -
 5
5 -
 6
6 -
 7
7 -
 8
8 -
 9
9 -
10
-
11
-
12
-
13
-
14
-
15
-
16
-
17
-
18
-
19
-
20
-
21
-
22
-
23
-
24
-
25
-
26
-
27
-
28
-
29
-
30
 |
 |
